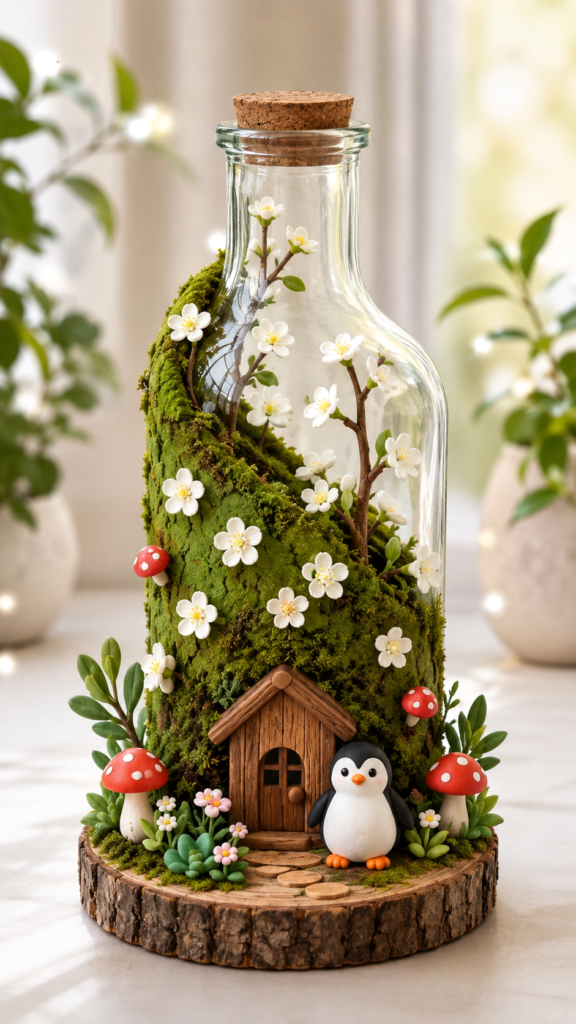
Turn a simple glass bottle into a miniature woodland scene with this charming DIY bottle craft idea. A clear bottle becomes the perfect display for mossy hills, delicate white flowers, tiny mushrooms, leafy plants, and a miniature wooden house. The result feels like a tiny garden captured inside a bottle, making it a beautiful project for anyone who loves upcycling, miniature decor, and whimsical handmade pieces.
DIY bottle crafts are a wonderful way to give everyday containers a creative second life. Instead of letting an attractive glass bottle sit unused, you can transform it into a decorative centerpiece with layers of texture and tiny details. This style of craft works especially well when you want something that feels natural, cozy, playful, and completely personal.
Key Takeaways
- A clear glass bottle can become a unique miniature garden display.
- Moss creates the main woodland texture and helps define the landscape.
- Miniature flowers, mushrooms, plants, and doors add personality.
- Layering different heights makes the finished bottle more visually interesting.
- A wooden slice creates a natural base for the entire display.
- You can customize the scene with colors and tiny decorations that match your style.
Why DIY Bottle Crafts Are So Appealing
There is something especially satisfying about turning a discarded or unused object into something decorative. Glass bottles already have an interesting shape, and their transparent surface allows you to create a scene that can be viewed from multiple angles. With a little imagination, a bottle can become a vase, lantern, planter-style display, or miniature landscape.
This woodland-inspired version takes the idea one step further. Rather than filling the bottle with a single decorative material, it creates a complete little environment. The moss-covered surface suggests rolling terrain, while the flowering branches rise through the clear upper section. At the bottom, a tiny wooden house, mushrooms, plants, and a small penguin create a focal point.
Important: The secret to a convincing miniature display is not simply adding more decorations. It is creating layers. Combine a large base element with medium-sized plants and a few tiny accents so the eye naturally moves through the scene.
Materials for a Whimsical Bottle Craft
You do not need an enormous collection of craft supplies to create a bottle scene like this. The exact materials can vary depending on whether you want a permanent decorative piece or a temporary arrangement, but the basic concept is easy to adapt.
The Bottle
Start with a clean, clear glass bottle that has an interesting silhouette. A bottle with a narrow neck and wider lower section works particularly well because it gives you both a tall area for branches and a broader space for the miniature landscape.
Make sure the bottle is thoroughly cleaned and completely dry before decorating. Removing labels and adhesive residue will also help the finished piece look polished.
Moss and Greenery
Moss is one of the most important visual elements in this style of DIY bottle craft. Its soft, irregular texture instantly creates the feeling of a woodland floor. You can combine different textures of preserved or artificial moss depending on the look you want.
Small artificial leaves, succulents, grass-like pieces, and other miniature greenery can be placed around the base. Mixing several shapes prevents the scene from looking flat or repetitive.
Miniature Decorations
The small details are what make a miniature garden feel special. Consider adding a tiny wooden house or door, miniature mushrooms, small flowers, stepping stones, and a tiny character or animal figure. These pieces create a story without requiring a complicated design.
White blossoms provide a soft contrast against the green moss, while red mushrooms introduce a playful pop of color. A small wooden structure gives the bottom portion of the arrangement a clear focal point.
How to Create a Miniature Garden Bottle
1. Prepare the Bottle
Begin by washing the glass bottle carefully and allowing it to dry fully. Clean glass is important because fingerprints, dust, or leftover residue can become noticeable once the decorative elements are in place.
Place the bottle on a protected work surface and decide which side will be the front. Thinking about the viewing angle early makes it easier to arrange the miniature scene later.
2. Build the Woodland Base
Start adding moss around the lower portion of the bottle. Rather than creating a perfectly even layer, shape it into gentle slopes and uneven sections. The reference style works because the greenery feels like a tiny landscape instead of a flat covering.
Use different heights and textures to create depth. A thicker section of moss can become a hill, while a lower section can form a pathway toward the miniature house.
3. Add the Wooden House
Position the miniature wooden house toward the front of the display. This gives the arrangement a recognizable focal point and makes the entire scene feel like a tiny habitat.
Leave enough space around the house for greenery, mushrooms, flowers, and a pathway. You want the door to remain visible rather than allowing surrounding decorations to completely hide it.
4. Create a Tiny Pathway
Small pieces of wood, miniature stones, or craft elements can be arranged in front of the house to suggest a pathway. Keep the pieces slightly irregular for a more natural appearance.
A pathway is a simple detail, but it helps connect the different elements. It visually guides attention from the outer edge of the base toward the miniature house.
5. Add Flowers and Branches
Next, introduce the flowering branches. Thin natural twigs or suitable craft stems can create the appearance of miniature trees growing through the landscape. Attach or arrange small white blossoms along the branches for a delicate spring-inspired effect.
Try varying the height of the branches. Some should remain close to the moss while others can extend upward into the clear portion of the bottle. This creates a stronger vertical composition.
6. Add Mushrooms and Small Plants
Place red-and-white miniature mushrooms around the base to introduce contrast. They work especially well beside green foliage because the colors immediately attract attention without overwhelming the softer palette.
Add small leafy plants between the larger decorative pieces. Think of these as the finishing greenery that fills empty spaces and makes the miniature landscape feel complete.
7. Finish With Character
A tiny animal figure can give the bottle garden an unexpected focal point. The penguin shown in this style adds a cute, playful element and gives the display a sense of personality.
You can choose another miniature figure if you prefer. The important thing is to select a piece that fits comfortably within the scale of the house, plants, and other decorations.
Expert Insight
- Keep the tallest elements toward the center or rear to preserve visibility.
- Use contrasting colors sparingly so flowers and mushrooms remain accents.
- Leave small areas of open space to prevent the composition from feeling crowded.
Design Tips for a More Professional Finish
Think in Layers
One of the easiest ways to improve a miniature arrangement is to divide it into visual layers. The front layer can contain mushrooms, low plants, and the pathway. The middle layer can feature the house and larger foliage. The back layer can hold branches and taller elements.
This arrangement creates depth even when the individual pieces are very small.
Balance Color
The strongest colors in the display should be used intentionally. Green forms the dominant foundation, white flowers provide softness, red mushrooms create visual interest, and natural brown wood connects everything together.
Pro Tip: When a miniature display starts looking too busy, remove a few small decorations rather than adding more. A handful of carefully placed details often looks more sophisticated than filling every available space.
Choose a Strong Focal Point
Every decorative arrangement benefits from one main feature. In this concept, the miniature wooden house provides that anchor. The surrounding flowers, moss, mushrooms, and greenery support the house rather than competing with it.
If you change the central feature, keep the same principle in mind. Choose one object that immediately catches the eye, then arrange smaller pieces around it.
Creative Variations to Try
Once you understand the basic structure, there are countless ways to personalize DIY bottle crafts. The same bottle can become a completely different decorative scene simply by changing the miniature theme.
- Spring garden: Use pastel flowers, fresh-looking greenery, and light-colored accents.
- Woodland retreat: Focus on moss, bark, mushrooms, tiny trees, and natural wood.
- Cozy cottage: Build the scene around a miniature house with a pathway and garden plants.
- Fairy-style garden: Add tiny benches, doors, flowers, lantern-inspired details, and winding paths.
- Forest animal scene: Use miniature animal figures surrounded by moss and plants.
- Minimal green display: Skip most decorations and create a simple moss-and-branch composition.
Where to Display Your Finished Bottle Craft
A miniature bottle garden can become a charming accent for many areas of the home. Because the design is vertical, it works especially well on shelves, side tables, craft areas, desks, and small display surfaces.
Place it somewhere where the details can be viewed easily. A bright room with soft natural light can highlight the transparent glass and make the greenery and flowers stand out beautifully.
If the bottle is intended as a decorative centerpiece, pair it with other natural materials such as wood, neutral ceramics, woven textures, or simple greenery. This helps the miniature scene feel connected to its surroundings.
Common Mistakes to Avoid
A successful DIY bottle craft does not have to be complicated, but a few simple mistakes can affect the final appearance.
- Overcrowding the bottle: Too many miniature pieces can hide the main focal point.
- Using only one texture: Combine moss, wood, flowers, leaves, and smooth glass for visual variety.
- Ignoring scale: Miniature elements should feel reasonably consistent in size.
- Hiding the front feature: Keep the house, pathway, or main character clearly visible.
- Making everything symmetrical: Natural scenes usually look more interesting when their shapes are slightly irregular.
At a Glance
- Start with a clean clear glass bottle.
- Build a textured mossy landscape around the base.
- Use one miniature house or structure as the focal point.
- Layer flowers, branches, greenery, mushrooms, and tiny accents.
- Keep the finished composition balanced and easy to view.
Conclusion: Give Your Bottle a Tiny New World
DIY bottle crafts are a creative reminder that beautiful home decor does not always require expensive materials. A simple glass bottle can become the foundation for an imaginative miniature garden filled with texture, color, and personality.
The woodland-inspired design is especially appealing because every layer contributes something different. Moss creates the landscape, wooden elements add warmth, flowers bring softness, mushrooms add playful color, and miniature figures make the scene feel alive. The transparent bottle then turns the entire arrangement into a display that can be enjoyed from different viewpoints.
Whether you recreate a tiny cottage garden, a woodland retreat, or your own completely original miniature world, focus on balance rather than perfection. Start with a clear focal point, build around it with layers, and leave enough open space for each detail to be appreciated.
The best DIY bottle crafts are the ones that tell a tiny story. Let your choice of moss, flowers, miniature furniture, plants, and characters create a scene that feels uniquely yours. With a little creativity, an ordinary bottle can become a memorable piece of handmade decor.
Tags
DIY Bottle Crafts Bottle Craft Ideas Miniature Garden Upcycling Crafts DIY Home Decor Woodland Decor Miniature Crafts Whimsical Decor