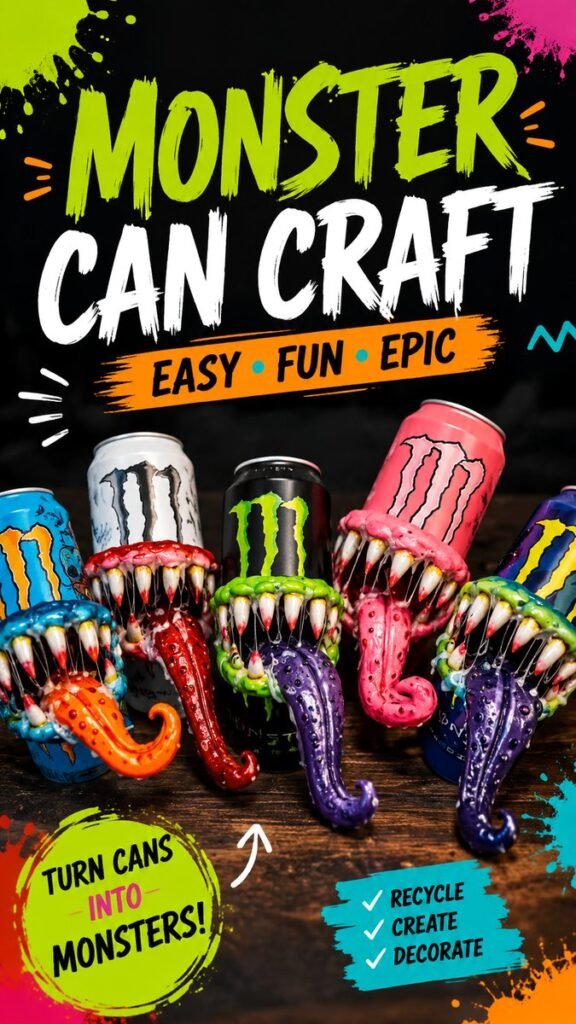
Looking for a creative way to turn ordinary cans into something wild and unforgettable? Monster cans DIY crafts are a fun way to transform empty cans into colorful monster decorations with expressive faces, sharp teeth, silly tongues, dripping textures, and plenty of personality. With a few basic craft supplies and some imagination, an everyday container can become a playful monster that works beautifully for Halloween décor, kids’ craft projects, recycled art, or simply a fun afternoon of creating.
The colorful monster cans featured in this craft idea take inspiration from exaggerated monster features. Bright blue, green, pink, orange, red, and purple details make each creation feel different, while oversized teeth and curling tongues give the cans a humorous spooky character. The goal is not perfection. It is about experimenting with shapes, textures, colors, and expressions to create something completely your own.
Key Takeaways
- Empty cans can become colorful monster-themed decorations.
- Bold colors, teeth, tongues, and textures create strong monster personalities.
- This is a flexible craft that encourages creativity rather than exact results.
- Use clean, dry cans and craft materials that are appropriate for your project.
- Monster cans work especially well for Halloween crafts, recycled art, and playful décor.
What Makes Monster Cans DIY So Fun?
The appeal of a monster can craft comes from its freedom. There is no single correct monster face, color combination, or expression. One can can look silly and friendly, while another can have a more dramatic spooky appearance. You can make your monsters bright and cheerful or dark and creepy, depending on the mood you want.
The examples shown use a particularly playful approach. The cans become the bodies, while exaggerated mouths surround the openings. Rows of pointed teeth, textured lips, oversized tongues, and colorful details create a cartoon-like monster effect. The unusual shapes make the finished crafts immediately noticeable, which is exactly what makes this style so appealing for Pinterest-inspired DIY projects.
Important: The most successful monster crafts usually focus on personality rather than precision. Slightly uneven teeth, playful colors, and exaggerated features can make each monster feel more handmade and expressive.
Materials for a DIY Monster Can Craft
You do not need an enormous collection of supplies to explore this idea. The exact materials will depend on the style you want to create, but a basic monster can project can be adapted around materials you already have in your craft box.
- Empty, clean cans
- Acrylic or suitable craft paint
- Paintbrushes in several sizes
- Craft foam or modeling material for facial details
- Glue or another suitable craft adhesive
- Decorative materials for eyes, teeth, tongues, or textures
- Paper, cardboard, or scrap materials for additional details
- Protective covering for your work surface
If children are participating, adults should handle any sharp edges, cutting, or tools that are not suitable for young crafters. Always make sure cans are properly cleaned and prepared before decorating them.
Start With a Safe Can Base
The can forms the foundation of the craft, so preparation matters. Remove labels or loose material as needed, wash the can thoroughly, and allow it to dry completely. Check the edges carefully before beginning. If the can has a sharp or damaged edge, do not use it as a casual craft surface without properly addressing the hazard.
For decorative projects, the can does not have to look perfect before you begin. Paint, texture, and monster features can cover much of the original appearance. What matters most is having a stable surface that is clean and ready for decoration.
How to Create a Monster Can
The fun begins when you decide what kind of creature your can will become. Instead of copying a particular monster, think about a few defining features. Does it have a huge mouth? Tiny eyes? Long teeth? A curly tongue? Bright slime? Giving the character one or two memorable traits makes the design easier to build.
1. Choose Your Monster Personality
Before painting, choose a simple personality. A green monster could look mischievous, while a pink monster might have a goofy expression. Blue and purple shades can create a fun fantasy look, while red and black details can make the character feel more dramatic.
Try sketching a quick face on paper first. You do not need an elaborate drawing. A rough outline of the mouth, teeth, tongue, and eyes is enough to help you decide where the major elements should go.
2. Paint the Can
Apply your chosen base color to the visible portion of the can. Bright shades work especially well for a playful Halloween monster craft, but you can use any palette that matches your décor or creative theme.
Allow the base layer to dry before adding additional details. Depending on the paint and surface, you may need more than one coat for an even appearance. For a deliberately handmade look, you can also embrace small variations in texture rather than trying to create a perfectly smooth finish.
3. Build the Monster Mouth
The mouth is the feature that gives this project its dramatic character. Create a wide opening shape around the can and add a contrasting lip or border. The reference style uses highly exaggerated mouths, so do not be afraid to make the shape oversized.
Once the mouth is established, add teeth around the opening. Varying the size and angle of the teeth can make the monster look more animated. You can create a neat row for a cartoon effect or arrange them irregularly for a wilder appearance.
4. Add a Silly Monster Tongue
An oversized tongue is one of the most playful ways to personalize a monster can. Create a long, curved shape that extends from the mouth, then experiment with curls, twists, spots, or raised textures.
Pink, purple, orange, and red are natural choices for a cartoon-inspired tongue, but unusual colors can make the character even more memorable. A purple tongue on a green monster, for example, creates a bold visual contrast.
Creating Texture and Slime Effects
Texture is what takes a simple painted can and turns it into a visually interesting DIY monster decoration. Raised details around the mouth can resemble slime, skin folds, scales, or exaggerated lips. You can use craft materials that can be shaped and attached securely, then paint them to match the rest of the monster.
Do not feel that every surface needs decoration. Leaving some areas simple gives the dramatic features more visual impact. A good design usually has a balance between detailed focal points and quieter areas.
Expert Insight
Use contrast to make monster features stand out. Pair a bright base color with a darker mouth, a contrasting tongue, and light teeth. Strong color differences help small decorative details remain visible from a distance.
- Combine bright and dark shades for stronger definition.
- Use texture sparingly so the main facial features remain easy to see.
- Give every monster one distinctive feature that separates it from the others.
Color Ideas for Creative Monster Cans
Color is one of the easiest ways to create a collection of unique monster cans. Instead of using the same palette for every character, assign each monster its own color story.
- Green and purple: A classic playful monster combination with strong contrast.
- Pink and red: Great for a funny, energetic creature.
- Blue and orange: Creates a bright complementary look.
- Black and neon green: Ideal for a bold spooky craft.
- White and red: Creates a dramatic cartoon-monster appearance.
A group of differently colored cans can look especially effective when displayed together. The variation makes the collection feel like a little family of monsters rather than several copies of the same craft.
Monster Can Ideas for Halloween
These crafts naturally fit into Halloween decorating because monsters are an easy way to create a playful spooky atmosphere. Place finished creations together as a colorful display, use them as part of a themed craft table, or incorporate them into a larger collection of handmade decorations.
For a kid-friendly Halloween project, focus on funny expressions rather than frightening details. Large eyes, colorful tongues, silly teeth, and bright paint can make the monsters feel more whimsical than scary. For older children and adults, you can experiment with darker palettes, dramatic textures, and more elaborate facial expressions.
A Fun Activity for Kids
Monster can crafts can also become an open-ended creative activity. Rather than giving everyone the same design, provide a selection of colors and decorative materials and let each person invent a character.
Ask simple creative questions: What is your monster’s name? Is it friendly or mischievous? What color is its tongue? Does it have giant teeth or tiny teeth? These questions turn a straightforward craft into a storytelling activity.
Ways to Make Your Monster Can Craft More Original
The best way to make a recycled can monster feel original is to change the character design rather than simply changing its colors. Experiment with different mouth shapes, facial expressions, textures, and proportions.
- Change the mouth shape. Try a surprised, smiling, grumpy, or enormous open mouth.
- Vary the teeth. Mix long, short, rounded, or uneven teeth for different personalities.
- Experiment with tongues. Make them straight, curled, spotted, or oversized.
- Add unusual textures. Raised bumps, drips, ridges, and spots can create extra character.
- Give every monster a different expression. A collection becomes much more interesting when every character looks unique.
Pro Tip: Photograph your finished monsters as a group. A colorful collection creates a stronger visual story than a single character and can make an especially eye-catching craft display.
Creative Uses for Recycled Monster Cans
Once your monster cans are complete, think beyond the crafting table. Depending on how they are constructed and finished, they can become decorative pieces, playful props, or part of a larger seasonal display.
- Halloween decorating
- Kids’ craft projects
- Classroom art activities
- Recycled art displays
- Party decorations
- Spooky-themed craft collections
- Creative photography props
If you want to use a finished can for storage or another practical purpose, make sure the construction is secure and that all exposed edges and attached materials are safe for the intended use. Decorative projects can be as simple or elaborate as you like.
How to Display Your Monster Can Creations
Presentation can make a huge difference. Arrange several monsters at different heights or angles so that their faces are easy to see. A simple dark background can make bright colors pop, while a wooden or neutral surface can provide a warm handmade feel.
For Halloween, combine the cans with other colorful craft decorations. For a children’s space, use brighter colors and friendlier expressions. If you are creating content for Pinterest, photograph the finished project in bright, clear lighting and keep the main craft large enough to understand immediately on a mobile screen.
Tips for a Better DIY Monster Craft
A few simple choices can make the process easier and the finished result more polished. Plan the largest features first, then add smaller details after the main structure is complete.
- Let paint and adhesives dry properly between stages.
- Use contrasting colors around the mouth so teeth are clearly visible.
- Keep the main facial features large enough to read easily.
- Test decorative materials before attaching them permanently.
- Protect your work surface from paint and adhesive.
- Do not worry about making every monster identical.
Most importantly, have fun with the imperfections. Handmade crafts often look more charming when they show a little personality. An uneven tooth or oversized tongue can become the feature that makes your monster memorable.
Quick Points
- Clean and prepare the can before decorating.
- Choose a bold color palette with plenty of contrast.
- Make the mouth, teeth, and tongue the main focal points.
- Mix textures and shapes to give every monster personality.
- Display several different monsters together for maximum impact.
Conclusion
A monster cans DIY project is a creative reminder that ordinary objects can become something surprisingly fun with a little imagination. Colorful paint, exaggerated mouths, sharp cartoon teeth, oversized tongues, and textured details can transform a simple can into a character with its own personality.
Whether you are planning a Halloween craft, looking for an entertaining activity, exploring recycled art, or simply want a colorful handmade decoration, monster cans offer plenty of room to experiment. Make your creatures silly, spooky, strange, or completely unexpected. The more you personalize the details, the more distinctive your collection becomes.
Start with one can, choose a bold color, and let the monster take shape. Once you make the first character, you may find yourself imagining an entire lineup of colorful creatures. Save this idea for your next creative afternoon and turn simple cans into monsters that are impossible to ignore.
Tags
Monster Cans DIY Monster Craft DIY Monsters Recycled Crafts Halloween Crafts Upcycling Ideas Kids Craft Ideas Spooky DIY Decor