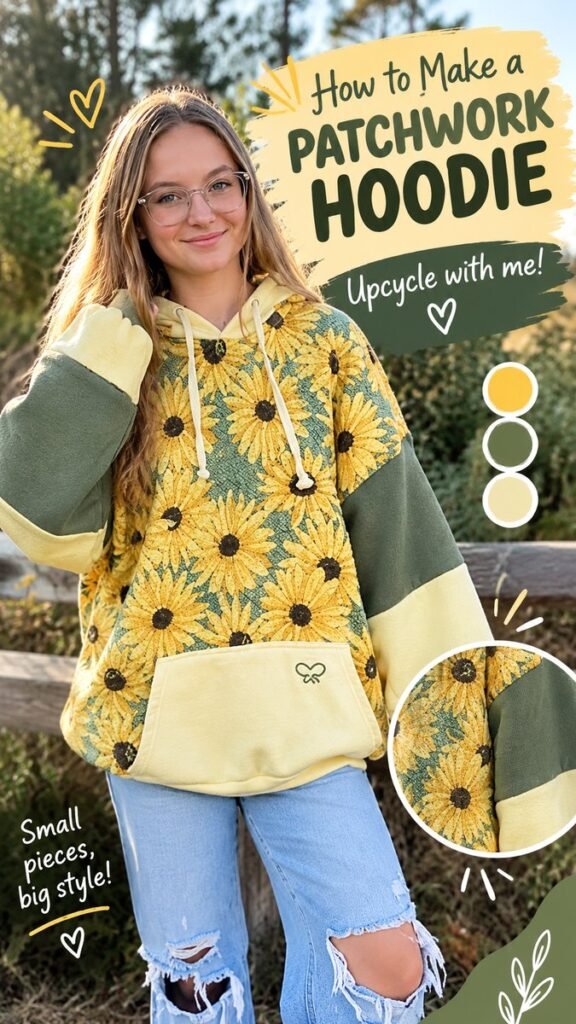
Creating a DIY hoodie is a fun way to turn an ordinary garment into something personal, practical, and full of character. A patchwork hoodie takes that idea even further by combining different fabrics, colors, and patterns into one cozy piece. The look featured here pairs a cheerful sunflower-inspired print with contrasting green sleeves and soft cream details, creating a relaxed handmade style that feels both playful and wearable.
Whether you are new to sewing or already enjoy upcycling clothes, a DIY patchwork hoodie gives you plenty of room to experiment. You can work with fabric scraps, repurpose old clothing, refresh a thrifted sweatshirt, or simply combine fabrics you already love. The goal is not perfect uniformity. The charm comes from thoughtful contrast, creative fabric placement, and the personal details that make the finished hoodie yours.
Key Takeaways
- A patchwork hoodie can transform simple fabric pieces into a standout everyday garment.
- Combining one statement print with calmer solid fabrics helps create a balanced design.
- Fabric weight and stretch are important when choosing materials for a comfortable hoodie.
- Planning the patchwork layout before sewing makes the final result cleaner and easier to wear.
- Upcycling old clothing or fabric scraps can make the project more affordable and sustainable.
- Small details such as cuffs, drawstrings, and a large front pocket can make the finished hoodie feel polished.
Why a DIY Patchwork Hoodie Is Worth Making
A hoodie is already one of the easiest pieces to wear casually, but a handmade version can feel completely different from something bought off the rack. Patchwork adds visual interest without requiring complicated decoration. Instead of relying on embroidery, printing, or elaborate embellishments, the fabric itself becomes the main design feature.
The example shown uses a bright floral-style print as the focal point while contrasting sleeve sections create structure. The cream-colored hood ties and front pocket add another layer of visual balance. This approach works because each element has a purpose. The patterned fabric attracts attention, the solid sections calm the design, and the lighter details help separate the different areas.
Important: The best patchwork hoodie designs usually balance variety with repetition. Choose one dominant print, then support it with two or three complementary colors rather than adding too many unrelated patterns.
Choosing Fabrics for Your DIY Hoodie
Fabric selection is one of the most important parts of a successful DIY hoodie. A patchwork design may look simple, but different materials can behave very differently during cutting, sewing, washing, and everyday wear.
For a comfortable hoodie, look for fabrics with a similar general weight and some flexibility when possible. Sweatshirt fleece, French terry, jersey, and other medium-weight knit fabrics can work well for casual hoodie projects. If you are upcycling an existing hoodie, matching the replacement fabric to the original material can make construction much easier.
Color is just as important as fabric type. A strong print can become the centerpiece, while solid fabrics can be used for sleeves, cuffs, pockets, or side panels. In the pictured style, sunny yellow and green create a cheerful combination, while cream introduces a softer neutral element.
Try a Simple Three-Color Palette
If you are unsure where to start, limit your palette to three main colors. Pick one dominant shade from your favorite patterned fabric, one darker or contrasting color, and one light neutral. This simple formula makes it easier to create a cohesive garment.
- Statement color: Use it in the main body or another large section.
- Supporting color: Repeat it on sleeves, panels, or trim.
- Neutral color: Use it for the pocket, cuffs, hood lining, or drawstrings.
How to Plan Your Patchwork Hoodie Design
Before cutting anything, spend a little time planning the layout. This step can save fabric, reduce mistakes, and help you visualize the finished DIY hoodie before committing to the sewing machine.
Start by deciding which section should be the visual focal point. You might place a bold fabric across the front, use it for the entire hood, or create a large central panel. From there, decide where your contrasting pieces will go.
A useful approach is to sketch the hoodie as a simple front and back outline. Mark the body, sleeves, hood, pocket, cuffs, and waistband. Then experiment with different fabric placements. You can also arrange actual fabric scraps on a flat surface to see how the colors interact.
Think About Visual Balance
Patchwork does not mean every section needs to be different. Repeating a color in several locations can make the design feel intentional. For example, if you use a dark green sleeve panel, repeat that green in another small detail such as a pocket edge or cuff.
Likewise, a patterned fabric can be used in more than one place. Repeating the same print in a small panel or pocket can visually connect separate parts of the hoodie.
Essential Materials for a DIY Hoodie
You do not need an extensive sewing studio to begin. A basic collection of supplies can be enough for many hoodie upcycling projects.
- A hoodie to customize or suitable hoodie pattern pieces
- Coordinating knit or sweatshirt fabrics
- Fabric scissors or a sharp rotary cutter
- Measuring tape and a ruler
- Fabric clips or pins
- Matching or contrasting thread
- A sewing machine suitable for knit fabrics
- Optional ribbing for cuffs and waistband
- Drawstring material for the hood
- An iron and pressing surface
If you are making the project primarily from old clothes, inspect each garment before cutting. Look for stretched seams, thinning fabric, stains, or areas that may not withstand repeated wear. Salvaging the strongest sections gives your finished hoodie a better chance of staying comfortable and durable.
Step-by-Step DIY Hoodie Upcycling Process
1. Choose Your Base Hoodie
Start with a hoodie that fits comfortably or use one as a template for your project. If you are upcycling an existing hoodie, decide which areas you want to preserve. You may be able to keep the hood, pocket, cuffs, or waistband while replacing selected panels.
Choosing a simple base makes it easier to concentrate on the patchwork design. A basic silhouette provides a clean canvas for colorful fabrics.
2. Prepare and Measure the Fabric
Wash and dry washable fabrics according to their care requirements before cutting whenever possible. This reduces the chance of significant shrinkage later.
Measure each section carefully and account for seam allowances. If you are replacing an existing panel, using the original piece as a rough template can help maintain the correct shape.
3. Arrange the Patchwork Pieces
Lay your fabric pieces together before sewing. Step back and look at the overall composition rather than focusing on one piece at a time. This is the easiest moment to swap colors, rotate prints, or simplify the arrangement.
For a design inspired by cheerful floral patchwork, consider keeping the most detailed print on the central body while using solid blocks on the sleeves. This gives the hoodie a strong focal point without making the entire garment visually busy.
4. Sew the Fabric Sections Together
Join the smaller patchwork pieces first, pressing the seams as you work. Then assemble the larger hoodie sections according to your pattern or the construction of your base garment.
When working with stretchy materials, avoid pulling the fabric as you sew. Let the machine feed the fabric naturally whenever possible. A suitable stretch stitch or narrow zigzag can help seams retain flexibility.
Expert Insight
Patchwork looks more polished when seam lines are pressed during construction instead of waiting until the garment is finished. Cleanly pressed seams make the panels sit flatter and help the final hoodie keep its shape.
5. Add the Hood and Sleeves
The hood and sleeves can dramatically change the personality of a DIY hoodie. You can keep them simple to let the body fabric stand out, or use contrasting panels for a more graphic look.
Color blocking works especially well on sleeves. A darker middle section with lighter cuffs, for example, creates a layered appearance without requiring complicated sewing techniques.
6. Create a Practical Front Pocket
A large front pouch pocket is both decorative and functional. It can also be an excellent place to introduce a neutral fabric if the rest of the hoodie contains bold patterns.
Consider adding a small decorative detail to the pocket, such as simple stitching, a fabric label, or a tiny embroidered motif. Keep the detail subtle so the patchwork remains the main attraction.
7. Finish the Edges
Pay close attention to cuffs, the waistband, hood opening, and other exposed edges. These finishing details can make the difference between a project that looks homemade and one that looks intentionally handmade.
Use matching ribbing or a coordinating fabric where appropriate. A repeated neutral color can tie the entire DIY hoodie together and create a cleaner finish.
Creative Ways to Customize Your Hoodie
Once you understand the basic construction, there are countless ways to make the design your own. The pictured sunflower-inspired aesthetic is only one possible direction.
Mix Floral Prints With Solid Colors
Large floral prints work beautifully as statement fabrics. Pair them with muted greens, creams, denim tones, or other colors pulled directly from the print. This keeps the design lively while preventing it from becoming overwhelming.
Use Reclaimed Clothing
Old sweatshirts, oversized shirts, worn jeans, and leftover sewing projects can all provide useful material. Think of your fabric collection as a palette rather than a collection of individual garments.
Different textures can also add interest. Just remember that fabrics with dramatically different stretch, thickness, or weight may be harder to combine neatly.
Make the Sleeves the Statement
If you prefer a more understated body, move the patchwork detail onto the sleeves. Contrasting blocks, alternating fabrics, or colorful cuffs can create an eye-catching effect while leaving the center of the hoodie relatively simple.
Pro Tip: Take a quick photo of your fabric arrangement before sewing. Seeing the layout on a phone screen can reveal color combinations that look unbalanced in person.
Common DIY Hoodie Mistakes to Avoid
Patchwork projects are forgiving, but a few common mistakes can make construction more difficult.
- Skipping fabric preparation: Unwashed fabric can change size after the first wash.
- Ignoring stretch direction: Knit fabrics can behave differently depending on how they are cut.
- Using too many competing prints: A limited palette usually creates a more cohesive result.
- Forgetting seam allowances: Accurate measurements are essential when replacing garment panels.
- Neglecting pressing: Pressing seams as you go can dramatically improve the finished appearance.
- Rushing the layout: A few extra minutes of planning can prevent unnecessary cutting mistakes.
How to Style a Patchwork Hoodie
A colorful DIY hoodie is already a statement piece, so styling can stay simple. Pair it with relaxed jeans, leggings, casual trousers, or denim shorts depending on the season. The combination of a distinctive handmade hoodie and basic bottoms lets the patchwork remain the focal point.
For a playful everyday outfit, repeat one of the hoodie colors in your shoes, bag, or accessories. You do not need an exact match. A similar shade is often enough to make the whole outfit feel coordinated.
Layering also works well. Wear the hoodie over a simple neutral top, especially when the weather is cool but not cold enough for a heavy coat. The relaxed silhouette makes it naturally suited to casual weekends, creative projects, outdoor walks, and comfortable everyday outfits.
Why Upcycling Makes This Project More Creative
Upcycling is not simply about using less. It encourages you to look at familiar materials differently. A fabric that seems outdated on its own might become the perfect accent when combined with another print or solid color.
A DIY hoodie can therefore become a small design exercise. Instead of beginning with a blank piece of fabric, you begin with materials that already have texture, color, and history. That limitation can actually make the creative process more interesting.
Using scraps can also help reduce the amount of usable textile material that ends up unused. Small pieces that are too limited for a complete garment may be ideal for cuffs, pockets, panels, or decorative sections.
Quick Points
- Start with a comfortable hoodie shape.
- Choose one standout print and complementary solids.
- Plan the fabric placement before cutting.
- Press seams as you sew for a cleaner finish.
- Use old clothing and fabric scraps for a creative upcycling project.
Conclusion: Make a DIY Hoodie That Feels Like You
A DIY hoodie is more than a sewing project. It is an opportunity to experiment with color, fabric, texture, and personal style while giving existing materials a new purpose. A patchwork design makes the process even more flexible because every panel can contribute something different to the final look.
The cheerful combination of floral-inspired fabric, green color blocking, cream accents, and relaxed denim styling demonstrates how approachable a handmade hoodie can be. You do not need an elaborate design to make something memorable. A thoughtful color palette, careful fabric placement, and clean finishing details can turn a simple hoodie into a distinctive wardrobe favorite.
Start small if you are new to sewing. Customize a pocket, replace a sleeve panel, add contrasting cuffs, or combine a few favorite fabric scraps. As your confidence grows, you can experiment with more ambitious patchwork layouts and complete hoodie constructions.
Most importantly, let the project reflect your own taste. Choose fabrics that make you happy, reuse materials you already have, and do not worry about making every piece identical. The beauty of a handmade DIY hoodie is that its personality comes from the choices you make along the way.