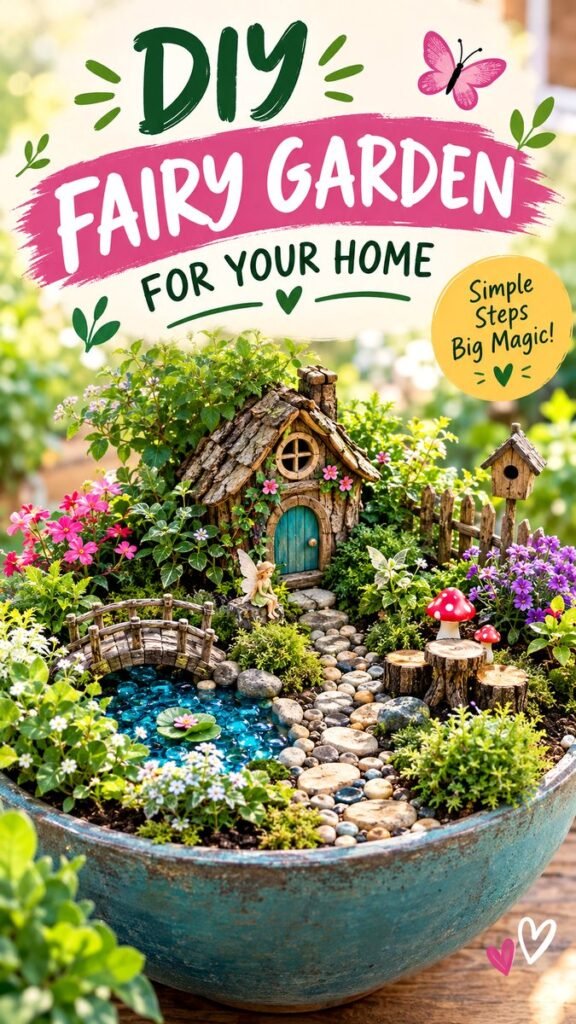
A fairy garden DIY project is a wonderful way to turn an ordinary planter, flower bed, or quiet corner of the yard into a tiny world filled with color, texture, and personality. A miniature cottage, winding pebble path, cheerful flowers, mossy greenery, a tiny bridge, and playful garden details can completely transform a small outdoor space. The beauty of a fairy garden is that it does not need to be perfect. With a few simple materials and a little imagination, you can create a charming miniature landscape that feels inviting from every angle.
Key Takeaways
- Choose a container or garden area that gives your miniature scene enough room to develop.
- Combine flowers, moss, stones, paths, and miniature structures for depth and variety.
- Use natural-looking materials to make the tiny landscape feel connected to the surrounding garden.
- Create a clear focal point, such as a fairy house, cottage, bridge, or colorful pathway.
- Keep the design flexible so plants can grow and decorations can be changed over time.
- Start small and add details gradually instead of trying to build everything at once.
What Makes a Fairy Garden So Charming?
The appeal of a fairy garden comes from its miniature scale. Everyday gardening elements become part of a tiny story when they are placed beside miniature doors, cottages, pathways, benches, bridges, or decorative mushrooms. Instead of simply planting flowers, you are creating a little landscape with its own visual flow.
A successful fairy garden DIY design usually combines several different textures. Smooth pebbles contrast beautifully with rough bark, soft moss, leafy plants, colorful blooms, and weathered miniature structures. This mixture makes the garden feel detailed without requiring complicated construction.
Important: The most memorable miniature gardens are built around layers. Place taller plants and structures toward the back, medium-height greenery in the middle, and low ground covers or stones toward the front. This simple arrangement helps every detail remain visible.
Choosing the Right Space for Your DIY Fairy Garden
You do not need a huge yard to make a fairy garden. A large container can provide enough space for a complete miniature scene, while a small section of a flower bed can become a permanent garden feature. The reference style works especially well because the miniature elements are surrounded by abundant plants, creating the feeling of a hidden little village.
Before planting, consider how much sunlight the location receives and choose plants that are suitable for those conditions. A container also needs adequate drainage. If you are working in an existing garden bed, make sure the area is easy to reach for watering, trimming, and occasional rearranging.
Container or Garden Bed?
A container is a practical option when you want a portable fairy garden. A weathered bowl, planter, trough, or other sturdy container can become the foundation for a miniature landscape. Containers are also useful when you want to move the display between different areas of the garden.
A garden bed gives you more room to experiment. You can create longer paths, larger planting areas, several miniature houses, and multiple focal points. The extra space also allows the garden to blend naturally into the surrounding landscape.
Planning the Layout Before You Plant
One of the easiest ways to make a fairy garden look polished is to plan the layout first. Place your largest decorative pieces temporarily on the soil and step back to view the arrangement. Think about where the eye naturally travels and make sure the main cottage or fairy house is easy to see.
A winding path is particularly effective because it adds movement. Instead of creating a perfectly straight line, arrange small flat stones or pebbles in a gentle curve. The path can lead toward a miniature door, bridge, pond, seating area, or another decorative feature.
Build Around One Main Focal Point
Start with one feature that immediately captures attention. A rustic miniature cottage is an obvious choice, but you could also use a tiny bridge, an unusual planter, a miniature treehouse, or a colorful pathway. Once the focal point is positioned, arrange smaller details around it rather than placing everything at the same visual level.
Create Visual Depth
Depth makes a miniature garden feel much larger than it really is. Use taller greenery behind the main structures, medium plants around the edges, and low-growing plants along paths. A few larger stones can also create height while helping the arrangement feel natural.
Essential Elements for a Fairy Garden DIY
There is no single formula for a fairy garden. The most enjoyable part is choosing details that match your personal style. A colorful cottage creates a cheerful storybook feeling, while natural bark, muted stones, and moss can create a woodland-inspired atmosphere.
Miniature Houses and Doors
A tiny house can become the heart of the display. Look for miniature cottages with interesting roofs, doors, windows, or natural textures. You can also make simple structures from bark, small pieces of wood, stones, or other weather-resistant craft materials.
Position the house slightly off-center rather than directly in the middle. This creates space for a path and allows plants to frame the structure naturally.
Pebble Paths and Natural Details
Small stones are one of the easiest ways to make a fairy garden look finished. Use pebbles to outline flower beds, create stepping stones, define a pathway, or surround a miniature water feature. Mixing different sizes gives the surface a more organic appearance.
Wood slices, bark, twigs, small logs, and natural stones can add another layer of texture. These materials work especially well with leafy plants because they help the decorative elements blend into the garden instead of looking disconnected.
Expert Insight
Think of your fairy garden as a miniature landscape rather than a collection of decorations. Repeating materials, colors, and shapes throughout the design helps everything feel connected. A pebble path echoed by a stone border or wooden accents repeated around the cottage can make a simple project look thoughtfully planned.
Adding Flowers and Greenery
Plants bring the miniature scene to life. The colorful example combines abundant flowers with leafy greenery, giving the garden a lush appearance. When selecting plants, consider their mature size as well as their current appearance. A plant that looks tiny at the garden center may eventually overwhelm a miniature cottage.
Mix Colors Without Losing Balance
Bright pinks, purples, yellows, whites, and greens can create a playful fairy garden. Rather than scattering every color randomly, repeat a few shades throughout the arrangement. For example, flowers in one color family can frame the pathway while contrasting blooms highlight the main cottage.
Greenery is just as important as flowers. Leaves, moss, small ground covers, and compact plants provide a calm background that allows brighter blooms and miniature decorations to stand out.
Use Moss for a Woodland Feel
Moss can soften the edges of stones and miniature structures while creating an aged, woodland-inspired appearance. It works particularly well around cottages, paths, tree roots, and small bridges. Keep plant care requirements in mind and use moss or moss-like ground covers that are appropriate for your growing conditions.
How to Build Your Fairy Garden Step by Step
Once your location, plants, and miniature accessories are ready, the actual project can be surprisingly simple. Work in layers and avoid overcrowding the garden during the first setup.
- Prepare the area: Clear away unwanted debris and create a suitable planting surface.
- Position the main structure: Place the cottage, house, or primary feature where it will remain visible.
- Create the path: Arrange small stones from the front of the garden toward the focal point.
- Add larger plants: Position taller greenery toward the back or sides to frame the scene.
- Fill in with flowers: Add colorful blooms around the path and miniature structures.
- Add texture: Introduce moss, bark, pebbles, wood pieces, and other natural accents.
- Finish with accessories: Place small bridges, benches, birdhouses, mushrooms, figurines, or other decorative details.
- Step back and edit: Remove or reposition anything that makes the scene feel crowded.
Pro Tip: Leave a little breathing room around pathways and focal pieces. A miniature garden often looks more detailed when each important feature has enough surrounding space to be noticed.
Creative Fairy Garden Ideas to Try
Once you understand the basic layout, there are countless ways to customize a fairy garden DIY project. You can change the theme according to your available space, favorite colors, or the materials you already have at home.
- Woodland cottage: Combine bark, moss, stones, and leafy plants for a natural forest-inspired scene.
- Flower village: Surround several miniature houses with colorful blooms and winding paths.
- Mini pond garden: Add a small blue decorative water feature or glass pebbles beside a tiny bridge.
- Fairy pathway: Focus on a winding stone walkway framed with low-growing plants and flowers.
- Container fairy garden: Create a complete miniature landscape inside a large planter for a compact display.
- Whimsical cottage corner: Combine colorful doors, tiny fences, mushrooms, birdhouses, and flowers for a playful look.
Keeping Your Miniature Garden Looking Beautiful
A fairy garden is still a garden, so the plants will need regular care. Water according to the needs of the plants you select, remove damaged foliage, and trim anything that begins to hide the miniature structures. Keeping the pathways visible is especially important because they help maintain the visual story of the design.
Outdoor accessories may also need occasional attention. Weather can affect painted wood, miniature houses, fabric details, and other decorative pieces. Choose durable materials when possible and move delicate accessories to a protected location when necessary.
Refresh the Design Seasonally
One advantage of a fairy garden is that it can evolve. Replace tired flowers, rearrange stones, add seasonal colors, or move miniature accessories to create a fresh arrangement. Even a small change, such as adding new flowers around the cottage, can make the entire display feel different.
At a Glance
- Choose a sunny or shaded location based on your plants.
- Start with one strong focal point.
- Use winding paths to create movement.
- Layer greenery, flowers, stones, and miniature accessories.
- Keep enough open space for plants and decorations to remain visible.
Final Thoughts on Fairy Garden DIY
Creating a fairy garden DIY project is less about following strict rules and more about building a miniature landscape that makes you smile. A simple planter can become a tiny village when you combine a charming cottage, a winding pebble path, lush greenery, colorful flowers, and a few carefully chosen details.
Start with the features you love most, then build outward. Give your plants room to grow, repeat natural textures throughout the scene, and do not be afraid to rearrange pieces until the garden feels balanced. Whether you create a small container display or a larger garden-bed village, the result can become a delightful focal point that adds imagination and personality to your outdoor space.
The best fairy garden is one that feels uniquely yours. Save your favorite ideas, gather a few simple materials, and spend a relaxed afternoon creating a miniature garden filled with flowers, pathways, tiny houses, and whimsical details.
Tags
Fairy Garden DIY DIY Fairy Garden Miniature Garden Fairy Garden Ideas Mini Garden Ideas Garden DIY Projects Whimsical Garden Cottage Garden Decor