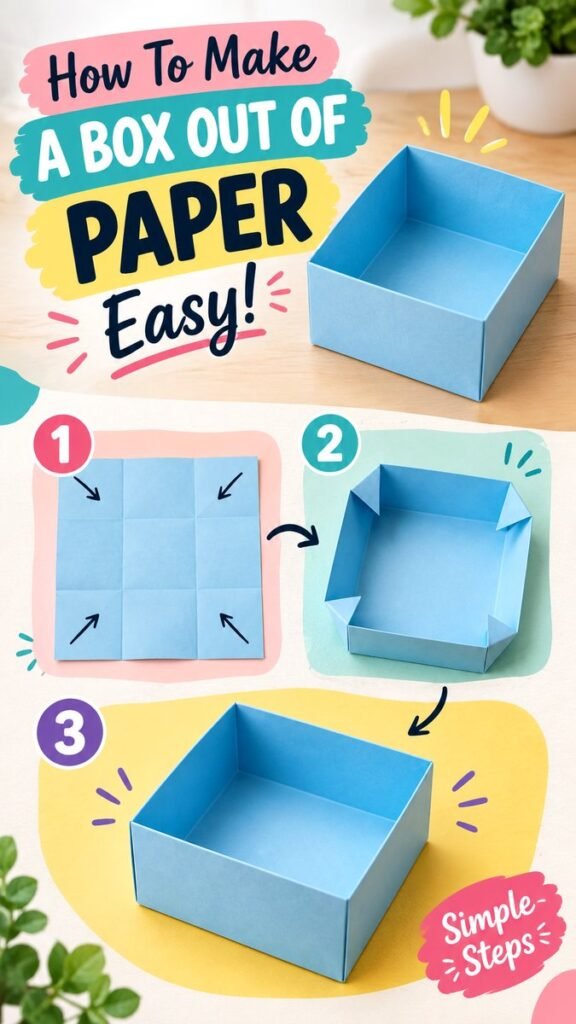
Looking for a simple craft that turns an ordinary sheet of paper into something genuinely useful? This easy paper box DIY is a great place to start. With a few careful folds, a flat piece of paper can become a neat, open-top box that works for organizing small items, holding craft supplies, creating gift packaging, or adding a handmade touch to everyday storage.
The project shown here keeps the process approachable by breaking it into clear stages. First, the paper is divided into an even grid and the corners are folded inward. Next, those folds are shaped into raised sides. Finally, the sides are secured to create a simple square paper box with a clean, sturdy-looking form.
Key Takeaways
- You can make a useful box from a single sheet of paper.
- Clear creases are the key to clean, even folds.
- A square or rectangular sheet works well for this style of paper box.
- The finished box is useful for lightweight storage and organization.
- Different paper colors and patterns can completely change the finished look.
- This is an accessible paper craft for beginners and casual crafters.
Why Make a Paper Box?
A paper box DIY is more than a quick folding exercise. It is a practical way to explore paper crafting while creating something that can actually be used. Instead of buying a small container for every little item, you can make a lightweight organizer in the size, color, and style you prefer.
Paper boxes are especially useful when you need temporary organization. They can hold notes, clips, beads, ribbons, stationery, small craft pieces, or other lightweight objects. They can also be made as simple gift boxes for small handmade presents.
Another advantage is the flexibility of the design. A plain sheet creates a clean and minimal box, while patterned scrapbook paper can give the same basic structure a completely different personality. You can even coordinate the paper with a party theme, seasonal color palette, or room decor.
Important: The quality of your creases matters more than rushing through the folds. Take a moment to line up each edge carefully and press the crease firmly. Accurate folds at the beginning make the final box much easier to shape.
What You Need for This Paper Box DIY
One of the best things about this craft is the short supply list. The basic version requires very little equipment, making it an easy project to try whenever you have a spare sheet of paper.
- Paper: Choose a square or suitably sized sheet that folds cleanly.
- Flat work surface: A table or desk gives you enough room to make accurate creases.
- Your hands: Most of the folding can be completed without specialized tools.
- Optional ruler: Useful if you want to make your initial divisions especially precise.
- Optional bone folder: Helpful for producing sharp creases when working with thicker paper.
For a first attempt, ordinary craft paper or lightweight colored paper is a practical choice. Very thick cardstock may be harder to fold neatly, while extremely thin paper can lose its shape easily. A medium-weight sheet provides a good balance between flexibility and structure.
Step 1: Create an Even Folded Grid
Begin by placing your paper flat on your work surface. The first stage is about creating the fold lines that will guide the rest of the project. In the example, the paper is divided into a simple grid, creating a central area surrounded by sections that will eventually become the sides of the box.
Fold the paper carefully so the edges line up as evenly as possible. Run your finger along each crease to make it visible. If you have a ruler or another flat-edged tool, you can use it gently to reinforce the crease without damaging the paper.
The corner sections are particularly important because they will help form the box’s structure. Keep the paper flat as you work and avoid creating unnecessary folds. A clean starting grid will make the next step much easier.
How to Get Cleaner Creases
- Match the edges before pressing the fold.
- Press from the center toward the outside of the crease.
- Use consistent pressure across the entire fold.
- Keep the paper flat instead of lifting it repeatedly.
- Work slowly when several fold lines need to meet.
If a fold looks slightly uneven, correct it before moving forward. It is much easier to fix a crease while the paper is still flat than after the box has begun taking shape.
Step 2: Fold the Corners Toward the Center
Once the main fold lines are established, bring the corners inward according to the crease pattern. The image demonstrates this movement with arrows pointing from the corners toward the interior of the paper.
This is the stage where the flat sheet starts to resemble the foundation of a container. Each corner should be folded with care so the resulting sections remain balanced. Try to make the folds symmetrical rather than forcing one corner to compensate for another.
As you fold, keep checking that the edges and crease intersections remain aligned. Small inaccuracies may not seem important at first, but several uneven folds can make the finished box look crooked or cause the sides to sit at different heights.
Expert Insight
Think of the fold lines as a construction guide. Rather than guessing where each corner should go, use the existing creases to keep the structure balanced. Precision at this stage helps the finished paper box stand evenly and look more polished.
Step 3: Raise the Sides of the Box
Now comes the satisfying part: turning the folded sheet into an actual box. Begin lifting the outer sections upward along the established crease lines. As the sides rise, the corner folds will overlap and create the basic shape of the container.
The goal is to create four raised sides surrounding a flat base. Keep one hand steady on the bottom while shaping each wall with the other hand. This helps prevent the base from shifting while you work around the perimeter.
The corner flaps shown in the tutorial help connect the walls and give the box its finished shape. Fold them neatly into position rather than bending them randomly. If a flap does not seem to sit correctly, flatten that section and check the original crease before trying again.
Keeping the Box Square
A common challenge with handmade paper boxes is keeping the four walls reasonably even. The easiest solution is to build the shape gradually. Raise one side, then its opposite side, followed by the remaining walls. Compare the corners as you go instead of completing one section without checking the rest.
Once all four sides are raised, gently adjust the corners. Do not pull aggressively because paper can weaken along repeated crease lines. Small, controlled adjustments are usually enough to improve the shape.
Why This Simple Folding Method Works
The design works because the original flat sheet is transformed through a planned series of folds. The center portion becomes the base, while the surrounding sections become the walls. The corner folds help bring those walls together and give the container definition.
This approach is a useful introduction to paper engineering. You are not simply folding paper for decoration. You are using geometry, symmetry, tension, and carefully placed creases to transform a two-dimensional material into a three-dimensional object.
That is also why this project can be enjoyable for both beginners and experienced paper crafters. Beginners get a straightforward project with a visible result, while experienced crafters can experiment with paper types, dimensions, patterns, and decorative details.
Choosing the Right Paper
Paper choice can dramatically affect the finished box. The light blue paper in the example creates a soft, clean appearance and makes the fold lines easy to see. You can use the same idea with many other colors depending on the purpose of your box.
- Colored craft paper: Great for simple, cheerful storage boxes.
- Patterned scrapbook paper: Adds visual interest without requiring extra decoration.
- Plain white paper: Ideal for a minimalist look or for decorating afterward.
- Pastel paper: Works well for soft, modern craft projects.
- Heavier paper: Can provide more structure, although it may require sharper creases and more careful folding.
If you are making several boxes, consider choosing a coordinated color palette. A collection of small boxes in complementary shades can look much more intentional when displayed together.
Creative Ways to Use a DIY Paper Box
Once you have made one box successfully, it is easy to find more uses for the technique. Because the finished container is lightweight and open at the top, it is particularly suitable for small, lightweight objects.
Desk Organization
Use a paper box to collect paper clips, sticky notes, small stationery pieces, or other desk essentials. Several boxes can be arranged side by side to create a simple modular organizer.
Craft Supply Storage
Paper boxes are handy for separating small craft materials. Sort items by color, project, or material so that everything is easier to find when you return to your craft table.
Small Gift Packaging
A handmade paper box can also become part of the gift itself. Choose decorative paper and add a simple ribbon, paper label, or handmade decoration. The packaging can feel personal without requiring complicated construction.
Everyday Organization
Keep small household objects together in drawers, on shelves, or inside cabinets. Since the boxes are inexpensive to make, you can create several and replace them easily when needed.
Why This Matters
- A simple fold can turn unused paper into functional organization.
- Making your own containers lets you customize color, size, and appearance.
- Practicing accurate folds builds confidence for more advanced paper crafts.
Easy Ways to Personalize Your Paper Box
The basic structure is only the beginning. Once you are comfortable with the folding technique, you can personalize the finished box to match your style or intended use.
Try contrasting colors on different boxes to create a playful collection. You can also use patterned paper with the pattern facing outward, or choose a subtle design for a more sophisticated appearance.
For a handmade gift, consider adding a small paper tag or decorating the finished box with simple stickers. Keep the decoration lightweight so the box retains its shape.
Pro Tip: Make a few practice boxes from inexpensive paper before using your favorite decorative sheets. Once your folds become consistent, switch to the paper you want for the final project. This saves materials and makes the finished boxes look much cleaner.
Common Paper Box DIY Mistakes to Avoid
Most problems with a folded paper box come from small alignment issues rather than the basic technique itself. Fortunately, these are easy to prevent with a little patience.
- Skipping the crease lines: Without clear guide folds, the corners can become uneven.
- Folding too quickly: Speed can cause edges to miss their intended alignment.
- Using unsuitable paper: Extremely thin or stiff paper can make shaping more difficult.
- Ignoring symmetry: Compare opposite sides as you build the box.
- Overworking the paper: Repeatedly unfolding and refolding the same area can weaken it.
- Forcing the corners: If something does not line up, check the previous folds instead of pulling the paper into place.
Remember that handmade crafts do not have to be perfectly identical to be useful. A slight variation can add character. The goal is to create a box that is stable, neat, and suitable for whatever lightweight items you want to store.
Make It a Fun Paper Craft Project
This paper box DIY can easily become a larger creative activity. Instead of making just one, prepare several sheets of paper and experiment with different colors, patterns, and sizes. Compare how each material changes the look and feel of the finished container.
You can also turn the project into a simple organization challenge. Choose one drawer or craft area that needs tidying and make a set of boxes specifically for that space. Label each box so small items have a designated home.
For families and classrooms, paper folding can be an engaging hands-on activity because the result appears quickly. The project also provides a natural opportunity to practice following visual instructions, recognizing patterns, and paying attention to alignment.
At a Glance
- Project: Easy paper box DIY
- Best for: Beginners, paper crafters, organization, and handmade projects
- Main material: A suitable sheet of paper
- Key skill: Accurate folding and crease alignment
- Result: A simple open-top paper box
Final Thoughts on This Easy Paper Box DIY
An easy paper box DIY proves that useful crafts do not need to be complicated. With a single sheet of paper and a little attention to folding, you can create a simple container that is attractive, practical, and easy to customize.
The most important part is taking your time with the foundation. Accurate fold lines, carefully aligned corners, and firm creases will make the final shaping process much smoother. Once you understand the basic structure, you can experiment with different papers and decorative styles to create boxes for organization, gifting, crafting, and everyday use.
Whether you are completely new to paper crafts or simply looking for a quick weekend project, this paper box is a satisfying project to try. Make one for a small collection of supplies, create a colorful set for your desk, or personalize one as part of a handmade gift. The simple folding process leaves plenty of room for creativity.
Start with one sheet, focus on clean folds, and see how easily a flat piece of paper can become a useful little box. Once you master the basic technique, you will have a simple paper craft you can return to whenever you need a quick, creative storage solution.