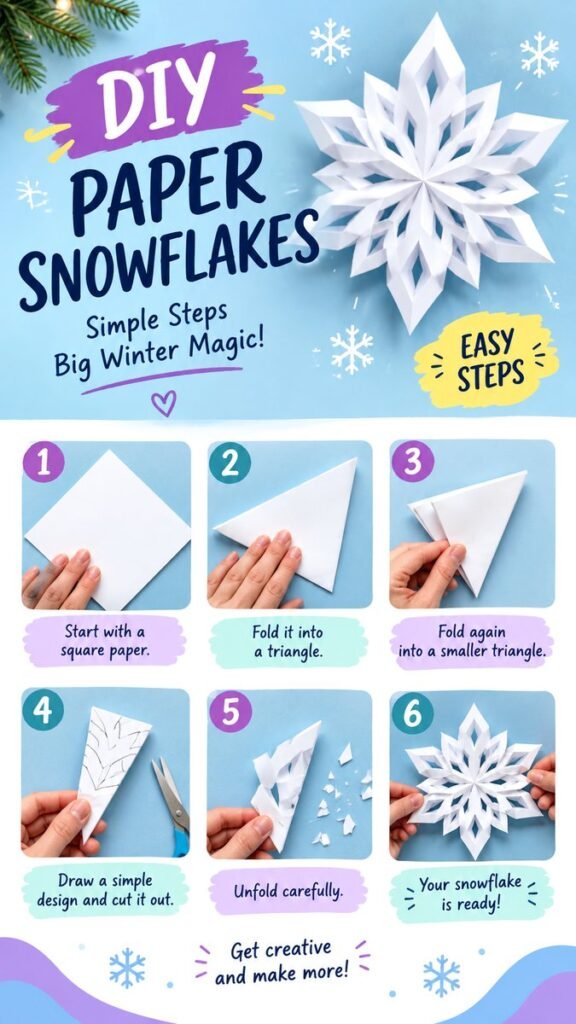
Turn a simple sheet of paper into a beautiful winter decoration with an easy paper snowflakes DIY project. This classic craft is inexpensive, beginner-friendly, and a fun way to spend a creative afternoon with kids or adults. With a few careful folds, a pair of scissors, and a little imagination, you can create delicate snowflake patterns that look wonderful in windows, on walls, gift packages, classroom displays, or holiday craft tables.
The beauty of making paper snowflakes is that every design can be different. Even when you begin with the same square sheet of paper, small changes in the folds and cuts create completely new patterns. The process shown here keeps the basic technique simple, making it a great starting point for anyone searching for easy paper crafts, winter craft ideas, or DIY holiday decorations.
Key Takeaways
- Use square paper for a balanced snowflake shape.
- Fold the paper neatly to create symmetrical designs.
- Make simple cuts first, then experiment with more detailed patterns.
- Unfold the paper slowly to avoid tearing delicate sections.
- Create several variations to build a charming winter display.
Why Paper Snowflakes Are Such a Fun DIY Craft
Paper snowflakes combine creativity with a surprisingly simple process. You do not need expensive supplies or complicated equipment. A few sheets of paper and scissors are enough to get started, which makes this project especially appealing for spontaneous crafting sessions.
There is also something satisfying about the transformation. At first, the folded paper looks like a small triangle or layered shape. After carefully cutting the edges and opening the folds, a detailed snowflake suddenly appears. That reveal is part of what makes this craft so enjoyable for children and adults alike.
Another advantage is the freedom to experiment. Some snowflakes can have large geometric openings, while others can feature tiny cuts and intricate points. You can keep the designs minimal for a modern look or create a whole collection of different patterns for a more playful display.
Important: The cleanest snowflakes usually begin with careful folding. Take a moment to line up each edge before pressing the crease, because uneven folds can make the final pattern less balanced.
Supplies for Easy Paper Snowflakes
One of the best things about this paper snowflakes DIY project is the short supply list. You can begin with basic materials that are commonly found around the home or in a craft space.
- Square paper: Plain white paper creates a traditional snowy appearance, but colored paper can add a fun modern touch.
- Scissors: Choose scissors that are comfortable to hold and suitable for the thickness of your paper.
- Pencil: Useful if you want to sketch cutting guides before making your shapes.
- Ruler: Optional, but helpful when you want more controlled geometric designs.
- Display materials: String, removable adhesive, or tape can be used to arrange finished snowflakes around a room.
You can also use leftover paper from other craft projects. This is a simple way to turn small amounts of unused material into attractive seasonal decorations.
How to Make Paper Snowflakes Step by Step
The basic method is easy to learn. The key is to fold the paper into a compact shape before cutting. This allows one cut to influence several layers at once, helping create the repeating structure associated with traditional paper snowflakes.
1. Start With a Square Sheet of Paper
Begin with a square piece of paper. A square gives you a convenient starting shape for creating the folded triangle used in this project. If your paper is rectangular, you can trim it into a square before folding.
Place the paper flat on your work surface. Smooth out any wrinkles so the first crease is clean and easy to follow.
2. Fold the Paper Into a Triangle
Bring one corner toward the opposite corner and align the edges carefully. Press along the fold to form a crisp triangle.
This first fold creates the foundation for the rest of the snowflake. Precise alignment is more important than making the crease extremely hard, so work slowly and check the edges before moving on.
3. Fold the Triangle Again
Fold the triangle into a smaller triangle, as demonstrated in the step-by-step design. Keep the layers aligned as you fold.
The folded shape becomes smaller and thicker at each stage. This is what makes the cutting portion so effective, because the cuts are repeated through multiple layers when the snowflake is unfolded.
4. Plan Your Snowflake Design
Once the paper is folded, you can begin thinking about the shapes you want to create. Simple angled cuts are an excellent choice for beginners. You can also sketch a few lines on the folded paper as a guide.
Try to leave enough paper between cuts. Very narrow sections can become fragile, especially when you are working with thinner paper. A combination of larger and smaller openings can create an attractive layered effect without making the design too difficult to handle.
Expert Insight
Think of the folded paper as a small design template. Instead of trying to cut a complicated snowflake all at once, begin with a few simple openings. As you become comfortable with the process, add curves, points, triangles, and layered shapes.
5. Carefully Cut the Folded Paper
Use your scissors to cut shapes along the folded edges. The cuts do not have to be perfect. Small variations can give each handmade snowflake its own personality.
For a beginner-friendly design, focus on simple triangular or curved openings. Avoid cutting completely across areas that need to remain connected. Those connecting sections help hold the finished snowflake together.
If children are making the craft, an adult should supervise the cutting process and choose scissors appropriate for the child’s age and ability.
6. Unfold the Snowflake Carefully
This is the most exciting step. Slowly open each fold and flatten the paper to reveal the completed design.
Do not rush this part. Small cut sections can stick together, and pulling them apart too quickly may tear the paper. Gently separate the layers with your fingertips and smooth the snowflake flat once it is fully open.
Pro Tip: If your snowflake does not open easily, pause and separate the folded layers little by little rather than pulling from the center. Patience makes a big difference when working with intricate cuts.
Simple Design Ideas to Try
Once you understand the basic folding method, the creative possibilities become much wider. You can make every snowflake unique by changing the cuts while keeping the same general folding process.
Geometric Snowflakes
Try triangles, diamonds, and sharp angled cuts for a crisp geometric appearance. These shapes are especially easy to plan because they can be drawn with a pencil before cutting.
Delicate Snowflakes
For a lighter look, make smaller openings and leave narrow sections around the design. This can create a more intricate appearance. Work carefully because thin paper connections are easier to tear.
Bold Decorative Snowflakes
If you want your finished pieces to stand out from a distance, use larger cuts and stronger shapes. These snowflakes are particularly useful for classroom displays, windows, party decorations, or large wall arrangements.
Tips for Better Paper Snowflakes
A few simple techniques can make the entire crafting experience easier and help your finished designs look more polished.
- Keep your folds aligned. Matching the edges carefully helps create a more balanced final design.
- Use sharp scissors. Clean scissors make it easier to create controlled cuts.
- Start simple. A basic pattern is easier to unfold and gives you a foundation for more advanced designs.
- Leave connecting areas. Avoid removing too much paper from the folded shape.
- Open slowly. Delicate sections can tear if the paper is unfolded too quickly.
- Make several versions. Experimenting is one of the easiest ways to discover designs you love.
Creative Ways to Display DIY Paper Snowflakes
After making a collection of snowflakes, you can turn them into a coordinated seasonal display. White paper looks especially crisp against darker surfaces, while pastel or colorful paper can create a playful craft-room atmosphere.
Hang snowflakes individually in a window, arrange several together on a wall, or create a simple garland. Smaller designs can also be incorporated into handmade cards, gift wrapping, or other paper craft projects.
For a more layered display, make snowflakes in several sizes. Place larger designs in the background and smaller ones closer to the center of your arrangement. This creates visual variety without requiring complicated decoration.
Paper Snowflakes for Kids and Family Craft Time
This DIY project is a natural choice for family crafting because the basic concept is easy to understand and the finished result is rewarding. Younger children can help choose paper, plan patterns, or decorate the finished snowflakes, while adults can assist with detailed cutting when needed.
It can also become a creative challenge. Give everyone a few sheets of paper and see how many different patterns they can create. Comparing the finished designs is part of the fun, especially because no two handmade snowflakes need to look exactly alike.
For classrooms and group activities, prepare the paper ahead of time and encourage participants to create their own cutting patterns. A collection of handmade snowflakes can quickly transform an ordinary display area into a cheerful winter-inspired space.
How to Make Your Snowflake Designs More Unique
Once the basic technique feels comfortable, experiment with different paper sizes and cutting styles. Try alternating large and small openings, combining pointed shapes with curved edges, or leaving a larger center area.
You can also explore different paper colors. White creates the familiar snow-inspired look, while pale blue, lavender, silver-toned paper, or other winter colors can give the project a fresh decorative style.
The most important thing is to treat each snowflake as an experiment. If one design does not unfold exactly as expected, use it as a learning opportunity and try another pattern on the next sheet.
At a Glance
- Simple materials make this an affordable craft.
- Careful folding helps create balanced patterns.
- Simple cuts are ideal for beginners.
- Every snowflake can have a completely different design.
- Use finished snowflakes for creative seasonal displays.
Conclusion
Making paper snowflakes is proof that a simple craft can create something wonderfully decorative. With square paper, scissors, and a little patience, you can transform folded sheets into unique winter-inspired designs. The basic process is approachable for beginners, yet it leaves plenty of room for creativity as your cutting skills develop.
Start with simple folds and uncomplicated shapes, then experiment with different patterns as you gain confidence. Make a few snowflakes for a window, create a collection for a seasonal display, or invite family and friends to design their own. The best part of this paper snowflakes DIY project is that there is no single correct pattern, so every handmade result can be part of the fun.
Gather some paper, fold your first triangle, and start cutting. Before long, you will have a collection of handmade snowflakes ready to brighten your space with a little creative winter charm.
Tags
Paper Snowflakes DIY Paper Crafts Winter Crafts Easy Crafts Holiday Crafts Kids Crafts Paper Craft Ideas DIY Winter Decor