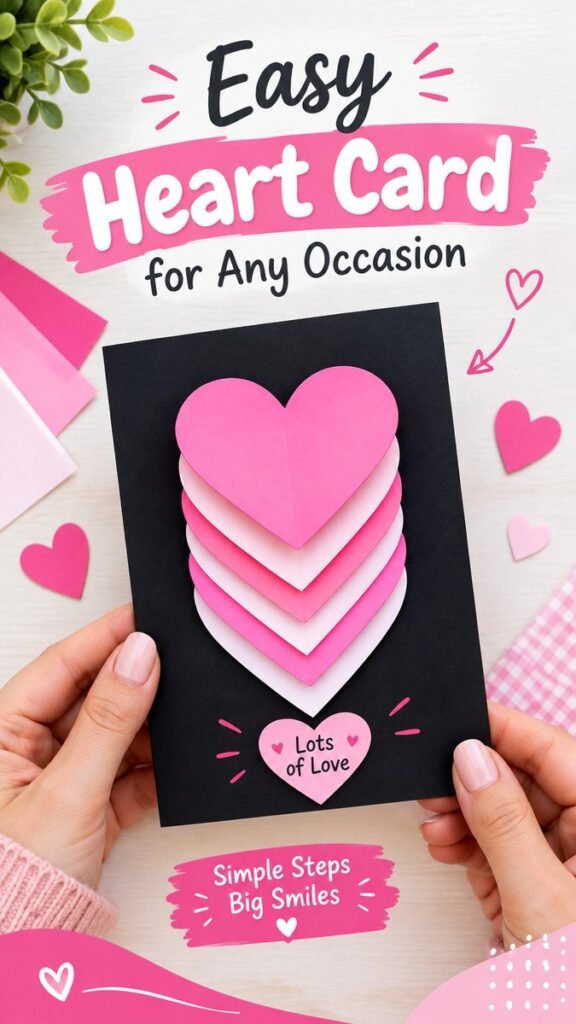
There is something special about a handmade card that a store-bought greeting card simply cannot capture. This cute DIY gift card combines a bold black cardstock base with layers of pink and white paper hearts to create a playful 3D effect. It is simple enough for a beginner, yet the finished design looks thoughtful, polished, and personal. Whether you are preparing a Valentine’s Day surprise, a birthday message, an anniversary note, or a small just-because gift, this layered heart card is an easy craft worth saving.
Key Takeaways
- Create a dimensional heart design with simple paper layers.
- Use contrasting cardstock colors to make the hearts stand out.
- Personalize the card with a short handwritten message.
- Adjust the number of heart layers for a simpler or fuller look.
- Use this handmade card for birthdays, Valentine’s Day, anniversaries, or thoughtful everyday surprises.
Why This DIY Gift Card Is So Charming
The appeal of this DIY gift card comes from its combination of simplicity and visual impact. A plain sheet of cardstock becomes a memorable handmade keepsake when decorated with carefully arranged heart shapes. The stacked design creates depth, while the alternating pink and white layers add rhythm and contrast.
The black card base provides an especially strong background for the bright hearts. Instead of needing complicated patterns or advanced paper-cutting techniques, the design relies on a few basic shapes and thoughtful placement. That makes it a great project for anyone searching for an easy handmade card idea.
Important: The secret to making a simple paper card look impressive is not adding dozens of decorations. A strong color combination, clean shapes, and intentional layering can create plenty of visual interest on their own.
Materials for a Layered Heart Card
You do not need a large craft supply collection to recreate this general style. Most of the materials are inexpensive and easy to find, making this a convenient project for a last-minute handmade gift.
- Black or another dark-colored cardstock for the card base
- Pink cardstock in one or two shades
- White or pale cardstock for contrast
- Scissors or a paper trimmer
- Pencil for marking heart shapes
- Craft glue or double-sided adhesive
- Ruler for positioning the layers
- A pen or marker for a personal message
- Optional decorative paper, stickers, or small heart cutouts
For a softer appearance, replace the black background with cream, blush, lavender, or another neutral shade. If you want a more energetic design, combine several shades of pink and red. The basic structure remains the same regardless of your color palette.
How to Make the DIY Gift Card
The best part of this paper craft is that the main technique is straightforward. You are essentially creating several heart shapes, arranging them in layers, and attaching them to a folded card base.
1. Prepare the Card Base
Start with a piece of cardstock large enough to fold into the size of card you want. Fold it neatly in half, pressing along the crease so the card opens and closes cleanly.
A dark base works particularly well because it creates a dramatic backdrop for lighter heart shapes. Before gluing anything, place the card flat and decide where you want the main decoration to sit.
2. Create the Heart Shapes
Draw a heart template on scrap paper first. Once you are happy with its proportions, use it as a guide for cutting the decorative hearts from pink and white cardstock.
For a layered effect, make several hearts that are similar in shape but vary slightly in size. You can alternate the colors so that each layer remains visible. Neat, symmetrical shapes will give the finished card a more polished appearance.
3. Arrange the Layers
Place the largest heart toward the back and continue with smaller hearts toward the front. Alternate pink and white pieces to create a striped, dimensional appearance.
Do not glue the pieces immediately. Move them around first and check the spacing from different angles. This simple step can make a big difference because even small changes in alignment can affect how balanced the final card looks.
4. Add Dimension
To create more depth, you can attach some heart layers with small foam adhesive pieces or folded paper spacers. This lifts selected layers away from the card and produces a more noticeable 3D effect.
If you prefer a flatter card that is easier to place inside an envelope, use thin double-sided tape or glue instead. The layered color arrangement will still provide plenty of visual interest.
5. Add a Personal Message
Finish the front with a short phrase such as “Lots of Love,” “For You,” “You’re Amazing,” or “Made With Love.” Keep the message short so the layered heart remains the main focal point.
Inside the card, write something personal. Even a few sincere sentences can turn a simple paper craft into a meaningful keepsake. Handwritten messages are one of the easiest ways to make a handmade gift card feel unique.
Expert Insight
Layering works best when each paper color remains clearly visible. Before applying adhesive, check the edges of every heart and leave enough of each layer exposed to create a clean visual pattern.
Creative Ways to Customize Your Handmade Card
Once you understand the basic layered heart technique, there are many ways to make the project your own. You can change the colors, number of layers, message, background, or decorative details without changing the fundamental construction.
Try Different Color Combinations
Pink and white create a soft, cheerful appearance, but they are not your only options. Try red and cream for a classic look, purple and lavender for something whimsical, or blue and white for a less traditional design.
For a modern handmade card, consider using one bold color with a neutral shade. A monochromatic design using several tones of the same color can also look sophisticated while remaining easy to create.
Experiment With Heart Sizes
Uniform layers create a neat and structured effect, while more noticeable size differences can produce a dramatic dimensional centerpiece. You can also create a single oversized heart surrounded by smaller decorative hearts.
Add Small Decorative Details
Keep additional decorations simple so they do not compete with the main heart design. Tiny paper hearts, hand-drawn lines, dots, stars, ribbons, or a small patterned paper accent can add personality.
A few carefully placed details often look better than covering the entire card with embellishments. The goal is to support the central design rather than hide it.
Occasions for a DIY Gift Card
A handmade heart card naturally works for romantic occasions, but its usefulness does not stop there. With a few changes to the colors and wording, this craft can become a versatile card for many celebrations.
- Valentine’s Day: Use pink, red, and white for a cheerful love-themed card.
- Birthday: Choose the recipient’s favorite colors and add a personalized birthday message.
- Anniversary: Create a more elegant version with neutral tones and a meaningful note.
- Thank you: Use bright colors and a simple appreciation message.
- Friendship gift: Choose playful colors and add an inside joke or personal greeting.
- Just because: Make a spontaneous card to let someone know you are thinking of them.
Tips for a Cleaner Paper Craft
Good cutting and careful placement are the two biggest factors in achieving a polished result. Take your time when preparing the heart template because the template determines the appearance of every layer that follows.
- Use sharp scissors for smoother edges.
- Fold cardstock firmly so the card base has a crisp crease.
- Test the arrangement before adding adhesive.
- Use small amounts of glue to avoid visible residue.
- Allow glued layers to settle before moving the card.
- Keep the decorative elements balanced around the main heart.
Pro Tip: Make one reusable heart template from sturdy scrap cardboard. Once you have a template you love, creating several handmade cards becomes faster and more consistent.
Make It a Handmade Gift Experience
A DIY gift card can become even more meaningful when it is paired with a small handmade or thoughtfully chosen gift. The card does not need to be elaborate. Its purpose is to add a personal touch and give the recipient something they can keep.
You could tuck the card into a small gift bag, attach it to a wrapped present, or place it beside a favorite treat. If you are making several cards, experiment with different messages while keeping the layered heart design as the common theme.
This approach is also useful when you need several cards for friends, classmates, coworkers, or family members. Prepare the heart shapes in batches, organize them by color, and assemble each card individually.
A Simple Craft With a Big Visual Impact
The layered heart design proves that an impressive handmade card does not require advanced crafting skills. With cardstock, scissors, adhesive, and a little patience, you can create a dimensional centerpiece that immediately catches attention.
What makes this project especially appealing is its flexibility. You can keep the design minimal or add your own creative touches. Change the colors, modify the number of layers, write a different message, or decorate the surrounding space with tiny paper shapes.
The result is a DIY gift card that feels personal without requiring complicated materials or techniques. It is the kind of project that is easy to save for later and revisit whenever you need a thoughtful handmade idea.
Quick Points
- Layer contrasting cardstock for instant dimension.
- Keep the heart shapes evenly aligned for a polished finish.
- Personalize the message to suit the recipient.
- Change colors and embellishments for different occasions.
Conclusion
This DIY gift card is a wonderful example of how simple paper crafts can become heartfelt keepsakes. The combination of layered hearts, contrasting cardstock, and a short personal message creates a cheerful design that feels handmade and intentional.
Whether you are making a Valentine’s Day card, birthday surprise, anniversary greeting, thank-you note, or spontaneous gift, this project gives you plenty of room to be creative. Start with the basic layered heart idea, then adapt the colors, wording, and decorations to make the card completely your own.
Most importantly, do not worry about making every detail perfect. Handmade gifts are special because they show time, thought, and creativity. Gather a few sheets of cardstock, cut some hearts, and turn a simple piece of paper into a small reminder that someone matters.
Tags
DIY Gift Card Handmade Card DIY Heart Card Paper Crafts 3D Card Ideas Cute DIY Gifts Easy Card Crafts Handmade Gift Ideas