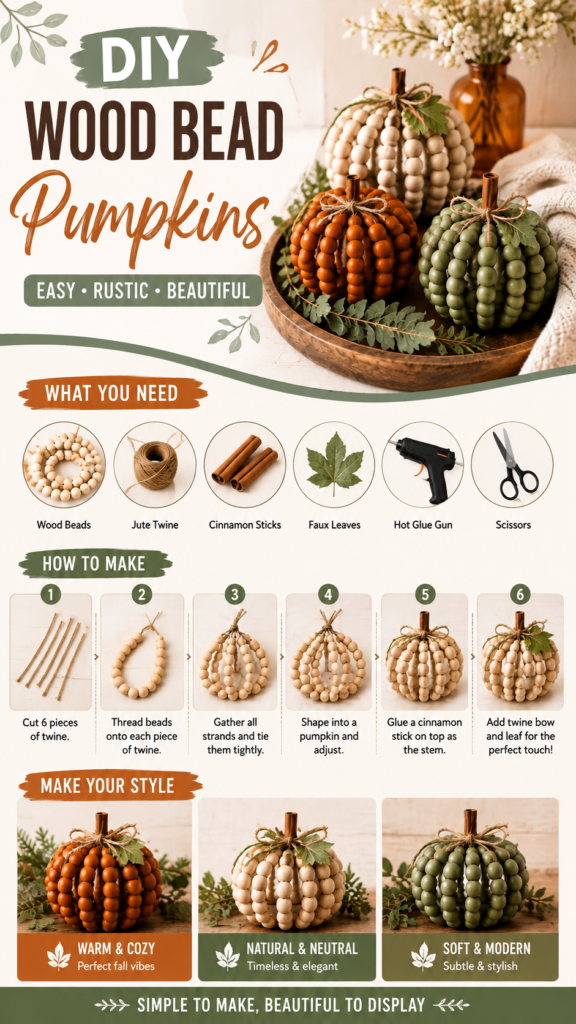
Bring a little rustic charm into your home this fall with an easy DIY wood bead pumpkin project. These decorative pumpkins combine simple wooden beads with natural-looking twine, cinnamon sticks, faux leaves, and greenery to create a cozy seasonal accent that feels handmade and timeless. They are especially appealing if you love farmhouse, neutral, rustic, or modern fall decorating but want something a little different from traditional ceramic or fabric pumpkins.
The beauty of wood bead pumpkins is their versatility. A warm orange version can create a classic autumn display, while cream and natural wood tones work beautifully with neutral interiors. Sage green beads offer a softer, modern alternative. Once you understand the basic construction, you can experiment with colors, sizes, textures, and finishing details to create pumpkins that fit your own decorating style.
Key Takeaways
- Wood beads can be transformed into charming three-dimensional pumpkin decorations.
- Jute twine helps create the rustic shape and adds natural texture.
- Cinnamon sticks make simple, attractive pumpkin stems.
- Orange, cream, and sage green create three distinct fall decorating looks.
- Faux leaves and greenery provide an easy finishing touch.
- The finished pumpkins work well in bowls, trays, shelves, and seasonal displays.
Why Wood Bead Pumpkins Are Perfect for Fall Decor
Fall decorating is often about texture as much as color. Natural wood, rough jute, greenery, warm cinnamon tones, and soft fabrics instantly create a welcoming seasonal atmosphere. Wood bead pumpkins bring several of these elements together in one small decoration.
Unlike a large centerpiece, a handmade bead pumpkin can fit into many different areas of your home. Place one inside a decorative bowl, arrange several on a wooden tray, or use them as accents on an open shelf. Their compact shape makes them easy to combine with other autumn decorations without overwhelming the space.
The biggest decorating advantage is flexibility. You are not limited to traditional pumpkin orange. A simple change in bead color can completely change the personality of the finished piece, allowing the same basic DIY technique to work with rustic farmhouse, minimalist, cottage-inspired, or contemporary fall decor.
Materials You Will Need
The project shown uses straightforward craft supplies that work together to create both the pumpkin shape and its rustic character. Keeping the supply list simple also makes this a practical project for a relaxed afternoon of crafting.
- Wood beads: Round wooden beads form the main body of the pumpkin.
- Jute twine or hemp cord: Use strong cord for threading and shaping the bead strands.
- Cinnamon sticks: A short stick creates the pumpkin stem.
- Faux leaves: These add color and a natural finishing detail.
- Greenery: Small faux sprigs can be tucked around the finished pumpkins.
- Hot glue and glue sticks: Helpful for securing the stem and decorative accents.
- Scissors: Use these to cut the cord and trim loose ends.
You can keep the materials exactly as simple as the project suggests, or make small substitutions based on what you already have. For example, different rustic cords can create slightly different textures, while assorted decorative greenery can help personalize the final arrangement.
Choosing the Right Wood Beads
Round wood beads are ideal because their shape naturally creates the plump, segmented appearance associated with a pumpkin. Natural unfinished beads give the project a soft farmhouse feel, while painted beads allow you to introduce stronger seasonal colors.
When selecting beads, think about the scale of your finished decoration. Smaller beads create a delicate, detailed appearance, while larger beads produce a bolder pumpkin that can hold its own as a centerpiece. Keeping the bead size consistent usually makes the strands look more balanced.
How to Make a DIY Wood Bead Pumpkin
The construction is surprisingly simple. Instead of building the pumpkin from a solid base, you create individual strands of beads and then gather them together. Once the strands are positioned around the center, they form the rounded silhouette of a pumpkin.
1. Cut the Twine
Begin by cutting several equal lengths of twine. The reference design uses multiple individual strands, which gives the finished pumpkin its distinctive ribbed appearance. Keeping the pieces close in length will make it easier to create an even shape later.
Leave enough extra cord at the ends to gather and tie the strands securely. It is better to have a little extra than to discover that the cord is too short once the beads have been added.
2. Thread the Beads
Thread the wood beads onto each piece of twine. The exact number can be adjusted depending on the size of your beads and how full you want the pumpkin to look. The goal is to create several matching or nearly matching strands.
As you work, place the completed strands together so you can compare their length and fullness. This small check can make the shaping stage much easier.
3. Gather the Strands
Once the beads are threaded, bring all of the strands together at the top. Tie the cords securely so the strands stay grouped. At this stage, the project begins to look like a loose collection of bead loops rather than a pumpkin, so do not worry if the shape is not perfect yet.
Take your time during this stage because the tension of the gathered strands has a major effect on the final silhouette. If the cords are too loose, the pumpkin may look flat or uneven. If they are gathered too tightly, the beads may bunch together.
4. Form the Pumpkin Shape
Spread the bead strands around the center to form a rounded pumpkin shape. Gently adjust the individual strands until they are distributed evenly. The spaces between the strands create the natural grooves that make the decoration recognizable as a pumpkin.
Rotate the pumpkin as you shape it so you can check it from different angles. Small adjustments to individual strands can make the overall design look much more symmetrical.
5. Add the Cinnamon Stick Stem
A cinnamon stick is a wonderfully simple choice for the stem because its warm brown color complements the wood beads and adds another natural texture. Position a short cinnamon stick at the top of the pumpkin and use hot glue to secure it.
The stem does not need to be perfectly centered to look charming. A slightly organic appearance works especially well with rustic fall decorating.
6. Finish With Twine, Leaves, and Greenery
Complete your pumpkin by adding a small twine bow around the stem. A few faux leaves can be attached near the top, while greenery can be placed around the base or tucked behind the pumpkin when it is used in a display.
Keep these details relatively light. The wood beads should remain the main visual feature, while the leaves, greenery, and bow provide just enough contrast to make the pumpkin feel finished.
Expert Insight
The most convincing pumpkin shape comes from even spacing rather than forcing the beads into place. Distribute the strands around the center, then make small adjustments until the pumpkin looks rounded from every angle.
Three Color Ideas for Your DIY Pumpkin
One of the most appealing details of this craft is how easily the same construction can create completely different decorating styles. The orange, cream, and sage examples demonstrate how color can influence the mood of a seasonal display.
Warm and Cozy Orange
Classic orange beads are an obvious choice for autumn. They bring warmth and energy to the display and pair beautifully with brown stems, natural twine, and greenery. This version works particularly well when you want your fall decor to feel traditional without relying on mass-produced decorations.
Try combining an orange wood bead pumpkin with other natural materials such as woven baskets, wooden trays, dried-looking greenery, or warm neutral textiles.
Natural and Neutral Cream
Cream or unfinished wood beads create a softer interpretation of fall. This version is especially useful for neutral interiors where bright orange may feel too strong. The result is understated, warm, and easy to blend with existing home decor.
A neutral bead pumpkin can sit beside beige textiles, light wood accessories, woven textures, or other simple seasonal accents without creating too much visual contrast.
Soft and Modern Sage Green
Sage green offers a fresh alternative to traditional autumn colors. Its muted quality keeps the pumpkin seasonal while giving the decoration a modern appearance. Pairing sage beads with natural twine and brown cinnamon stems maintains the earthy character of the project.
This color option is a great choice when you prefer subtle seasonal decorating rather than a room filled with bright fall colors.
Easy Ways to Customize Your Wood Bead Pumpkins
Once you have mastered the basic technique, there are plenty of ways to make each pumpkin feel unique. The structure is simple enough that small changes can have a noticeable effect.
- Mix colors: Alternate two complementary bead colors for a striped effect.
- Keep it natural: Use unfinished wood and minimal embellishment for a clean farmhouse look.
- Change the stem: Experiment with natural twigs or another rustic stem material.
- Vary the size: Make a group of small and medium pumpkins for a layered display.
- Add texture: Combine different types of twine, greenery, or small fabric bows.
- Adjust the fullness: Use more or fewer strands to create a slimmer or fuller silhouette.
How to Display DIY Wood Bead Pumpkins
These pumpkins are small enough to decorate almost any surface. Their rounded shape also makes them easy to combine with other fall accessories without taking over the arrangement.
Create a Bowl or Tray Arrangement
Place several pumpkins in a shallow wooden bowl or decorative tray. Add greenery around the pumpkins to fill empty spaces and create a fuller centerpiece. Mixing orange, cream, and sage versions can make the arrangement feel collected rather than overly coordinated.
Decorate a Shelf
A single bead pumpkin can add a subtle seasonal detail to a shelf. Position it beside books, a small vase, framed artwork, or other neutral accessories. For a more layered arrangement, place pumpkins at different heights rather than lining them up evenly.
Build a Cozy Tabletop Display
For a dining table, coffee table, or entryway surface, combine the pumpkins with greenery and natural textures. A simple arrangement often looks more polished when you repeat one or two materials throughout the display, such as wood and jute.
A helpful styling rule is to let the pumpkins remain the focal point and use greenery as supporting texture. Too many decorative elements can hide the bead construction that makes these pumpkins special.
Tips for a Better Finished Result
Although this is an approachable craft, a few small details can make the finished pumpkins look more polished and intentional.
- Cut your twine pieces as evenly as possible before threading the beads.
- Check the spacing of the strands before securing the gathered ends.
- Shape the pumpkin gradually instead of pulling all the strands at once.
- Rotate the pumpkin while shaping it to maintain a balanced silhouette.
- Use a modest amount of hot glue when attaching the stem and decorative pieces.
- Trim visible cord ends neatly after everything is secure.
- Keep the finishing accents proportional to the pumpkin body.
Why This DIY Works for Different Decorating Styles
The simple materials give this craft an adaptable quality. Wood and jute naturally lean rustic, but the finished pumpkin does not have to look strictly farmhouse. Choosing cream beads and minimal greenery creates a softer neutral aesthetic. Sage green gives it a contemporary feel, while orange creates a traditional fall statement.
This makes wood bead pumpkins particularly useful for seasonal decorating because you can match them to the room instead of trying to make your entire room match the decoration.
Quick Points
- Use round wood beads for the pumpkin body.
- Gather multiple beaded twine strands to create the ribbed shape.
- Finish with a cinnamon-stick stem and rustic twine bow.
- Choose orange, cream, sage, or mixed colors to suit your decor.
- Style the finished pumpkins in bowls, trays, shelves, or tabletop arrangements.
Conclusion
DIY wood bead pumpkins are a simple way to bring handmade character and cozy fall texture into your home. With wood beads, twine, a cinnamon stick, and a few decorative accents, you can create a seasonal decoration that feels thoughtful without requiring a complicated crafting process.
The real charm is in the ability to make the project your own. Choose classic orange for a warm autumn display, cream for a natural neutral look, or sage green for something softer and more modern. You can also create several sizes and colors and arrange them together for a layered seasonal centerpiece.
Whether you are decorating a shelf, refreshing a tabletop, or creating a cozy fall display in a bowl or tray, these handmade pumpkins offer an easy way to add warmth and personality. Gather your supplies, choose your favorite color palette, and enjoy creating a collection of rustic pumpkins that you will be happy to bring out year after year.
Tags
DIY Fall Decor Wood Bead Crafts DIY Pumpkins Rustic Home Decor Farmhouse Fall Decor Easy DIY Crafts Autumn Decorating Rustic Crafts