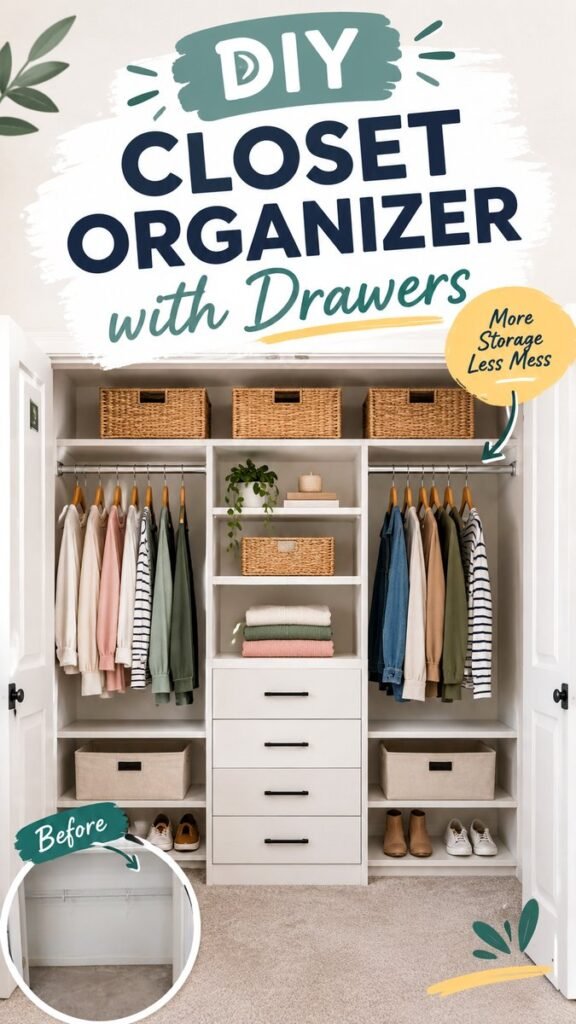
A well-organized wardrobe can make a bedroom feel calmer, more spacious, and much easier to use every day. This DIY wardrobe idea shows how an ordinary closet can be transformed into a practical storage system with drawers, open shelving, hanging areas, baskets, and dedicated spaces for shoes. The result is a clean, functional setup that makes better use of available closet space without relying on an overly complicated design.
Key Takeaways
- Use drawers to organize folded clothes, accessories, and smaller essentials.
- Combine hanging rods with shelves to make the wardrobe more versatile.
- Add baskets for flexible storage that keeps clutter out of sight.
- Use vertical space to increase storage without expanding the closet footprint.
- Plan your layout around the clothing and items you actually use most often.
Why a DIY Wardrobe Organizer Is Worth Considering
A closet does not have to be large to be useful. In many bedrooms, the real problem is not a lack of space but a lack of structure. A single hanging rod and one shelf can leave valuable vertical space unused, while folded clothing, accessories, shoes, and everyday items compete for room.
A DIY wardrobe organizer gives you an opportunity to divide the closet into storage zones. Instead of placing everything on one rod, you can create separate areas for hanging clothes, folded pieces, shoes, accessories, and less frequently used belongings. This makes the wardrobe easier to maintain and can also make getting dressed much faster.
Important: The best wardrobe organization is not simply about adding more storage. It is about creating a place for each category of item so that putting things away becomes simple and natural.
The Basic Layout to Aim For
The featured closet design uses a balanced combination of hanging sections, shelves, baskets, and a central drawer unit. This type of arrangement works especially well because it gives different belongings their own dedicated zones.
- Hanging zones: Keep shirts, jackets, dresses, and other garments wrinkle-free and easy to see.
- Open shelving: Use shelves for folded clothing, baskets, shoes, or accessories.
- Drawers: Store smaller and frequently handled items in a contained space.
- Baskets: Group casual items or accessories while keeping the overall look tidy.
- Lower storage: Reserve the bottom area for shoes, larger baskets, or items that do not need daily access.
This combination creates visual balance while making the closet much more functional. It also allows you to adjust the storage strategy as your needs change.
How to Plan Your DIY Wardrobe
Before adding drawers, shelves, or organizers, take a moment to think about how you use your closet. A successful DIY wardrobe starts with the contents rather than the furniture.
1. Empty and Sort Everything
Start with a completely empty wardrobe if possible. Seeing the full closet will help you understand its actual dimensions and identify areas that are currently being wasted.
Sort your belongings into simple categories such as hanging clothes, folded clothes, accessories, shoes, bags, and seasonal pieces. You may also discover that some items no longer need valuable everyday storage space.
2. Measure the Available Space
Measure the width, height, and depth of the closet before planning the organizer. Pay attention to doors, baseboards, existing shelves, hanging rods, and any features that could affect the installation.
Accurate measurements are especially important when planning a central drawer unit. Drawers need enough clearance to open comfortably, while shelves should remain accessible without making the wardrobe feel crowded.
Think Vertically
One of the easiest ways to increase closet storage is to use the height of the wardrobe. If the upper portion of the closet is mostly empty, consider adding a shelf or storage baskets. Higher areas are ideal for seasonal clothing or belongings that are not needed every day.
3. Decide What Deserves Drawer Space
Drawers are particularly useful for items that can become messy when stored on open shelves. Folded basics, accessories, undergarments, and smaller clothing pieces can benefit from being contained.
Rather than filling every available section with drawers, think about accessibility. Items used daily should be placed within easy reach. Less frequently used belongings can go higher or lower in the wardrobe.
Create Dedicated Storage Zones
A wardrobe becomes much easier to manage when every section has a purpose. The organizer shown in the design uses multiple zones instead of treating the closet as one large storage area.
Hanging Clothes
Use hanging rods for garments that benefit from being stored vertically. Grouping similar pieces together can make the closet easier to navigate. For example, you might keep tops in one section and jackets or heavier garments in another.
Matching or coordinating hangers can also create a cleaner visual appearance. Even a simple wardrobe can look more intentional when clothing is arranged by category, length, or color.
Folded Clothing
Open shelves work well for folded sweaters, shirts, jeans, and other pieces that do not need to hang. Keep frequently used clothing at a comfortable height so you do not have to reach or bend constantly.
Stacking can be effective, but avoid making piles so tall that the bottom pieces become difficult to access. Smaller stacks or shelf dividers can help maintain order.
Baskets and Bins
Baskets are a simple way to introduce flexible storage into a DIY closet organizer. They are especially useful for items that do not need to be displayed individually.
Consider using baskets for accessories, seasonal pieces, scarves, casual clothing, or miscellaneous items. Labeling them can make it even easier to find what you need without searching through every container.
Expert Insight
A good closet system should reduce daily decisions, not create more of them. Keep your most-used clothing at eye level, place smaller essentials in drawers, and reserve harder-to-reach areas for seasonal or occasional items.
- Store everyday pieces where they are easiest to reach.
- Use containers to group similar items.
- Leave a little breathing room so the system remains easy to maintain.
Make Drawers the Center of Your Organization System
The central drawers in this wardrobe concept provide an especially useful storage solution. Instead of spreading small items across several shelves, drawers create a dedicated location for belongings that benefit from being concealed.
When organizing drawers, avoid treating them as catch-all spaces. Give each drawer a clear category. One could hold everyday accessories, another could be used for smaller clothing items, and another could contain items that are frequently needed but difficult to keep neatly stacked on a shelf.
Pro Tip: Do not fill drawers to their maximum capacity. Leaving a small amount of open space makes it easier to see what is inside and encourages you to put things away instead of creating another clutter pile.
Use the Lower Closet Area Wisely
The floor area of a closet is often overlooked. In a well-planned DIY wardrobe, the lower section can become valuable storage rather than an empty strip of carpet.
Shoes are an obvious choice for this area. Open shelving keeps pairs visible and prevents them from becoming scattered across the bedroom floor. Baskets can also work well when you want a more streamlined appearance.
Keep heavier items lower down whenever practical. This makes the wardrobe easier to access and can help prevent awkward reaching or lifting.
Keep the Floor Clear
One of the biggest advantages of adding shelves and drawers is that they can lift belongings away from the floor. A clear closet floor instantly makes the space feel more organized and gives you room to clean easily.
Budget-Friendly Ideas for a DIY Closet Makeover
You do not necessarily need an elaborate custom closet system to improve wardrobe storage. The concept can be adapted to different budgets by combining simple components and focusing on the storage problems that matter most.
- Prioritize drawers if small items are your biggest source of clutter.
- Add simple shelves to make better use of vertical space.
- Use baskets as flexible alternatives to built-in compartments.
- Reuse suitable storage containers where practical.
- Upgrade the organizer gradually instead of trying to complete everything at once.
A phased approach can make a wardrobe project feel much more manageable. Start with the most important storage problem, test the layout, and then improve the remaining areas once you know what works.
How to Keep Your New Wardrobe Organized
Installing an organizer is only the beginning. The most effective DIY wardrobe is one that remains easy to maintain weeks and months later.
Give Every Item a Home
When everything has a designated location, tidying becomes much faster. After wearing something, you should be able to decide immediately whether it belongs on a hanger, in a drawer, on a shelf, or inside a basket.
Review Your Storage Regularly
Wardrobes naturally change throughout the year. Clothing moves in and out of rotation, seasonal items become useful again, and storage needs can shift. A quick review every few months can prevent clutter from gradually taking over.
Rotate Seasonal Items
Keep clothing that is not currently needed in higher shelves or labeled baskets. Bring those items down when the season changes and move less relevant pieces out of the prime storage zones.
Small Details That Make a Big Difference
The most successful closet transformations often come from small organizational decisions. Consistent hangers, coordinated baskets, clear categories, and sensible placement can make a basic storage system feel much more polished.
You can also create visual calm by avoiding unnecessary overcrowding. A wardrobe does not need to be packed from floor to ceiling to be efficient. Leaving a little open space makes it easier to see your belongings and maintain the system.
Think of your DIY wardrobe as a daily-use tool. The goal is not simply to make the closet look beautiful in a photograph. It should make mornings easier, laundry simpler to put away, and everyday items easier to find.
At a Glance
- Combine hanging space, shelves, drawers, and baskets.
- Use vertical space instead of letting the upper closet area go unused.
- Keep everyday items within easy reach.
- Use lower storage for shoes and larger containers.
- Build the system around your personal wardrobe habits.
Final Thoughts on Creating a DIY Wardrobe
A DIY wardrobe organizer can completely change the way a closet feels and functions. The most inspiring part of this design is its practical combination of storage types. Hanging rods handle clothing that needs to stay wrinkle-free, shelves provide flexible open storage, baskets hide smaller categories, and drawers create a dedicated home for everyday essentials.
You do not need to copy one exact layout to achieve the same result. Instead, use the concept as inspiration and adapt it to your own closet dimensions, wardrobe size, and daily routine. Start by identifying what causes the most clutter, then give that category the storage solution it needs.
Remember: The best DIY wardrobe is one that makes organization feel effortless. Prioritize accessibility, use every practical section of the closet, and choose storage solutions that are simple enough to maintain every day.
With thoughtful planning, even a basic closet can become a functional wardrobe system that looks clean, feels spacious, and makes better use of the storage you already have. Whether you are planning a full closet makeover or simply adding a few shelves and drawers, these ideas can help you create a wardrobe that works harder for your home.
Tags
DIY Wardrobe Closet Organizer DIY Closet Wardrobe Organization Closet Storage Ideas Closet Makeover Home Organization Bedroom Storage