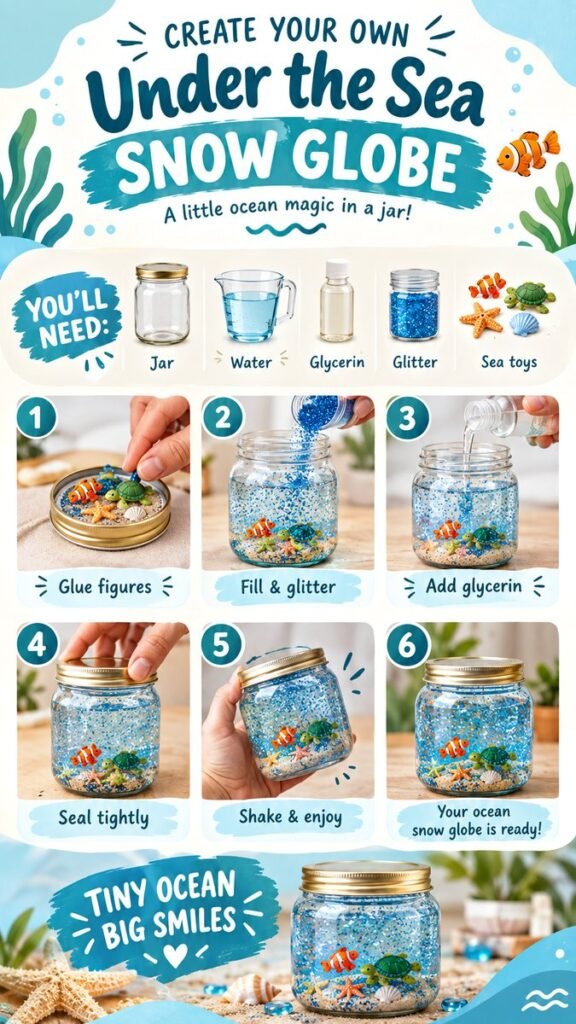
Turn a simple glass jar into a tiny underwater world with this fun DIY snow globe project. An under-the-sea snow globe combines sparkling glitter, colorful sea creatures, and a few easy-to-find supplies to create a miniature ocean scene that feels playful and magical. It is a creative craft for kids, families, classrooms, seasonal activities, or anyone who enjoys making decorative projects at home.
The finished globe shown here features tiny ocean animals, shells, sand-like details, and shimmering blue glitter that moves through the water when the jar is gently shaken. The project is approachable because the basic process is simple: attach the decorations, add water and glycerin, introduce glitter, seal the jar, and enjoy your homemade underwater scene.
Key Takeaways
- Create an ocean-inspired snow globe with a jar, water, glycerin, glitter, and small sea toys.
- Arrange the underwater figures before filling the jar for easier placement.
- Glycerin helps create a slower, more graceful glitter effect.
- Use waterproof decorations and secure them firmly before adding liquid.
- Seal the lid carefully so the finished globe can be shaken and displayed safely.
What Is an Under-the-Sea Snow Globe?
A DIY snow globe does not have to feature traditional winter scenery. This creative version replaces snow-covered trees with an underwater landscape filled with colorful marine-inspired details. Blue glitter becomes the moving “snow,” while miniature fish, turtles, starfish, shells, and other sea-themed pieces create the central scene.
The result is a small decorative display that captures the feeling of an ocean aquarium inside a clear jar. Because the concept is flexible, you can adjust the colors, decorations, and arrangement to suit a child’s favorite animals or a particular ocean theme.
One of the best things about an ocean snow globe is its visual appeal. The clear water allows the decorations to remain visible from different angles, while the glitter adds movement whenever the jar is gently shaken.
Supplies for a DIY Snow Globe
The pictured craft uses a straightforward collection of materials. You do not need a complicated crafting setup to get started.
- Clear glass jar: Choose a jar with a secure screw-top lid and enough room for your decorations.
- Water: This provides the liquid environment for the glitter and underwater scene.
- Glycerin: A small amount can help slow the movement of glitter through the water.
- Glitter: Blue or ocean-inspired glitter works especially well for an underwater effect.
- Small sea toys: Tiny fish, turtles, starfish, shells, or similar waterproof decorations can form the scene.
- Suitable adhesive: Use a waterproof adhesive appropriate for the materials you are attaching.
Keep the decorations small enough to fit comfortably inside the jar without crowding the scene. A few well-positioned pieces often create a more attractive result than filling every available space.
Choosing the Right Jar
A clear jar with a relatively wide opening is convenient because it makes it easier to arrange the sea creatures. A sturdy screw-top lid is also helpful when you need to seal the finished project.
Before beginning, wash and dry the jar thoroughly. A clean interior gives the water a clearer appearance and makes the glitter and decorations stand out.
How to Make an Under-the-Sea Snow Globe
The process can be broken into a few manageable stages. Take your time with the decoration placement and sealing steps because these details have the biggest impact on the finished globe.
1. Prepare the Sea-Themed Decorations
Start by selecting the small figures you want to use. The reference design uses a playful mix of colorful sea creatures and ocean details, creating the appearance of a miniature underwater environment.
Arrange the figures before applying adhesive. Try different combinations until the scene looks balanced. Consider placing larger figures toward the center or slightly toward the back, with smaller shells and starfish around them.
Think about visibility as you arrange everything. Decorations that overlap too heavily may become difficult to see once the jar is filled with water and glitter.
2. Attach the Figures to the Lid
The pictured project demonstrates placing the ocean decorations on the inside surface of the jar lid. This technique allows the figures to remain anchored rather than floating around randomly.
Apply an appropriate waterproof adhesive to the pieces and position them carefully on the lid. Allow the adhesive to cure according to its instructions before moving to the filling stage.
Important: Make sure the adhesive is fully set before the decorations come into contact with water. A strong, waterproof bond helps keep your underwater scene intact over time.
3. Add Water and Glitter
Once the decorations are secure, turn your attention to the jar. Add water while leaving enough room for the lid and decorations to fit without excessive overflow.
Next, add your chosen glitter. Blue glitter is especially effective because it reinforces the ocean theme and creates the appearance of sparkling particles moving through the water.
Start with a modest amount of glitter. It is easier to add more later than to correct a globe that has become so glittery that the sea creatures are difficult to see.
Expert Insight
The goal is balance. Glitter should add movement and sparkle without hiding the underwater decorations. A clear scene with a moderate amount of glitter usually creates a more pleasing visual effect.
4. Add Glycerin
Glycerin is one of the useful ingredients in this type of homemade snow globe. It can make the glitter move more slowly through the water, giving the particles a gentle drifting effect rather than having them fall immediately.
Add glycerin carefully and avoid overfilling the jar. The ideal amount depends on the size of the jar, the amount of water, and the effect you want to achieve.
If you are making this craft with children, an adult can handle the measuring and filling while younger crafters focus on choosing and arranging the sea decorations.
5. Seal the Snow Globe
After the liquid, glitter, and decorations are ready, carefully place the lid onto the jar. Work slowly because the decorations attached to the lid will enter the water as you close it.
Tighten the lid securely. Wipe away any excess water around the outside before testing the globe.
For a display piece, you may choose to reinforce the seal around the lid with an appropriate waterproof sealant. Follow the product instructions carefully and allow it to cure fully before handling the finished craft.
6. Shake and Enjoy
Once everything is securely sealed, gently shake or turn the jar and watch the glitter swirl around the miniature ocean scene. As the particles drift downward, the fish, turtle, shells, and starfish become part of a sparkling underwater display.
Place the finished DIY snow globe somewhere it can be appreciated from several angles. Natural light can make the water and glitter look especially bright, while a simple shelf or craft display can turn it into a cheerful decorative accent.
Easy Ways to Customize Your Ocean Snow Globe
The basic design is only a starting point. You can personalize the project by changing the miniature figures, glitter color, and overall underwater arrangement.
Choose a Favorite Sea Animal
Build the scene around one main character. A turtle, fish, dolphin, whale, or other small sea-themed figure can become the focal point. Surround it with smaller pieces to create depth.
Experiment With Ocean Colors
Blue is the natural choice for an underwater theme, but you can explore different shades to create different moods. Pale aqua can give the globe a soft coastal appearance, while deeper blue tones can create a more dramatic ocean look.
You can also combine small amounts of complementary glitter, provided the final mixture does not obscure the decorations.
Create a Mini Beach Scene
For another variation, incorporate shells and sandy-looking decorative material around the base of the scene. This can make the globe look like a tiny section of a beach beneath the water.
Keep any added materials suitable for use in water and make sure they do not cloud the liquid or interfere with the lid seal.
Tips for a Clear and Beautiful DIY Snow Globe
A successful homemade snow globe is not just about adding glitter to water. The proportions, decoration placement, and finishing details all contribute to the final appearance.
- Clean the jar first. Dust, residue, or fingerprints inside the container can reduce clarity.
- Test your arrangement. Position the sea toys before gluing them permanently.
- Keep glitter controlled. Too much can hide the miniature scene.
- Allow adhesive to cure. Rushing this stage can cause decorations to loosen.
- Leave filling space. Avoid filling the jar completely to the rim.
- Check the seal. Tighten the lid carefully and inspect it for leaks before displaying the globe.
Pro Tip: Before permanently sealing the jar, gently test how the glitter moves. If the particles fall too quickly, adjusting the liquid mixture can help create a slower, more relaxing swirl.
Why This Craft Is Great for Creative Activities
Making a DIY snow globe combines simple crafting with imaginative scene-building. Instead of simply assembling materials, crafters get to make decisions about color, composition, character placement, and movement.
The ocean theme also makes the project easy to adapt. Children can choose their favorite sea creatures, while adults can create more polished decorative versions for seasonal displays, parties, classrooms, or handmade gift projects.
Because the finished globe has a moving element, it can feel more interactive than a static craft. A gentle shake transforms the appearance of the scene as the glitter floats around the miniature ocean.
Safety and Practical Considerations
When making this craft with children, adult supervision is recommended, particularly when working with glass jars, adhesives, small decorations, and liquids. Small sea toys and glitter should be kept away from very young children who may put small objects in their mouths.
Choose a stable work surface and handle glass carefully. Make sure the completed jar is placed somewhere secure where it is unlikely to be knocked over or dropped.
If the craft is intended as a long-term decoration, periodically check the lid and seal for signs of leakage. A secure container is especially important when the globe will be handled frequently.
At a Glance
- Theme: Under-the-sea DIY snow globe
- Main materials: Jar, water, glycerin, glitter, and sea-themed toys
- Best visual effect: Sparkling blue glitter drifting around miniature ocean creatures
- Key technique: Secure decorations before filling and sealing the jar
- Customization: Change figures, colors, glitter, and underwater arrangements
Conclusion: Make Your Own Tiny Ocean World
This DIY snow globe is a charming way to turn everyday craft materials into a miniature underwater adventure. With a clear jar, sparkling glitter, water, glycerin, and a few small sea-themed decorations, you can create a colorful scene that looks beautiful when displayed and comes alive when gently shaken.
The most important part is to keep the design balanced. Choose a few eye-catching decorations, secure them carefully, use enough glitter to create movement without hiding the scene, and take your time when sealing the jar. These simple choices can make the finished project look polished and inviting.
Whether you are planning a creative afternoon with children or simply want an ocean-inspired handmade decoration, this project is easy to personalize. Try different sea creatures, colors, and arrangements to create a snow globe that feels completely your own. Once finished, give it a gentle shake and enjoy your tiny sparkling ocean world.