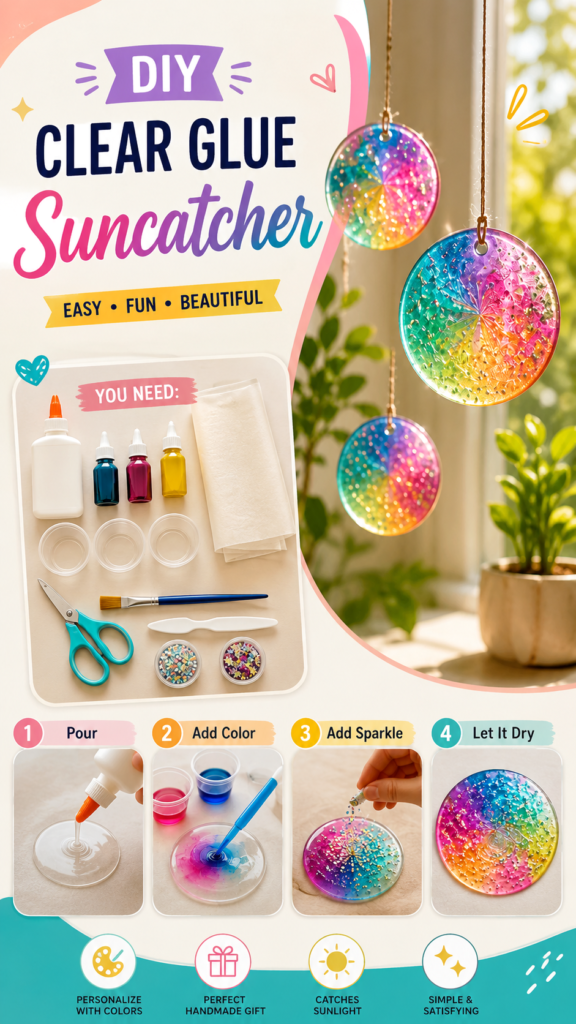
Looking for colorful DIY stuff that feels creative, simple, and genuinely fun to make? Clear glue suncatchers are a beautiful project to try when you want to turn a few basic craft supplies into eye-catching window decorations. With clear glue, colorful pigments, glitter, and decorative pieces, you can create translucent designs that glow beautifully when natural light passes through them.
This craft is especially appealing because every suncatcher can look completely different. You can experiment with bright rainbow colors, soft pastel shades, glitter combinations, or tiny decorative details to create a piece that matches your personality and space. Whether you enjoy weekend crafting, handmade home decor, or easy creative projects, this is one DIY idea worth saving.
Key Takeaways
- Clear glue creates the transparent base for a colorful suncatcher.
- Liquid color can be blended to create rainbow-inspired designs.
- Glitter and small decorative pieces add texture and sparkle.
- Simple shapes make this project easy to personalize.
- Finished pieces can brighten a sunny window with colorful reflections.
Why Clear Glue Suncatchers Make Great DIY Stuff
Some craft projects require a long shopping list, complicated tools, or advanced techniques. This idea takes a much more approachable route. The visual focus is on a clear, round shape filled with vivid colors and sparkling details. That combination makes the finished decoration look much more elaborate than the process itself.
The beauty of a clear glue suncatcher comes from its translucent appearance. Instead of creating a solid decoration that blocks light, the finished piece allows light to shine through the colorful surface. A window becomes part of the display, giving the craft a bright and lively quality.
One of the most important creative advantages is that there is no single “correct” design. Let the colors overlap, place glitter wherever you like, and experiment with different combinations. The slight variations are what make handmade suncatchers special.
What You Need for This DIY Suncatcher
The supplies shown for this project are straightforward and centered around a clear glue base. Small containers are useful for separating colors, while simple craft tools help with spreading and shaping the material. Decorative glitter or confetti-style pieces can then be added before the surface dries.
- Clear craft glue: This forms the transparent base of the suncatcher.
- Liquid colors: Use several bright shades to create a multicolor effect.
- Small clear containers: Helpful for preparing and organizing different colors.
- Glitter or decorative pieces: These add sparkle and visual interest.
- Wax or parchment-style paper: A useful surface for working with the glue.
- Small brush or spreading tool: Helps move and blend the material.
- Scissors: Useful for preparing materials and making small adjustments.
You do not need to follow the exact supply arrangement shown in the inspiration. The most important elements are a transparent base, color, and decorative sparkle. Once you understand that basic combination, you can adapt the project to the supplies you already have.
How to Make a Clear Glue Suncatcher
1. Prepare Your Work Surface
Start by protecting your workspace with a sheet of parchment or wax paper. This gives you a smooth surface on which to create the circular design and makes cleanup easier. Arrange your glue, colors, decorative pieces, and tools within easy reach before you begin.
Preparation matters with a project like this because the glue needs to be handled while it is workable. Having everything nearby lets you focus on the design instead of searching for supplies halfway through the process.
2. Create the Clear Base
Squeeze clear glue onto the prepared surface and shape it into a rounded form. The image inspiration shows a simple circular suncatcher, but you can explore other silhouettes if you prefer. A circle is an excellent starting point because it creates an attractive pendant-like shape and gives you plenty of room for colorful details.
Try to keep the shape relatively even while leaving enough room around the edges for the design to look intentional. Avoid rushing this stage. A smooth base gives the colors and decorative elements a better foundation.
3. Add Your Favorite Colors
Next comes the most playful part. Add small amounts of colored material to the clear glue and begin arranging the shades. The inspiration uses vibrant blues, pinks, purples, greens, yellows, and warm orange tones, creating a cheerful rainbow effect.
You can copy the general idea of using several bright shades without reproducing the exact arrangement. Place colors side by side, allow them to overlap slightly, or create sections of contrasting color. For a softer look, choose pastel shades instead.
Pro Tip: Start with small amounts of color. It is much easier to intensify a design gradually than to correct a surface that has become too heavily colored.
4. Blend and Shape the Colors
Use a small craft tool or brush to gently move the colors across the glue. You can create swirls, soft transitions, curved sections, or abstract patterns. There is no need to make every area perfectly uniform.
In fact, a slightly organic pattern often makes a handmade suncatcher more interesting. Let some areas remain translucent while others become more colorful. Those variations can become especially noticeable when sunlight passes through the finished piece.
5. Add Glitter and Decorative Details
Once the colors are arranged, sprinkle glitter or small decorative pieces over the surface. The inspiration image shows a mixture of bright, sparkly details that catch the eye against the translucent background.
Use decoration strategically rather than covering every part of the surface. Leaving some clear or lightly colored areas creates contrast and allows light to travel through the design.
Expert Insight
The strongest suncatcher designs usually balance three visual elements: transparency, color, and sparkle. Too much of one element can make the design feel heavy, while a thoughtful mix keeps it bright and dimensional.
6. Let the Suncatcher Dry Completely
After the design is finished, leave it undisturbed until the glue has fully dried and firmed up. Drying time can vary depending on the amount of material used and the surrounding conditions, so patience is important.
Do not rush to lift or move the piece while it is still soft. Allowing it to set properly helps the finished suncatcher retain its shape and keeps the decorative details in place.
7. Add a Hanging Point
The finished inspiration features round suncatchers hanging individually in front of a bright window. You can create a small opening near the top of the design while the material is still workable, allowing you to attach string or cord after it has dried.
Position the opening carefully so the finished decoration hangs evenly. Once secured, place your suncatcher where natural light can reach it and enjoy the colorful effect.
Creative Color Ideas for DIY Suncatchers
Color is where you can make this DIY stuff truly your own. The rainbow-inspired look shown in the design is lively and cheerful, but there are plenty of other directions to explore.
- Rainbow blend: Combine several bright colors for a playful window decoration.
- Ocean palette: Pair blue, turquoise, and purple for a cool, calming appearance.
- Sunset shades: Try pink, orange, yellow, and purple for a warm look.
- Pastel mix: Use lighter colors for a soft and delicate design.
- Two-color contrast: Choose two bold shades for a cleaner, more modern effect.
Another fun option is to create several small suncatchers, each with a different palette. Hang them together to form a colorful collection instead of relying on one large decoration.
Ways to Personalize Your Handmade Suncatcher
Personalization is one of the biggest reasons simple DIY crafts remain so enjoyable. Once you understand the basic process, you can change the size, color placement, sparkle level, and overall style.
Experiment With Shapes
Although round designs are especially effective for hanging decorations, you can explore hearts, stars, flowers, clouds, or abstract silhouettes. Keep the shapes simple so the translucent material remains the main visual feature.
Change the Sparkle
Try fine glitter for a subtle shimmer or larger decorative pieces for a more noticeable textured appearance. Combining different sizes can add depth without making the design overly complicated.
Create a Matching Collection
Instead of making one piece, create several coordinated designs. You might use the same colors in different patterns or give every suncatcher its own color combination while keeping the overall style consistent.
Where to Display Your DIY Suncatchers
A sunny window is the natural choice for this craft because the transparent, colorful surface is designed to interact with light. Hang the finished pieces where daylight can illuminate the colors and glitter.
A bedroom window, craft room, kitchen window, or bright workspace can all provide a lovely setting. You can also group multiple pieces at different heights to create a layered display.
For a particularly cheerful arrangement, combine several color palettes and vary the sizes. The result can feel like a miniature rainbow hanging in the window.
Simple Tips for Better Results
- Work on a protected, smooth surface.
- Prepare your colors and decorations before handling the glue.
- Use small amounts of color and build intensity gradually.
- Leave some transparent areas so light can pass through.
- Distribute glitter instead of concentrating it in one area.
- Allow the piece to dry thoroughly before moving it.
- Create several variations to discover your favorite style.
Remember that handmade crafts do not need to look factory-perfect. Slight swirls, uneven color transitions, and unique glitter placement can give each piece its own character. The goal is to create something colorful and enjoyable, not to make every suncatcher identical.
At a Glance
- Clear glue creates a transparent foundation.
- Bright colors bring the design to life.
- Glitter adds sparkle and texture.
- Simple shapes make personalization easy.
- Sunny windows provide an ideal display location.
Conclusion
Clear glue suncatchers are a wonderful example of how simple DIY stuff can become beautiful handmade decor. With a transparent base, a few colorful shades, and plenty of room for creativity, you can create bright pieces that feel personal and playful.
The rainbow-inspired look is only a starting point. Experiment with different colors, shapes, glitter combinations, and arrangements to create a style that feels completely yours. Make one for a sunny window, create several as a colorful collection, or turn the project into a relaxing afternoon of creative crafting.
The best part is the freedom to experiment. Start with a simple design, enjoy the process, and let your own color combinations transform an everyday craft project into something worth displaying.
Tags
DIY Stuff Suncatcher Craft Clear Glue Crafts DIY Home Decor Easy Crafts Rainbow Crafts Window Decor Handmade Crafts