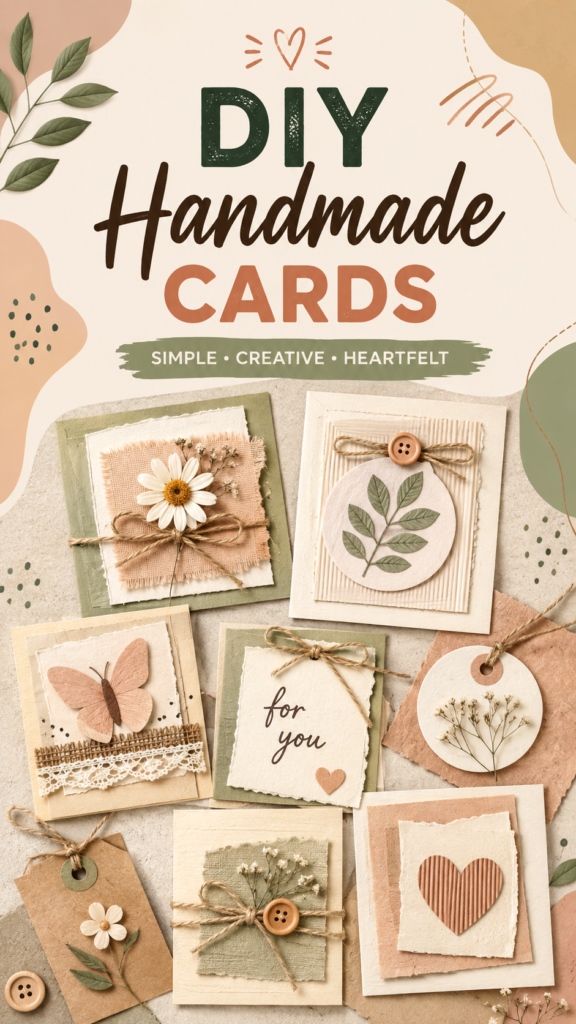
DIY stationery is a wonderful way to turn simple paper, fabric scraps, twine, buttons, lace, and natural details into something personal and beautiful. A handmade card does not need complicated tools or expensive supplies to feel special. With a few thoughtful layers and creative touches, ordinary materials can become charming stationery for birthdays, thank-you notes, gifts, celebrations, and everyday messages.
The cozy stationery style shown here combines neutral paper tones with soft sage, warm beige, dusty peach, natural twine, delicate flowers, butterflies, leaves, buttons, and textured paper. The result feels handmade, relaxed, and timeless. If you love paper crafts or want to make your own stationery at home, this aesthetic offers plenty of easy inspiration.
Key Takeaways
- Layer different paper textures to create depth and personality.
- Use twine, buttons, lace, and dried flowers for simple handmade details.
- Choose a coordinated palette of cream, kraft, sage, and soft peach.
- Mix cards, gift tags, envelopes, and small paper pieces for a complete stationery collection.
- Keep decorations balanced so the message remains easy to read.
Why DIY Stationery Is So Special
Store-bought stationery can be beautiful, but handmade paper goods have a different kind of charm. Every small detail reflects the person who created it. A slightly uneven torn-paper edge, a tied piece of twine, or a tiny button can make a card feel more thoughtful than something produced in large quantities.
DIY stationery also gives you freedom to experiment. You can make a card as simple or decorative as you like. A small gift tag might need only a piece of kraft paper and a pressed flower, while a greeting card can include several layers of paper, fabric, ribbon, and decorative elements.
Important: The beauty of handmade stationery comes from thoughtful details rather than perfection. Slightly irregular textures, torn edges, and natural materials can make your finished pieces feel warmer and more authentic.
Choose a Soft, Coordinated Color Palette
Color is one of the easiest ways to create a polished DIY stationery collection. The warm neutral palette used for this style works especially well because it feels calm and versatile. Cream and ivory create a clean foundation, kraft brown adds a natural craft feel, while muted sage green and dusty peach provide gentle contrast.
You do not need dozens of colors. In fact, limiting your palette can make handmade cards look more intentional. Try selecting three or four main shades and repeating them across your cards, tags, envelopes, and decorative pieces.
- Cream and ivory: Great for card bases and backgrounds.
- Kraft brown: Adds warmth and a rustic paper-craft feeling.
- Sage green: Works beautifully with botanical details.
- Soft peach: Adds a gentle feminine accent without becoming overpowering.
Create Contrast With Texture
Even when the colors are subtle, texture keeps the design interesting. Combine smooth cardstock with handmade-looking paper, corrugated paper, fabric scraps, lace, burlap, or lightly textured materials. The contrast between surfaces makes a simple composition feel much richer.
Try placing a smaller textured paper panel on top of a larger cardstock base. Add another torn layer beneath it, then finish with one decorative focal point. This simple formula can create an elegant handmade card without requiring advanced crafting skills.
Essential Materials for Handmade Stationery
You can build a useful DIY stationery supply collection gradually. Start with basic paper and a few decorative materials instead of purchasing everything at once. Many of the most attractive details can come from leftover craft supplies.
- Blank cardstock or sturdy paper
- Kraft paper and cream-colored paper
- Textured or handmade-style paper
- Scrap fabric and lace
- Natural twine or thin ribbon
- Wooden or decorative buttons
- Paper flowers and leaf shapes
- Dried flowers or small botanical pieces
- Scissors and a paper trimmer
- Glue or double-sided adhesive
- Pens, markers, or lettering tools
- Decorative punches or simple craft templates
Easy DIY Card Ideas to Try
Once your materials are ready, you can start creating different stationery designs using the same basic components. The key is to change the focal detail while keeping your colors and textures consistent.
1. Floral Handmade Card
Start with a cream card base and add a slightly smaller piece of textured paper. Place a fabric or burlap square in the center, then attach a paper flower, dried flower, or botanical decoration. Finish with natural twine tied into a small bow.
This design works beautifully for birthdays, thank-you notes, spring greetings, or simply sending a thoughtful message to someone. Keep the flower as the main focal point and avoid adding too many competing decorations.
2. Butterfly Paper Card
A layered butterfly makes an easy decorative centerpiece. Cut two butterfly shapes from different shades of paper and layer them slightly so the wings have dimension. Add a strip of lace or textured fabric near the bottom of the card for another visual layer.
A small butterfly design can also be adapted into gift tags, envelopes, scrapbook pages, or mini note cards. Try using the same butterfly shape in several sizes to create a coordinated collection.
3. Simple “For You” Note Card
Minimal stationery can be just as attractive as heavily decorated cards. Use a small piece of torn cream paper as the message area and write a short phrase such as “for you.” Attach it to a muted green or kraft paper base and finish the top with a small twine bow.
This approach is especially useful when you want versatile stationery. The same design can work for gifts, flowers, packages, handwritten notes, or small surprises.
4. Botanical Gift Tag
Gift tags are another easy DIY stationery project. Cut a tag from kraft cardstock, punch a hole near the top, and thread it with twine. Add a small paper leaf, flower, or dried botanical accent. A handwritten message gives the tag a personal finishing touch.
For a coordinated look, use the same paper and botanical elements on your greeting cards. This makes individual pieces feel like part of one handmade stationery set.
Expert Insight
Choose one main focal point for each card. A large flower, butterfly, heart, botanical motif, or layered paper shape can immediately attract attention. Supporting details such as twine, buttons, and lace should enhance that focal point rather than compete with it.
How to Make Layered Paper Crafts Look Polished
Layering is a major part of the handmade stationery aesthetic. Instead of placing every decoration directly onto the card base, build the design from large elements to small ones. Begin with the card itself, then add a larger paper panel, followed by a smaller textured piece.
Once the main layers are positioned, add one focal decoration. Finally, use small accents such as twine, buttons, tiny flowers, or leaves. This creates visual hierarchy and prevents the finished card from feeling cluttered.
Pro Tip: Leave some breathing room around your focal element. Empty space is part of the design and helps handmade details stand out. If every area is decorated, the card can quickly lose its clean, modern appearance.
Add Natural Details for a Cozy Handmade Look
Natural materials are particularly effective for DIY stationery because they bring warmth and visual character. Twine creates an organic line across a card, while wood-style buttons add a tactile accent. Dried flowers and botanical shapes introduce delicate details without requiring bright colors.
Lace can also be used sparingly as a decorative border. Attach a narrow strip across the bottom of a card or beneath a paper layer. If the lace is detailed, keep the rest of the design relatively simple so the pattern remains visible.
Use Recycled Paper Scraps
DIY stationery is a great opportunity to use leftover materials. Save interesting paper scraps from previous craft projects and organize them by color and texture. Small pieces are perfect for layered cards, mini tags, decorative corners, and paper embellishments.
Uneven edges can actually enhance the handmade appearance. Rather than trying to make every piece perfectly symmetrical, embrace natural torn edges and slightly varied shapes when they suit the design.
Make a Matching Stationery Set
Instead of making just one card, consider creating a small collection. A coordinated set might include greeting cards, gift tags, mini note cards, envelopes, and decorative paper pieces. Use the same palette throughout while changing the main motif on each item.
For example, one card could feature a flower, another could use a butterfly, and a gift tag could showcase a leafy branch. Repeating cream paper, sage accents, kraft details, and natural twine will visually connect everything.
This is also a practical approach if you enjoy sending handwritten notes. Once several pieces are finished, you have a ready supply of personalized stationery for different occasions.
Creative Ways to Personalize DIY Stationery
The simplest personalization can make a handmade card feel meaningful. Add the recipient’s initials, write a short message by hand, or choose a decorative motif that matches their personality. A favorite flower, color combination, or simple shape can become a recurring theme.
You can also vary the wording. Try short phrases such as “thank you,” “for you,” “thinking of you,” or a handwritten birthday greeting. Keep lettering simple and readable, especially when the decorative layers are already visually rich.
For an extra personal touch, create a small handmade envelope to match the card. Use coordinating paper and a simple closure, such as a paper tab, sticker, or twine detail. The combination makes even a small note feel like a carefully prepared gift.
Tips for Beginner Paper Crafters
If you are new to DIY stationery, start with one simple design rather than trying to recreate an elaborate arrangement. Practice layering paper first, then experiment with decorative materials once you feel comfortable with the basic composition.
- Choose a simple card base and two or three coordinating papers.
- Arrange your layers before applying adhesive.
- Select one focal decoration.
- Add one or two supporting details such as twine or a button.
- Write your message after the main design is finished.
- Allow adhesives to dry fully before storing or packaging the card.
Most importantly, do not worry about making every card identical. Handmade stationery is appealing because it has character. Small variations can make a collection feel more personal and creative.
At a Glance
- Build designs with cream, kraft, sage, and soft peach tones.
- Layer paper, fabric, lace, and textured materials for depth.
- Use one strong focal element on each card.
- Finish with small handmade accents such as twine, buttons, or flowers.
- Create matching cards and gift tags for a cohesive stationery set.
Conclusion
DIY stationery is all about transforming simple materials into thoughtful paper goods with personality. You do not need complicated techniques or a large craft room to get started. A few sheets of textured paper, some twine, a button, a little lace, and a handful of botanical-inspired details can create beautiful handmade cards and tags.
The soft neutral aesthetic is especially easy to adapt because it works across birthdays, thank-you notes, gifts, celebrations, and everyday correspondence. Experiment with layers, textures, shapes, and handwritten messages until you find a style that feels like your own.
Whether you create one special card or an entire collection, the finished result will carry something that mass-produced stationery cannot: your personal creative touch. Gather your favorite paper scraps, choose a calming color palette, and start making stationery that is simple, useful, and genuinely heartfelt.
Tags
DIY Stationery Handmade Cards Paper Crafts DIY Cards Stationery Ideas Paper Craft Ideas Handmade Gift Tags Creative DIY Crafts