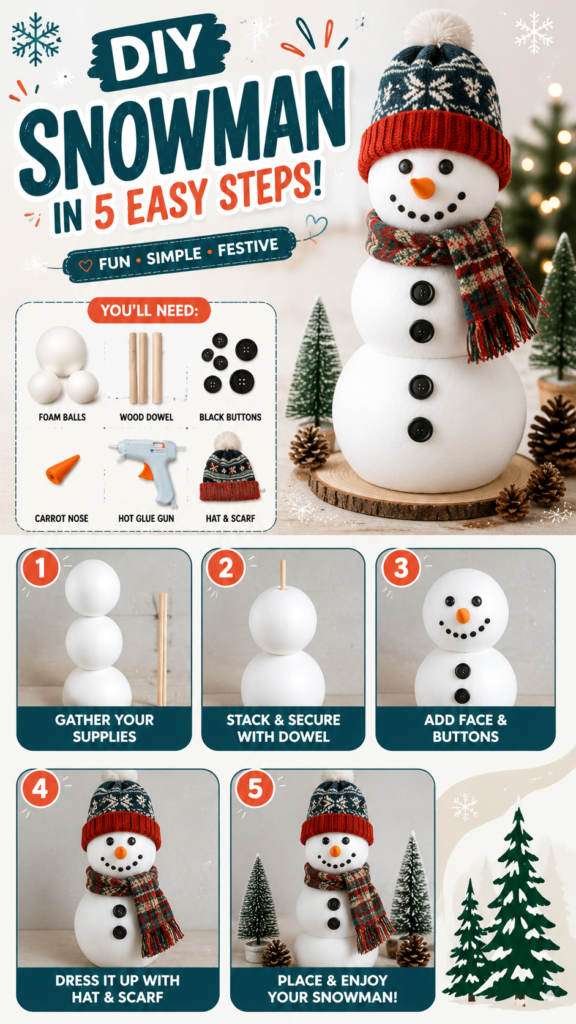
Few DIY projects capture the cozy charm of winter quite like a handmade snowman. With a few simple materials, some creative accessories, and a little imagination, you can turn plain foam balls into an adorable decoration that feels warm, festive, and completely personalized. This easy snowman craft is especially appealing because it combines simple construction with plenty of opportunities to add character through hats, scarves, buttons, and facial details.
Whether you are looking for a fun weekend project, a handmade seasonal decoration, or an easy craft to enjoy with family, this DIY snowman idea is wonderfully approachable. The finished design has a cheerful handmade look while still appearing polished enough to display on a table, mantel, entryway, or cozy winter shelf.
Key Takeaways
- A DIY snowman can be made with simple craft materials and basic tools.
- Stacked foam balls create an easy and recognizable snowman shape.
- A wooden dowel helps provide structure and stability.
- Buttons, a carrot-shaped nose, a scarf, and a hat bring personality to the design.
- The finished snowman can be customized to match different winter decorating styles.
Why DIY Snowman Crafts Are So Popular
Snowman crafts are popular because they are simple, recognizable, and endlessly customizable. You do not need advanced crafting skills to create something charming. The basic shape is easy to understand, and the decorative possibilities are almost unlimited.
A snowman can be playful, rustic, elegant, colorful, minimalist, or whimsical depending on the materials you choose. That flexibility makes DIY snowman crafts suitable for many types of homes and creative preferences. A neutral white snowman can fit beautifully into modern decor, while a patterned scarf and knitted hat can create a warm, traditional winter look.
The appeal also comes from the process itself. Building a snowman craft step by step feels satisfying because the project transforms quickly. What begins as a few plain round forms gradually develops into a recognizable character with a face, clothing, and personality.
A Beginner-Friendly Winter Craft
One of the best things about this project is that it does not require complicated techniques. The main construction involves arranging three round foam pieces, securing them together, and adding decorative details.
For beginners, this makes the project an excellent introduction to three-dimensional crafting. You can focus on placement, proportion, and decoration without worrying about difficult cutting patterns or advanced tools.
Important Tip: The charm of a handmade snowman often comes from small imperfections. Do not worry if every feature is not perfectly symmetrical. Slight variations can make the finished character feel more friendly and unique.
Materials for an Easy DIY Snowman
The materials shown for this type of project are simple and easy to adapt. The exact size of each item can vary depending on how large you want your finished snowman to be.
- Three foam balls in graduated sizes for the head and body
- Wooden dowel for added support and alignment
- Hot glue gun and suitable glue sticks
- Black buttons for facial features and body details
- Small orange cone or shaped piece for the carrot-style nose
- Warm winter hat or a miniature knit cap
- Small scarf made from fabric or another soft textile
You can also add optional materials such as felt, fabric scraps, pom-poms, miniature decorations, paint, ribbon, or small wooden accessories. These extra details are not necessary, but they can help you create a snowman that feels more personal.
Choosing the Right Foam Ball Sizes
The classic snowman silhouette works best when the bottom section is the largest, the middle section is slightly smaller, and the head is the smallest. This creates a balanced shape that is instantly recognizable.
Before gluing anything together, place the foam balls on a flat surface and test the proportions. A small adjustment at this stage can make a big difference in the final appearance.
Keep the Base Stable
If your bottom foam ball rolls easily, consider placing the finished snowman on a decorative wood slice, tray, or other stable display surface. This can make the decoration easier to position while also giving it a finished, intentional appearance.
How to Make a Snowman Craft Step by Step
The beauty of this DIY snowman project is its simple progression. Each stage builds on the previous one, allowing the character to gradually come to life.
Step 1: Arrange Your Supplies
Start by gathering all of your materials in one workspace. Lay out the foam balls, dowel, buttons, glue gun, nose piece, hat, and scarf so you can see how everything will work together.
This is also a good time to test your color palette. Place the scarf and hat near the foam balls and check whether the colors complement each other. Coordinating accessories can give even a simple craft a more polished look.
Step 2: Stack and Secure the Snowman Body
Arrange the three foam balls from largest to smallest. The largest ball becomes the base, the medium ball forms the middle section, and the smallest ball becomes the head.
A wooden dowel can be inserted through the center to help keep the pieces aligned. Once the structure is positioned correctly, use hot glue where needed to reinforce the connection points.
Work carefully and allow the adhesive to set before moving to the next stage. A stable body makes decorating much easier later.
Expert Insight
Building the structure before decorating helps prevent alignment problems. Take a moment to view the snowman from the front and sides before the glue fully sets so you can make small adjustments early.
Step 3: Create a Friendly Snowman Face
The face is where your DIY snowman begins to develop its personality. Two dark buttons can be used for eyes, while smaller buttons can form a curved smile.
Place the facial features before gluing them permanently. This gives you a chance to experiment with the expression. Moving the eyes slightly farther apart or changing the curve of the smile can completely change the character’s appearance.
Add the orange carrot-style nose in the center of the face. Keep the placement simple and balanced so the expression remains easy to read from a distance.
Create Expression With Placement
You do not need complicated sculpting to make the snowman expressive. The spacing of the eyes, nose, and smile can create a cheerful, curious, playful, or classic look. Try arranging the pieces first without glue until you find an expression you like.
Step 4: Add Buttons and Winter Accessories
Once the face is complete, add larger buttons to the body. Two or three buttons placed vertically down the front create the familiar snowman appearance.
Next comes one of the most enjoyable parts of the project: dressing your snowman. A patterned scarf can be wrapped around the neck, while a cozy knit hat adds height, texture, and color.
Choose accessories that feel proportional to the foam body. Oversized pieces can create a playful style, while smaller accessories can give the decoration a more delicate appearance.
Pro Tip: Use the scarf to hide the connection between the head and body. This simple detail makes the structure look more finished while adding softness and texture.
Step 5: Style and Display Your Finished Snowman
The final step is finding the perfect place to display your handmade snowman. A finished piece can look beautiful surrounded by greenery, pinecones, warm lights, small trees, or other seasonal accents.
Try creating a small winter scene rather than displaying the snowman alone. Natural textures such as wood and greenery work especially well with the soft white surface of the foam.
A pair of snowmen in different sizes can also create an appealing decorative arrangement. You might make one larger centerpiece and one smaller companion using similar colors and accessories.
Creative Ways to Customize Your DIY Snowman
One of the biggest advantages of making your own snowman decoration is the freedom to customize every detail. A few changes in color or texture can create a completely different style.
Try Different Color Themes
Traditional winter colors such as red, green, white, and dark blue create a cozy seasonal look. For a softer design, consider neutral accessories in beige, cream, gray, or muted blue.
A modern snowman can also use a simple monochromatic palette with black buttons and a textured neutral scarf. The clean contrast keeps the design stylish while allowing the snowman shape to remain the main focus.
Experiment With Textures
Texture can make a simple craft feel much more interesting. Knitted fabrics, woven scarves, wooden bases, smooth buttons, and natural greenery all add visual variety.
When selecting materials, try combining soft and structured surfaces. A soft scarf paired with round foam shapes and glossy buttons creates an attractive mix without making the design feel too busy.
Make a Snowman Family
Instead of stopping at one decoration, create several snowmen in different sizes. Give each one a different hat, scarf, or facial expression.
A snowman family display can become a charming centerpiece for a shelf, tabletop, or entryway. Using a consistent color palette helps the group feel coordinated even when each character has unique details.
Where to Display Handmade Snowman Decorations
A DIY snowman is versatile enough to work in many parts of the home. Because the design is lightweight, it can easily be moved and restyled throughout the winter season.
- Entryway: Welcome guests with a cheerful handmade decoration.
- Living room: Place the snowman on a mantel, shelf, or side table.
- Dining area: Use a smaller version as part of a seasonal centerpiece.
- Covered porch: Create a cozy winter display with greenery and natural textures.
- Craft room: Keep your creation visible as inspiration for future projects.
Consider the scale of the space when deciding where to place your snowman. A large piece can become a focal point, while a smaller design works well as an accent among other decorations.
Tips for Making Your Snowman Craft Look Polished
A few thoughtful details can help transform a basic craft into a display-worthy decoration.
Check Proportions Before Gluing
Always test the arrangement first. Look at the snowman from several angles and make sure the head and body sections feel balanced.
Keep the Face Simple
Too many facial details can make a small craft look cluttered. A few carefully placed features are often more effective than an overly complicated design.
Use Accessories as Focal Points
A colorful scarf or textured hat can become the visual highlight of the project. Let one or two accessories stand out rather than competing with too many different patterns.
Create a Finished Display
Even a beautiful craft can look unfinished if it is placed randomly. A simple base, a few natural accents, or a coordinated backdrop can help the final project feel intentional and complete.
Why This Matters
- Simple materials can create a high-impact handmade decoration.
- Personal accessories make each snowman feel unique.
- A coordinated display helps the finished craft look more polished.
Why This DIY Project Is Perfect for Winter Crafting
Winter crafting is often about creating warmth, personality, and visual comfort during the colder months. A handmade snowman checks all of those boxes. The project is playful enough to feel fun but attractive enough to become part of your seasonal decor.
It is also easy to adapt based on the materials you already have. Old fabric scraps can become scarves, spare buttons can become facial features, and simple decorative pieces can be reused in creative ways.
Creative Takeaway: The best DIY snowman crafts do not need expensive supplies. Focus on a strong basic shape, a friendly expression, and a few textured accessories. Those simple elements can create a decoration with plenty of personality.
At a Glance
- Start with three graduated foam balls.
- Secure the shape before adding decorations.
- Use buttons and a simple orange nose for a classic face.
- Add a hat and scarf for color and texture.
- Display the finished snowman with complementary winter accents.
Final Thoughts on Making a DIY Snowman
A handmade snowman is proof that a simple idea can become something truly charming with the right finishing touches. Starting with basic round forms and gradually adding a face, buttons, scarf, and hat creates a project that is easy to understand and enjoyable to personalize.
The best part is that there is no single correct way to make one. You can experiment with different sizes, colors, fabrics, expressions, and display arrangements until you create a snowman that matches your own style.
Whether you are crafting alone, planning a creative afternoon with family, or looking for a new winter decoration idea, this DIY snowman project offers a fun balance of simplicity and creativity. Gather a few supplies, build your snowy character step by step, and enjoy turning ordinary craft materials into a cheerful handmade decoration that can brighten your space all season long.
Tags
DIY Snowman Snowman Crafts Winter Crafts DIY Winter Decor Foam Ball Crafts Handmade Decorations Easy DIY Projects