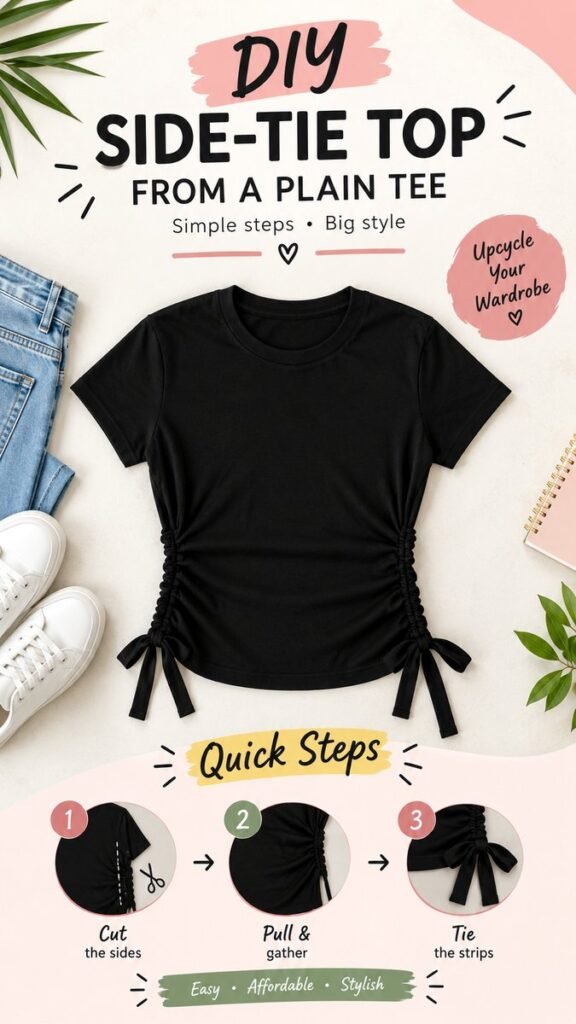
Transforming a plain T-shirt into something stylish does not always require a sewing machine, expensive fabric, or a complicated pattern. One of the easiest ways to refresh a basic tee is with creative shirt cutouts and side-tie details. This DIY fashion technique turns an ordinary oversized or fitted T-shirt into a custom top with gathered sides, adjustable ties, and a more flattering silhouette.
The look is especially popular because it combines comfort with personalization. A simple black T-shirt can become a trendy ruched side-tie top with just a few careful cuts and knots. Whether you are updating an old shirt, experimenting with upcycled clothing, or looking for an affordable fashion project, DIY shirt cutouts offer plenty of creative possibilities.
Key Takeaways
- DIY shirt cutouts can transform a plain T-shirt into a personalized fashion piece.
- Side-tie designs create adjustable ruching and a more fitted appearance.
- A ruler, fabric scissors, and a washable marking tool can help create cleaner results.
- Even beginners can experiment with simple strips, knots, and gathered details.
- Upcycling old clothing is a creative way to refresh your wardrobe without buying something new.
Why DIY Shirt Cutouts Are Such a Popular Fashion Idea
DIY clothing projects have become a favorite creative outlet because they allow people to make fashion feel more personal. Instead of wearing a basic T-shirt exactly as it came from the store, a few strategic changes can create an entirely different look. Shirt cutouts are especially appealing because the finished design can range from subtle to bold.
A side-tie top is a great example. The shirt remains comfortable and casual, but the gathered fabric along the sides creates shape and texture. The dangling ties also add movement and visual interest. This makes the design feel intentional rather than simply altered.
Another reason this style works so well is versatility. A DIY cutout shirt can be worn with jeans, shorts, skirts, leggings, or layered over another top. The final look depends on how much fabric is gathered, where the cuts are placed, and how tightly the side strips are tied.
The biggest advantage of DIY shirt cutouts is customization. You control the fit, the amount of gathering, the placement of the details, and the overall style. Two people can begin with similar T-shirts and create completely different finished designs.
The Side-Tie Shirt Trend: Simple Details, Big Style
Side-tie shirts use narrow strips of fabric to gather and secure the sides of a top. The result is often a ruched or scrunched effect that gives a loose shirt a more defined shape. This technique works particularly well on soft knit T-shirts because the material has enough flexibility to gather naturally.
The design shown by this style of project focuses on both sides of the shirt. Matching gathered sections create balance and make the finished top look polished. The ties at the bottom can be left long for a playful appearance or trimmed shorter for a cleaner finish.
What Makes a Side-Tie Top Different?
Unlike a traditional fitted shirt, a side-tie design offers flexibility. You can adjust the tightness of the ties depending on the look you want. Pulling the strips tighter creates more gathering and can shorten the shirt slightly. Loosening them creates a softer, more relaxed shape.
This adjustability is one reason the technique is useful for upcycling. If you have a T-shirt that feels too wide or boxy, side gathering can change the proportions without requiring advanced tailoring skills.
- Loose fit: Tie the strips gently and allow the shirt to drape naturally.
- Ruched fit: Pull the side sections tighter to create more visible gathering.
- Cropped effect: Gather the fabric higher along the sides for a shorter silhouette.
- Asymmetrical style: Adjust one side differently for a more experimental look.
How to Turn a Plain Tee Into a DIY Side-Tie Top
The basic process behind this type of DIY fashion project is surprisingly straightforward. The main idea is to create evenly spaced fabric strips along the sides of the T-shirt and then use those strips to pull and secure the fabric.
Choose the Right T-Shirt First
Start with a shirt that gives you enough fabric to work with. A slightly loose T-shirt is often easier to transform because gathering the sides will naturally bring the material inward. Cotton and cotton-blend tees are popular choices because they are soft, comfortable, and generally easy to cut.
Before making any changes, wash and dry the shirt if you plan to keep the finished piece for regular wear. This can help you avoid unexpected shrinkage after the design is complete.
Gather Your Basic DIY Tools
You do not need a large collection of supplies for a simple shirt cutout project. A few basic tools can make the process much easier.
- Sharp fabric scissors
- A ruler or measuring tape
- Washable fabric chalk or a removable marking tool
- A flat work surface
- The T-shirt you want to transform
Fabric scissors are particularly useful because dull scissors can stretch or snag knit material. If you are experimenting with an older shirt for the first time, practicing on a small hidden area can help you understand how the fabric reacts when cut.
Step 1: Plan the Side Cutouts
Lay the T-shirt flat and smooth out wrinkles. Decide where you want the side-tie section to begin and end. For a balanced design, the same general area should be marked on both sides of the shirt.
Take your time with this stage. Even spacing can make a DIY project look much more intentional. You do not need to create an exact factory-perfect pattern, but planning before cutting reduces the chance of removing too much fabric.
Step 2: Cut the Side Strips
Once the placement is marked, carefully cut narrow strips into the side area. The strips should remain attached to the shirt rather than being completely removed. These connected strips will later become the material used to create the gathered effect.
Work slowly and cut one section at a time. It is easier to make a strip slightly wider or refine the design later than it is to replace fabric that has already been cut away.
Pro Tip: Start with smaller cuts than you think you need. Knit T-shirt fabric can stretch when pulled, so narrow strips may become longer and more flexible once you begin tying and gathering the sides.
Step 3: Pull and Gather the Fabric
After the strips are created, gently pull them to encourage the fabric edges to roll naturally. Then begin gathering the shirt along the side. This is the step that creates the ruched appearance and transforms the silhouette of the top.
The amount of gathering is entirely up to you. A small amount creates subtle shaping, while tighter gathering produces a more dramatic fashion statement. Check both sides as you work so the overall design remains balanced.
Step 4: Tie the Strips Into Place
Once you are happy with the gathered shape, tie the strips securely. Depending on the design, you can use simple knots, small bows, or layered ties. Bows add a softer decorative detail, while tighter knots create a cleaner, more minimal appearance.
Try the shirt on before trimming anything. This allows you to adjust the gathering and determine whether the ties are comfortable. The beauty of a tied design is that you can often loosen or tighten it without permanently changing the shirt again.
Expert Insight
The most successful DIY clothing projects usually focus on proportion. Keep the side details in harmony with the shirt’s overall shape. Small, evenly planned changes can often look more polished than adding too many cutouts at once.
Creative DIY Shirt Cutout Ideas to Try
Once you understand the basic side-tie technique, there are many ways to adapt it. A plain T-shirt can become the starting point for different fashion ideas depending on your personal style.
Ruched Side Details
This is one of the most wearable options. Gather the sides evenly and secure them with matching ties. The result is flattering, simple, and easy to pair with everyday outfits.
Long Decorative Ties
Leave the fabric strips longer and tie them into visible bows near the hem. This creates a playful detail that makes the shirt look more customized and expressive.
Adjustable Crop Style
By gathering the sides more tightly, a longer T-shirt can take on a cropped appearance. This is useful when you want flexibility because the fit can often be adjusted through the ties.
Multiple Cutout Rows
For a more detailed DIY fashion project, experiment with multiple small rows of cuts. Keep the design organized and avoid cutting too close together, especially if the fabric is thin. Testing the structure as you work can help prevent overstretching.
How to Keep DIY Shirt Cutouts Looking Neat
The difference between a quick craft project and a polished handmade top often comes down to preparation. A few simple habits can help your DIY shirt look cleaner and last longer.
Measure Before Cutting
Perfect measurements are not always necessary, but rough guidelines help maintain symmetry. If you are creating matching details on both sides, use a ruler or measuring tape to compare placement before making each cut.
Keep the Shirt Flat
Cutting fabric while it is bunched or stretched can create uneven lines. Work on a clean, flat surface and smooth the shirt frequently as you move through each step.
Avoid Overstretching the Material
It can be tempting to pull hard on the strips to create dramatic gathering. However, excessive stretching may distort the shape of lightweight fabric. Pull gradually and check how the shirt looks after each adjustment.
Check the Fit Before Making Final Changes
Try the shirt on during the process whenever possible. The way a garment looks flat on a table can be very different from the way it sits on the body. Checking the fit early gives you more control over the final result.
A practical rule for DIY fashion: you can always cut more, but you cannot easily put fabric back. Make small adjustments in stages and allow the design to develop gradually.
Why Upcycling Old T-Shirts Is Worth Trying
DIY shirt cutouts are about more than following a fashion trend. They also offer a creative way to look at clothing differently. An old T-shirt that feels boring, oversized, or outdated may still have plenty of potential.
Upcycling encourages experimentation. Instead of throwing away a shirt you no longer wear, you can explore new cuts, shapes, and details. A simple alteration can turn an overlooked piece into something that feels new again.
This approach can also help you develop confidence with clothing customization. You do not have to begin with complicated sewing patterns. Projects involving simple cuts and ties allow beginners to experiment while learning how fabric behaves.
How to Style a DIY Side-Tie Shirt
One of the best things about a customized side-tie top is how easily it fits into different outfits. The black T-shirt style is particularly versatile because it can work with casual basics or more polished accessories.
- With jeans: Pair the top with straight-leg, skinny, or relaxed denim for an easy everyday outfit.
- With shorts: A ruched side-tie shirt works well with denim shorts during warmer weather.
- With a skirt: Balance the casual T-shirt fabric with a flowing or fitted skirt.
- With leggings: Create a comfortable look while letting the gathered side details add shape.
- Layered under a jacket: Let the custom side ties add texture beneath a casual outer layer.
Accessories can also change the mood of the outfit. Minimal jewelry keeps the look clean, while colorful shoes or a statement bag can make the customized shirt feel more playful.
Common Mistakes to Avoid When Making Shirt Cutouts
DIY clothing projects are meant to be creative, but avoiding a few common mistakes can save you from frustration.
Cutting Too Much Too Quickly
Large cuts may dramatically change the structure of the shirt. Begin conservatively and increase the size only after checking the result.
Skipping the Planning Stage
Random cuts can work for intentionally distressed designs, but structured side-tie projects benefit from basic planning and even placement.
Using Dull Scissors
Dull blades can pull at knit fabric and make precise cutting more difficult. Clean, sharp scissors improve control and help create smoother edges.
Forgetting to Test the Fit
A shirt may feel tighter after gathering the sides. Trying it on before finalizing the ties helps you make adjustments while you still have flexibility.
Making Your DIY Fashion Project Feel Personal
The best DIY shirt ideas do not have to look exactly like anyone else’s. Use the basic technique as inspiration and adapt it to your own preferences. You might prefer subtle gathering, dramatic bows, shorter ties, or an oversized fit.
Consider the T-shirt itself when planning your design. Dark colors create a sleek, minimal appearance, while bright colors and printed shirts can make cutouts feel more playful. The texture and thickness of the fabric may also influence how the finished design drapes.
Personalization is what makes upcycled fashion exciting. A handmade shirt can reflect your style while giving an ordinary wardrobe staple a second life.
Quick Points
- Start with a plain T-shirt that has enough room for gathering.
- Plan side cuts before using scissors.
- Create gradual adjustments instead of removing too much fabric at once.
- Use the ties to customize the amount of ruching and fit.
- Experiment with the finished look until the design feels uniquely yours.
Final Thoughts on DIY Shirt Cutouts and Side-Tie Tops
DIY shirt cutouts are a simple but creative way to transform a basic T-shirt into something more stylish and personal. The side-tie technique is especially appealing because it adds texture, shape, and adjustability without requiring complicated construction.
With careful planning, a few basic tools, and a willingness to experiment, an ordinary tee can become a ruched side-tie top that feels completely different from the original garment. Start slowly, make thoughtful cuts, and remember that small details can have a major impact on the finished look.
Whether you are exploring DIY fashion for the first time or searching for fresh upcycled clothing ideas, this project is a great reminder that creativity can begin with something as simple as a plain shirt. Give an old favorite a new purpose, experiment with different tie styles, and create a custom piece that fits your wardrobe and your personality.
Tags
DIY Shirt Cutouts DIY Fashion Side Tie Top T-Shirt DIY Upcycled Clothing Clothing Hacks Ruched Top Fashion Crafts