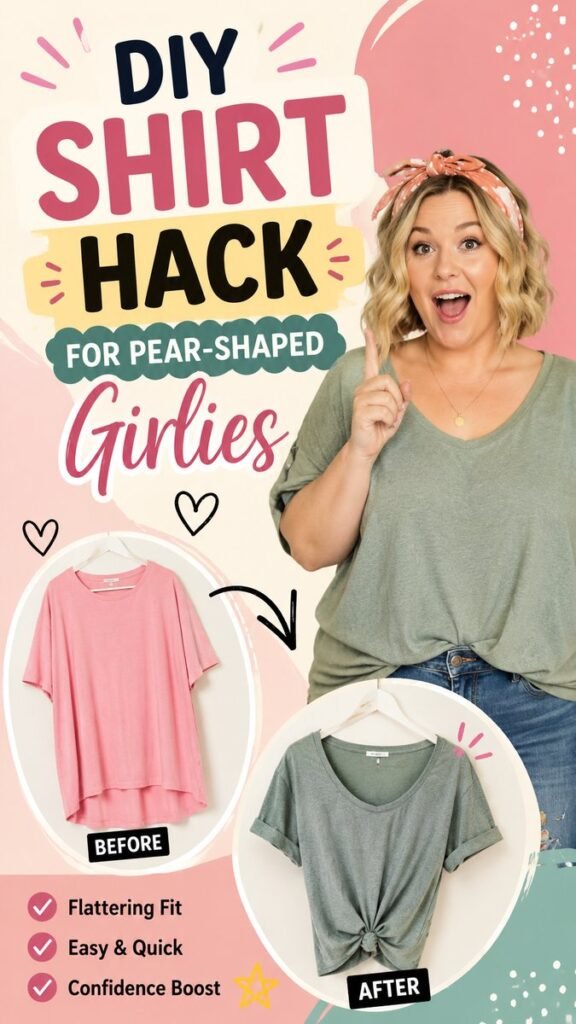
Giving an ordinary T-shirt a fresh shape does not have to require advanced sewing skills or an entirely new wardrobe. A simple DIY shirt hack can turn a basic top into something more flattering, personalized, and fun to wear. With a few easy adjustments, an oversized or relaxed-fit shirt can take on a more defined silhouette while keeping the casual comfort that makes T-shirts so popular.
This DIY shirt idea is especially useful for anyone who enjoys experimenting with clothing proportions. The featured transformation shows how a loose pink T-shirt can be reworked into a more shaped style, with a simple front detail and rolled sleeves creating a noticeably different look. It is an approachable example of how small styling changes can make a familiar garment feel completely new.
Key Takeaways
- A basic T-shirt can be transformed with simple styling and fit adjustments.
- Knotted or gathered details can create more definition through the waist area.
- Rolled sleeves can make an oversized shirt look cleaner and more intentional.
- Choosing the right starting shirt makes DIY transformations easier.
- Small changes can help balance proportions without sacrificing comfort.
- Upcycling existing clothes is an easy way to experiment with personal style.
Why DIY Shirt Hacks Are So Useful
T-shirts are one of the easiest pieces to customize because their simple construction leaves plenty of room for experimentation. A relaxed shirt can be tucked, tied, gathered, cropped, layered, or reshaped depending on the look you want. You do not necessarily need a sewing machine or complicated pattern to make a visible difference.
A DIY shirt hack is also a practical solution when a favorite top feels too loose or lacks the shape you prefer. Instead of putting the shirt aside, you can experiment with its proportions and discover a silhouette that works better for your everyday outfits.
One of the biggest advantages is reversibility. If you are using a simple knot, tuck, or fold rather than cutting the fabric, you can change the shirt again whenever you want. That makes these techniques particularly appealing for beginners who are not ready to permanently alter their clothes.
The Shirt Transformation at a Glance
The visual inspiration centers on a relaxed pink graphic T-shirt. In its original form, the shirt hangs loosely through the body and sleeves. The transformed version has a more intentional shape, with the fabric gathered toward the lower front and the sleeves rolled for a casual, polished finish.
The important idea is not the exact shirt or graphic. It is the styling technique. A loose shirt can be visually reshaped by controlling excess fabric instead of allowing it to hang straight from the shoulders.
This creates a useful before-and-after effect. The original shirt feels relaxed and oversized, while the adjusted version looks more structured without losing its casual character.
Start With the Right T-Shirt
The easiest shirt to transform is one with enough extra fabric to manipulate comfortably. An oversized, relaxed, or slightly loose T-shirt is generally more forgiving than a fitted top because you have additional material to gather or tuck.
Look for a shirt that already feels comfortable around the shoulders and chest. The goal is to modify the way the shirt falls through the body rather than force an uncomfortable garment into a different size.
- Choose a soft fabric that moves easily.
- Make sure the shoulder area fits comfortably.
- Use a longer shirt if you want enough fabric for a front knot or tuck.
- Test the technique on an inexpensive shirt before modifying a favorite piece.
How to Create a Simple DIY Shirt Hack
The transformation can be approached as a styling exercise rather than a complicated clothing alteration. Begin by putting on the shirt and looking at how the fabric naturally falls. This gives you a useful starting point before you begin adjusting it.
1. Smooth the Shirt Into Place
Put the T-shirt on and smooth the front and sides so the fabric is not twisted. Stand naturally rather than pulling the shirt tightly against your body. This helps you see where the extra material naturally gathers.
Check the hem as well. If the shirt is particularly long, decide whether you want to keep the full length or create a slightly shorter appearance with a tuck or knot.
2. Gather the Excess Fabric
Bring some of the excess fabric toward the front of the shirt. The amount you gather depends on how loose the original T-shirt is and how much definition you want.
A smaller gather creates a subtle adjustment, while a larger gather produces a more obvious transformation. Start conservatively. You can always tighten the detail after checking the overall shape.
3. Create a Simple Front Knot or Tuck
Once you have gathered the fabric, experiment with a small knot or secure tuck near the lower front of the shirt. The purpose is to bring some of the loose fabric together and create visual definition.
Keep the detail comfortable. It should not pull excessively across the shirt or make movement difficult. A relaxed knot often looks more natural than an extremely tight one.
4. Adjust the Sleeves
Rolling the sleeves is another simple way to change the proportions of a loose T-shirt. A single clean roll can make the sleeves look shorter and more deliberate. You can also experiment with a slightly wider roll for a stronger casual effect.
Try to keep both sleeves relatively similar in size. Symmetry is not essential, but matching rolls generally create a cleaner finish.
5. Check the Silhouette
Take a moment to look at the full outfit rather than focusing only on the knot. Walk around, raise your arms, sit down, and make sure the shirt still feels comfortable.
If the front feels too tight, loosen the gathered section. If the shirt still feels overly loose, adjust the amount of fabric you bring together. The best DIY shirt hack is one that looks intentional while remaining easy to wear.
Expert Insight
The most flattering result usually comes from controlling proportions rather than simply making a shirt tighter. Keep the shoulders comfortable, then use the body, hem, sleeves, or waist area to create the shape you want.
Why the Before-and-After Effect Works
A good clothing transformation often relies on proportion. When a loose shirt hangs straight down, it can create one uninterrupted vertical shape. Adding a small gathered detail interrupts that shape and gives the eye a clearer focal point.
The rolled sleeves contribute to the same effect. They expose a little more of the arms and visually reduce the amount of fabric surrounding the upper body. Together, these small changes make the casual shirt appear more styled.
This does not mean there is one correct way to dress a particular body shape. Clothing should ultimately feel comfortable and reflect personal preference. The value of a DIY technique is that it gives you more control over how an existing garment looks.
Easy Ways to Personalize the Look
Once you understand the basic technique, there are plenty of ways to make it your own. The same approach can produce different results depending on the shirt, knot placement, sleeve treatment, and styling pieces you choose.
Try Different Knot Positions
A centered front knot creates a clear focal point. Moving the knot slightly to one side gives the shirt a more relaxed, asymmetrical feel. You can also keep the gathered detail very subtle by tucking the excess fabric rather than tying a visible knot.
Experiment With Sleeve Styling
Short, neat sleeve rolls can give an oversized T-shirt a more fitted appearance. For a softer look, use a loose single fold. For a more defined silhouette, make the roll slightly tighter and keep the edges even.
Use Different Shirt Styles
This DIY shirt idea does not have to be limited to plain cotton tees. Try it with graphic shirts, vintage-inspired tops, solid colors, oversized basics, or lightweight casual shirts. Different fabrics will naturally create different knot shapes and levels of volume.
How to Style a Transformed T-Shirt
A reshaped T-shirt can become the foundation for many casual outfits. Pair it with high-waisted jeans for an easy everyday combination. The higher rise of the jeans works naturally with a gathered or knotted shirt because it helps create a defined transition between the top and bottom.
For a relaxed weekend outfit, try the shirt with denim shorts and simple sneakers. If the T-shirt has a colorful graphic, keep the rest of the outfit relatively simple so the top remains the main feature.
You can also layer the transformed shirt beneath an open jacket, cardigan, or lightweight overshirt. The added shape underneath helps prevent the outfit from looking overly bulky.
- Casual: Pair with jeans and sneakers.
- Weekend: Try denim shorts and simple accessories.
- Layered: Add an open jacket or overshirt.
- Colorful: Let a graphic tee provide the main visual accent.
Common DIY Shirt Mistakes to Avoid
DIY clothing does not have to be perfect, but a few simple checks can make the final result much better. The most common mistake is gathering too much fabric too quickly. This can make the shirt uncomfortable and create unnecessary bulk.
Another issue is placing the knot without considering the rest of the outfit. Before securing it firmly, look at the shirt with your chosen pants or skirt. A slightly different position may create a more balanced overall appearance.
It is also important not to stretch the fabric aggressively. Excessive pulling can distort the shirt and make the neckline or seams sit unevenly.
Pro Tip: Treat your first attempt as a fitting session rather than a final result. Try several small adjustments, take a quick mirror photo if helpful, and compare the different silhouettes before deciding which version you like best.
DIY Shirt Hacks Without Cutting
If you are new to clothing customization, reversible methods are a great place to start. Knots, tucks, sleeve rolls, partial front tucks, and strategic layering can dramatically change a shirt without permanently altering the fabric.
This approach is particularly useful for graphic T-shirts. You can keep the original design intact while changing the way the garment sits on your body.
Once you become comfortable with temporary styling, you may decide to explore more permanent alterations such as hemming, cropping, adding seams, or adjusting the sleeves. Those projects require more care because the changes cannot easily be undone.
Making DIY Shirts Part of Your Wardrobe
The real appeal of DIY shirts is not simply saving money. It is the ability to make your existing wardrobe more versatile. A shirt that feels too plain one day can become a completely different piece with a simple styling adjustment.
Before buying another top, look through your closet and identify pieces that could benefit from a new shape. An oversized shirt, an old graphic tee, or a basic top with a relaxed fit may have more potential than you realize.
Take your time with experimentation. Try different combinations with the same shirt and photograph the results if you want to remember which technique worked best. Over time, you can develop a collection of easy clothing hacks that suit your personal style.
Quick Points
- Start with a comfortable loose or oversized T-shirt.
- Gather only enough fabric to create the shape you want.
- Use a simple knot or tuck for a reversible transformation.
- Roll the sleeves to create cleaner proportions.
- Test comfort and movement before wearing the finished look.
Conclusion
A DIY shirt hack is a simple way to turn an everyday basic into a more personalized wardrobe favorite. The transformation shown here demonstrates how much difference a few small adjustments can make. Gathering excess fabric, adding a simple front detail, and rolling the sleeves can create a more intentional silhouette without requiring complicated sewing techniques.
The best part is that you can adapt the idea to your own preferences. Keep the knot subtle, make the shape more defined, change the sleeve roll, or experiment with different T-shirt styles. There is no single formula that works for everyone, so use the technique as a starting point and make it yours.
If you have a few oversized or relaxed T-shirts sitting in your closet, this is a perfect opportunity to experiment before buying something new. With a little creativity, a basic shirt can become a fresh outfit piece in just a few minutes.
Tags
DIY Shirts T-Shirt Hacks DIY Clothes Clothing DIY DIY Fashion Upcycled Clothing Fashion Hacks Easy DIY