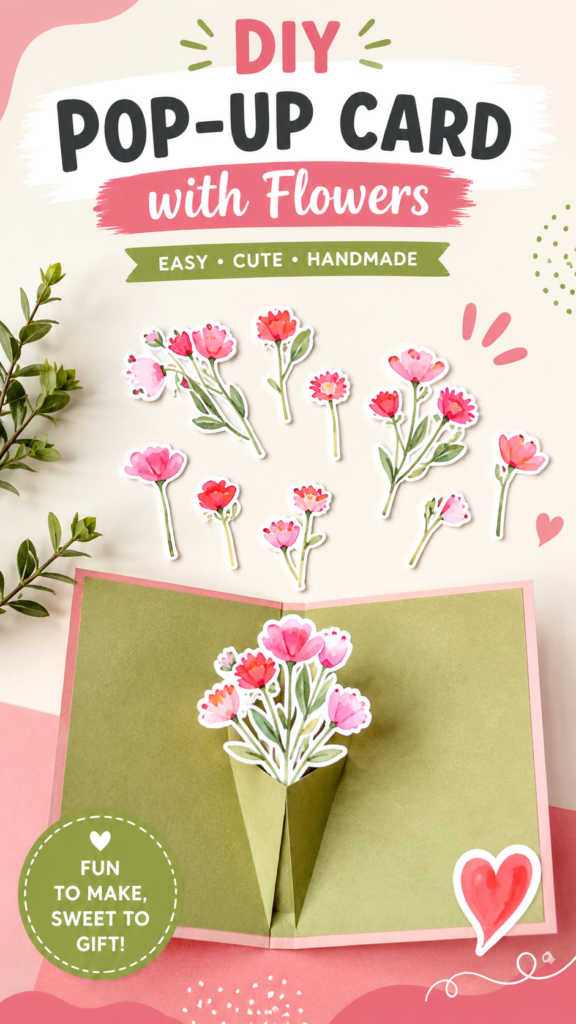
There is something wonderfully satisfying about opening a card and discovering a surprise inside. A handmade pop-up card takes that simple moment and turns it into a small piece of paper magic, with flowers that appear to rise from the center as the card opens. This DIY pop-up flower card is a cheerful craft project that combines paper cutting, simple folding, arranging, and creativity into one memorable handmade gift.
The design centers on a folded card with a dimensional bouquet attached inside. Separate flower pieces can be prepared ahead of time, then arranged so they lift forward when the card opens. The result looks much more elaborate than the basic construction actually is, making it a great project for beginners, older children with supervision, and anyone who enjoys thoughtful handmade cards.
Key Takeaways
- Learn a simple way to create a dimensional flower pop-up card.
- Use colorful paper flowers to build a cheerful handmade bouquet.
- Choose sturdy cardstock for a cleaner fold and stronger card structure.
- Personalize the design with different flowers, colors, shapes, and messages.
- Keep the construction simple while creating a surprisingly impressive result.
Why DIY Pop-Up Cards Are So Special
A handmade card already feels more personal than a quick message, but a pop-up design adds an unexpected element of surprise. Instead of remaining flat, the inside of the card changes shape as it opens. That movement makes the finished project interactive and gives the recipient something to discover.
Flower designs work especially well for this type of card because individual stems and blooms can be arranged at different heights. A small collection of paper flowers can become a miniature bouquet without requiring complicated mechanisms or expensive craft supplies.
Important: The secret to a polished pop-up card is not adding as many flowers as possible. A balanced arrangement with enough space between the blooms will usually look cleaner, open more easily, and create a stronger three-dimensional effect.
What You Need to Make a Pop-Up Flower Card
The beauty of this project is that the materials can remain simple. The reference design uses a folded card, colorful flower cutouts, paper stems, and basic adhesive. You can recreate the concept with supplies you may already have in a craft drawer.
- Cardstock or thick craft paper for the card base
- Colored or patterned paper for flowers and leaves
- Scissors or a precision craft cutting tool
- Glue or double-sided adhesive
- Pencil and ruler for measuring folds
- Optional markers, colored pencils, or small decorative stickers
For the card base, medium-weight cardstock is a practical choice. It should be sturdy enough to support the flowers but flexible enough to fold cleanly. Very thin paper may bend under the weight of several flower pieces, while extremely thick cardstock can make the pop-up mechanism harder to fold.
Choosing Colors for Your Flower Bouquet
The image shows a playful combination of pink, coral, red, green, and neutral paper tones. This type of palette gives the finished card a fresh spring-inspired feeling. You do not need to follow the same colors, though. A monochromatic bouquet can look elegant, while contrasting colors can make the card feel bright and energetic.
Consider choosing two or three main flower colors and one or two shades of green. Keeping the palette controlled helps the bouquet feel intentional instead of visually crowded.
How to Make a DIY Pop-Up Flower Card
The project can be broken into a few straightforward stages. Prepare the decorative flowers first, create the pop-up structure inside the card, and then attach the bouquet pieces so they move naturally when the card opens.
Step 1: Prepare the Card Base
Start with a rectangular piece of cardstock and fold it neatly in half. Run a ruler or a flat edge along the fold to create a crisp center crease. A clean fold is important because the pop-up elements will need to move around this central line.
Open the card and place it flat with the inside facing upward. Take a moment to identify where you want the bouquet to sit. A centered arrangement creates a traditional greeting-card appearance, while a slightly lower arrangement can leave more room for a handwritten message above it.
Step 2: Create the Pop-Up Support
The dimensional effect comes from a folded paper support inside the card. Create a small rectangular or angled section that can fold inward when the card closes and move forward when the card opens.
One simple approach is to make two short parallel cuts or carefully folded sections near the center of the card. Push the resulting section inward to create a small platform. This platform becomes the anchor for the flower bouquet.
Before applying glue, open and close the card several times. The support should fold inward without resistance and return to a forward position when the card opens.
Step 3: Make the Paper Flowers
Next comes the most creative part. Cut or draw several flower shapes using pink, red, coral, white, or other colors that complement your card. Vary the sizes so the bouquet has depth.
You can create simple five-petal flowers, rounded blooms, tiny blossoms, or more stylized shapes. The goal is not perfect botanical accuracy. Slight differences between the flowers can actually make the finished bouquet look more handmade and charming.
Add narrow green stems and a few leaves to complete each flower. If you prefer an easier method, draw flowers on colored paper and cut around them. If you have decorative paper punches or pre-cut embellishments, those can also speed up the process.
Step 4: Arrange the Bouquet
Before gluing anything permanently, place your flower pieces on the card and experiment with different arrangements. Put taller flowers toward the middle or back and smaller flowers toward the front or sides.
Think of the arrangement as a tiny bouquet. Some stems can lean slightly outward, while others can remain upright. Leaves can fill small gaps without adding too much bulk.
Expert Insight
- Test the bouquet arrangement before using adhesive.
- Keep bulky pieces away from the center crease.
- Leave enough room for the card to close completely.
Step 5: Attach the Flowers
Once you are happy with the arrangement, attach the stems and flower pieces to the pop-up support. Use a small amount of adhesive rather than covering the entire back of each piece. Excess glue can make the paper damp, wrinkled, or difficult to reposition.
Start with the largest central flowers and then add smaller flowers around them. Hold each piece in place for a few moments so the adhesive can grip the paper.
After attaching several flowers, gently close the card. If a piece catches on the opposite side, reposition it before the adhesive fully sets. This simple test can prevent the bouquet from becoming too crowded.
Step 6: Add the Finishing Details
Once the pop-up bouquet works smoothly, decorate the outside and inside of the card. A handwritten greeting can make the project feel especially personal. You can also add small hearts, dots, leaves, borders, or simple paper accents.
Keep the decoration balanced. Since the bouquet is already the main feature, a simple cover can create a nice contrast. A small floral motif on the front paired with a dimensional bouquet inside can make the card feel cohesive from beginning to end.
How to Make the Pop-Up Mechanism Work Smoothly
The most important technical detail is movement. A beautiful bouquet is not very useful if the card cannot close. Before finalizing the design, repeatedly test the mechanism.
Pro Tip: Build the mechanism first and decorate it afterward. Testing the empty structure lets you identify folding problems before delicate flower pieces are attached.
Make sure the stems are not too long or positioned too close to the card edges. When the card closes, the flowers need enough space to fold inward rather than pressing tightly against the front or back.
If the mechanism feels stiff, check the center crease and every folded section. Sharpening the fold with a ruler can improve movement. If the card is too crowded, remove one or two flowers instead of forcing the pieces into a smaller space.
Creative Ways to Personalize DIY Pop-Up Cards
Once you understand the basic structure, there are countless ways to change the look. The flower bouquet can be adapted to match almost any occasion, season, or personal style.
Try Different Flower Styles
Mixing flower shapes creates a more natural-looking bouquet. Combine small simple blossoms with larger layered flowers. Add tiny buds around the edges or use leaves to create additional dimension.
You can also make a themed bouquet using one flower shape repeated in several colors. This is especially useful when you want a clean, modern design.
Create Seasonal Versions
Spring cards can feature soft pinks, greens, and cheerful blossoms. Summer designs can use brighter colors, while autumn-inspired cards can include warm orange, yellow, and red tones. For a winter version, experiment with white flowers, evergreen shapes, and subtle metallic paper accents.
The same pop-up technique can also be adapted beyond flowers. Leaves, balloons, stars, hearts, butterflies, or other simple paper shapes can replace the bouquet while keeping the basic interactive concept.
Add a Personal Message
A short handwritten message can make the finished card much more meaningful. Instead of filling every available space, choose one clear sentiment and allow the pop-up bouquet to remain the visual focus.
For a birthday card, you could add a cheerful greeting. For a thank-you card, a simple note of appreciation works beautifully. The handmade nature of the card is what gives it much of its charm.
Common Mistakes to Avoid
Pop-up cards are beginner-friendly, but a few small mistakes can affect the final result. Fortunately, most are easy to prevent.
- Using paper that is too thin: Lightweight paper can struggle to support multiple decorative pieces.
- Adding too much adhesive: Excess glue can warp paper and create messy edges.
- Skipping the movement test: Always open and close the card before the design is considered finished.
- Overcrowding the bouquet: A few carefully positioned flowers often look better than a large cluster.
- Ignoring the center fold: Keep bulky decorations away from areas that need to bend freely.
Why This Craft Makes a Great Handmade Gift
A DIY pop-up flower card is more than a paper project. It gives you an opportunity to create something specifically for another person. The recipient gets a card they can open, explore, and keep, while the maker gets to experiment with color, composition, and paper craft techniques.
The design is also easy to adapt. You can make a small minimalist bouquet or build a fuller arrangement with several layers. That flexibility makes it suitable for different crafting skill levels and occasions.
Because the materials are simple, you can focus more attention on the details that matter most: clean folds, thoughtful color combinations, balanced spacing, and a personal message.
At a Glance
Quick Points
- Project: DIY pop-up flower card
- Main materials: Cardstock, colored paper, scissors, and adhesive
- Design focus: Dimensional paper flowers and a simple bouquet
- Best feature: The flowers rise as the card opens
- Personal touch: Customize colors, flowers, decorations, and your message
Final Thoughts on DIY Pop-Up Flower Cards
DIY pop-up cards prove that a few sheets of paper can become something surprisingly memorable. The flower bouquet creates movement and dimension, while the handmade details give the card a warm personal quality that a mass-produced greeting card cannot quite replicate.
Start with a sturdy folded card, create a simple pop-up support, and experiment with a handful of colorful flowers. Do not worry about making every bloom identical. Slight variations, playful colors, and handmade imperfections are part of what makes the finished card special.
The best part is the reveal: when the recipient opens the card and sees the paper bouquet rise from the center, a simple handmade greeting becomes a small interactive surprise. Save this DIY pop-up card idea for your next crafting session and let your own flower arrangement take shape.