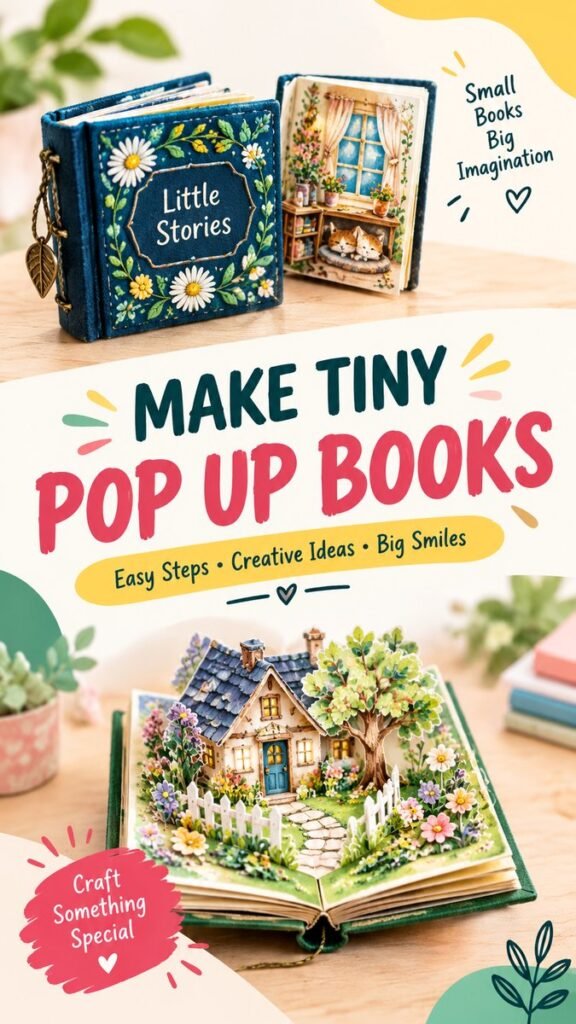
There is something wonderfully satisfying about opening a tiny handmade book and discovering an entire three-dimensional scene inside. A DIY pop up book turns ordinary paper, folds, layers, and imagination into a miniature world that can be opened, displayed, and enjoyed again and again. From charming little rooms to storybook cottages, flowers, windows, animals, and garden scenes, pop up book projects offer endless ways to make a small piece of paper feel surprisingly magical.
The ideas shown here combine the charm of miniature crafts with the interactive nature of paper engineering. A decorated book cover can make the project feel special before it is even opened, while a carefully layered interior can create depth and movement. Whether you are looking for a creative weekend project, a handmade gift, a children’s craft, or a new way to experiment with paper art, a DIY pop up book is an approachable project with plenty of room for creativity.
Key Takeaways
- Start with a simple folded page before attempting complex scenes.
- Use layers to create depth and make small details stand out.
- Combine paper, color, patterns, and miniature decorations for personality.
- Keep moving parts lightweight so the book opens and closes smoothly.
- Test every fold before adding delicate decorative elements.
- Use the finished book as a gift, display piece, or creative keepsake.
What Makes a DIY Pop Up Book So Special?
A traditional handmade book is already a creative object, but a pop up book adds another dimension. Instead of keeping every illustration flat on the page, the design allows selected elements to rise, fold, unfold, or appear at different depths. When the book opens, a scene can seem to come alive right in front of you.
This interactive quality is one of the biggest reasons DIY pop up books are so appealing. The project is not only about making something attractive. It is also about thinking carefully about how paper behaves. Every fold affects the final composition, and every layer can change the way the scene looks from different angles.
The reference-inspired style works particularly well because it combines a miniature book format with detailed scenes. A tiny floral cover creates an inviting first impression, while the open pages can reveal a cozy interior or a small storybook landscape. The contrast between the compact format and the amount of detail inside makes the finished craft especially eye-catching.
Important: The best DIY pop up book projects do not need hundreds of complicated pieces. A thoughtful arrangement of a few well-designed layers can create more visual impact than an overcrowded page.
Choosing a Theme for Your Pop Up Book
Before cutting paper, decide what kind of miniature world you want to create. Having a clear theme makes it much easier to choose colors, shapes, decorations, and page layouts. The cottage and garden look shown in the design is a natural choice because it provides plenty of opportunities for layered elements.
A small house can become the main focal point, with a path leading toward the front door. Flowers can fill the foreground, trees can create a middle layer, and a sky or patterned background can sit behind everything. This simple arrangement gives the page a strong sense of depth without requiring complicated engineering.
Popular Theme Ideas
- Miniature cottage: Build a tiny home surrounded by flowers, trees, and a garden path.
- Cozy room: Create a small interior with furniture, windows, shelves, and decorative objects.
- Garden scene: Layer plants, flowers, fences, paths, and trees to create a colorful outdoor setting.
- Storybook landscape: Combine several simple paper elements to suggest a playful fantasy-inspired setting.
- Animal scene: Add friendly paper animals as focal points within a garden, room, or landscape.
Materials for a Simple DIY Pop Up Book
You can keep the material list surprisingly simple. The goal is to choose paper that is sturdy enough to hold its shape while remaining flexible enough to fold. A few decorative supplies can then transform basic pieces into a detailed miniature scene.
- Cardstock or sturdy craft paper for the book base
- Colored paper for backgrounds and layered shapes
- Patterned paper for covers and decorative panels
- Scissors or a craft knife for precise cutting
- A ruler and pencil for measuring folds
- Paper glue or another suitable craft adhesive
- Markers, colored pencils, or other decorating tools
- Small paper embellishments for flowers, leaves, windows, and furniture
Choose colors that work together rather than selecting every shade independently. A small palette of complementary colors can make even a highly detailed page feel organized. Soft greens, warm neutrals, floral shades, and a contrasting accent color can create the cheerful handmade appearance seen in miniature paper crafts.
How to Build the Basic Pop Up Structure
The easiest way to begin is with a simple folded page. Start by deciding the finished size of your book and fold the base carefully in half. The central fold becomes the foundation for the interactive mechanism, so it should be neat and accurate.
Step 1: Prepare the Base
Cut a sturdy piece of cardstock to the desired page size. Fold it cleanly along the center. Use a ruler or another flat tool to reinforce the crease without damaging the paper.
Step 2: Create Simple Tabs
For a beginner-friendly mechanism, create small horizontal or angled cuts near the center fold. Fold the resulting tabs inward or outward depending on the shape you want to raise. These tabs become attachment points for the three-dimensional elements.
Step 3: Add the Main Scene
Attach the largest element first. This could be a small house, a window, a piece of furniture, or another central object. Close the page slowly to check that the piece folds correctly. If it catches against the opposite page, adjust the position before adding more details.
Step 4: Build the Layers
Add secondary elements at different distances from the viewer. A foreground fence, flower, or path can sit closer to the front, while trees, walls, and background patterns remain farther back. Layering is what gives a simple paper page its miniature-diorama appearance.
Step 5: Test Before Decorating
Open and close the book several times before adding fragile decorations. This simple test can reveal problems with the folds, tabs, or placement. It is much easier to move a plain paper shape than to reposition one covered in tiny flowers and decorative details.
Expert Insight
Think about your pop up page as a tiny stage. The background establishes the setting, the middle layer supports the story, and the foreground creates the strongest sense of depth. Leaving a little breathing room between layers can make each detail easier to see.
Creating a Miniature Cottage Scene
A miniature cottage is an especially effective centerpiece for a DIY pop up book because its basic shape is easy to recognize. A roof, door, windows, and walls can be simplified into paper shapes while decorative elements provide the personality.
Start with the cottage as the central focal point. Then add a pathway extending toward the front of the page. A small fence can frame the foreground, while flowers and plants can fill empty areas around the house. Trees can rise behind or beside the cottage to create another layer.
Do not worry about making every flower or leaf identical. Slight variations can make the scene feel handmade and lively. Repeating a few shapes in different sizes is often enough to suggest a much fuller garden.
For a cozy look, consider adding tiny details such as curtains, flower boxes, roof shingles, a mailbox, a garden table, or decorative window frames. These details do not need to be highly complex. Their purpose is to help the viewer imagine the miniature world.
Making the Cover Just as Creative
The outside of the book deserves attention because it introduces the project before anyone opens it. A patterned cover can immediately communicate the mood of the craft. Floral motifs, leaves, simple geometric borders, or hand-lettered titles can all work beautifully.
The small floral book shown in the concept demonstrates how a compact cover can become a decorative object on its own. A framed title area surrounded by flowers creates a clear focal point while leaving enough space for the pattern to remain visible.
For your own DIY pop up book, choose a cover design that complements the interior. A garden-themed inside might pair naturally with botanical patterns, while a cozy room could use warm colors and subtle decorative motifs.
Tips for Better Depth and Detail
Depth is what makes a pop up book different from a regular illustrated book. Fortunately, you do not need complicated mechanisms to create a convincing three-dimensional effect.
- Vary the height of your layers. Keep some elements close to the page while allowing focal pieces to rise farther forward.
- Use overlapping shapes. A flower partly covering a fence or a tree overlapping a house can make the composition feel more dimensional.
- Keep the largest shapes simple. A recognizable silhouette is often more effective than an overly detailed shape.
- Reserve tiny details for focal areas. Small decorations are most useful around the main subject rather than everywhere.
- Check the closed position. A beautiful open page is only successful if it can still fold comfortably into the book.
Pro Tip: Photograph or inspect your pop up book from slightly different angles while building it. A detail that looks perfect from above may disappear when the book is viewed straight on. Small adjustments to height and spacing can dramatically improve the final presentation.
Creative Ways to Personalize Your Project
One of the best parts of making a handmade pop up book is that there is no single correct design. Once you understand the basic folding principle, you can adapt the format to suit almost any creative theme.
Try giving each page its own scene while keeping a common color palette throughout the book. For example, one page could feature a cottage, another could show a garden, and another could reveal a cozy miniature room. Connecting the scenes visually can make the whole book feel like one complete story.
You can also experiment with textures. Layered cardstock creates clean shapes, while patterned paper adds instant visual interest. Hand-drawn details can make the pages more personal, and carefully placed embellishments can give the finished book a handcrafted character.
DIY Pop Up Book Ideas for Gifts and Keepsakes
A handmade pop up book can be more than a craft project. Its compact size makes it suitable as a thoughtful gift or personal keepsake. A book can be designed around a favorite place, a shared memory, a hobby, a seasonal theme, or simply a collection of miniature scenes.
For children, simple colorful pages can make an engaging creative activity. For adults, more detailed miniature interiors and decorative covers can turn the project into a relaxing paper craft. The same basic concept can be adapted to different skill levels by changing the number of layers and complexity of the mechanisms.
If you are creating a gift, consider leaving a few areas intentionally simple so you can add a handwritten message or personalized detail. The result can feel much more meaningful than a mass-produced decorative item.
Common Mistakes to Avoid
Pop up books become easier to make once you know which problems to watch for. One common mistake is adding too many elements before testing the basic structure. Extra decorations can make pages heavier and interfere with the folding mechanism.
Another issue is using paper that is too thin for structural components. Decorative paper can be beautiful, but important tabs and moving pieces often benefit from slightly sturdier cardstock. It is also important to apply glue sparingly. Excess adhesive can wrinkle paper and make precise folds more difficult.
Finally, avoid placing every important detail in the same visual plane. A pop up book becomes more interesting when the viewer can clearly distinguish the background, middle ground, and foreground.
At a Glance
- Choose one clear theme before cutting your paper.
- Build the basic mechanism before adding decoration.
- Use three visual layers to create stronger depth.
- Test the opening and closing movement throughout the project.
- Finish with small details that support the main scene.
Conclusion
A DIY pop up book is a wonderful way to turn simple materials into something interactive, decorative, and completely personal. The combination of folding paper, layered scenes, miniature details, and creative storytelling gives even a small handmade book plenty of visual impact.
Whether you choose a charming cottage garden, a cozy room, a playful animal scene, or your own original miniature world, start with a simple structure and build gradually. Focus on clean folds, balanced layers, and a clear focal point before adding the tiny details that make the project feel special.
Most importantly, let the design reflect your own creativity. Experiment with colors, patterns, shapes, and layouts until the pages feel like your own little world. With a few sheets of paper and some patience, you can create a pop up book that is fun to make, beautiful to display, and memorable to open.