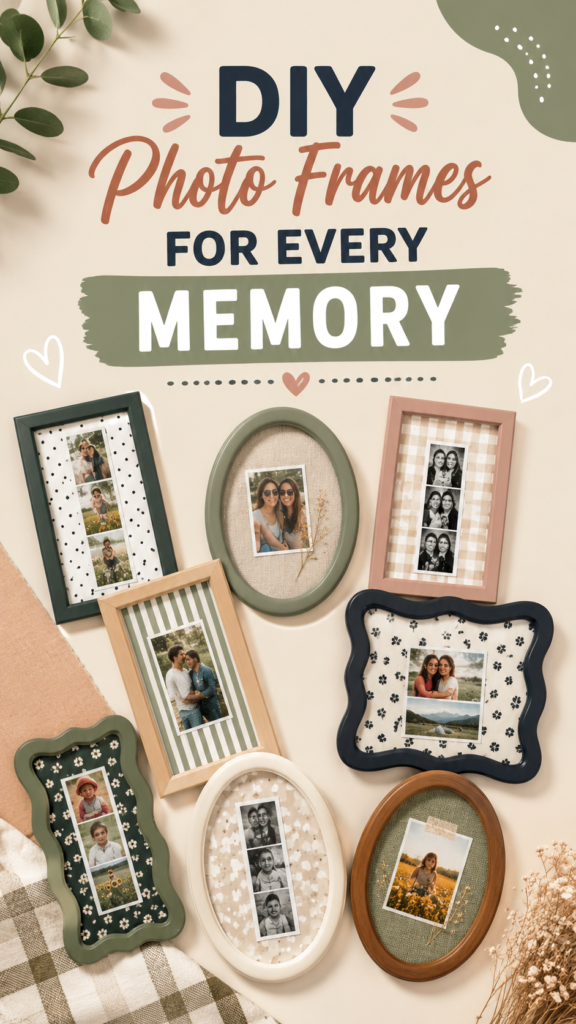
DIY photo frames are one of the easiest ways to turn favorite memories into meaningful home decor. A simple frame can become something much more personal when you combine photographs with fabric, patterns, painted details, layered paper, or decorative accents. The inspiration here shows how different frame shapes, borders, textures, and photo arrangements can work together to create a warm, collected look rather than a matching set.
Whether you are decorating a bedroom, creating a memory wall, refreshing a shelf, or looking for a thoughtful handmade gift, DIY picture frames give you plenty of room to experiment. You do not need complicated tools or advanced crafting skills. With a few basic supplies and a clear idea of the mood you want, ordinary frames can become unique pieces that reflect the people, places, and moments you love.
Key Takeaways
- Mix frame shapes, patterns, and finishes to create visual interest.
- Use fabric, scrapbook paper, paint, and small embellishments to personalize frames.
- Choose photos that share a story, color palette, or meaningful connection.
- Layering several frame styles can create a relaxed gallery-inspired display.
- Simple DIY details can make inexpensive frames feel thoughtful and distinctive.
Why DIY Photo Frames Make Special Home Decor
Photographs already carry emotional meaning, but the way you display them can make those memories feel even more intentional. A handmade or customized frame adds another layer to the story. Instead of choosing a standard frame that looks like everything else in the room, you can select colors, textures, and patterns that complement the photograph and your decorating style.
The examples of oval, rectangular, and softly curved frames demonstrate how variety can make a collection more interesting. Some designs use bold patterned backgrounds, while others rely on subtle fabric textures or classic borders. This creates a cozy, vintage-inspired appearance without requiring every frame to look identical.
Important: The most successful DIY photo frame does not necessarily use the most decorations. A thoughtful combination of one strong pattern, one memorable photograph, and a complementary frame can often create more impact than adding too many embellishments.
Choose a Frame Style Before You Start
Before reaching for your craft supplies, decide what kind of finished look you want. The frame itself provides the foundation, so its shape and proportions can influence everything that comes afterward.
Classic Rectangular Frames
Rectangular frames are versatile and easy to arrange. They work especially well for photo strips, portraits, family pictures, and landscape photographs. Because their shape is familiar, you can make them more distinctive by changing the inner mat or background.
Try adding gingham, plaid, stripes, dots, or a neutral textured paper behind the photograph. A narrow strip of patterned material can also frame the photo without overwhelming it.
Oval Frames
Oval frames instantly create a softer, more nostalgic appearance. Their curved silhouette works beautifully with portraits and intimate photographs. They can also break up a display filled with rectangular shapes.
For an understated project, use a neutral fabric background with a small photograph in the center. For a more decorative look, add a delicate botanical print or subtle handwritten-style pattern around the image.
Wavy and Decorative Frames
Curved or scalloped frames bring a playful handmade quality to a photo display. They are particularly useful when you want your decor to feel creative rather than formal.
These frames can stand alone as statement pieces, but they also look attractive when mixed with simpler shapes. A decorative silhouette becomes even more noticeable when surrounded by clean rectangular frames.
Creative Materials for DIY Picture Frames
You can customize a frame with many everyday craft materials. The goal is not to use everything at once. Instead, select one or two materials that support the style of your photograph and the room where the frame will be displayed.
Fabric and Textile Details
Fabric is an easy way to introduce warmth and texture. Plaid, gingham, ticking stripes, linen-look material, and small floral patterns can all create a cozy effect.
For a neat finish, measure the visible area inside the frame and cut the fabric slightly larger than the opening. Secure it to a backing board or thick cardstock, keeping the surface smooth. A fabric background can then act as a soft mat around the photograph.
Scrapbook Paper
Decorative paper is another beginner-friendly option. It is available in countless colors and patterns, making it easy to coordinate several frames without making them identical.
Choose paper with a pattern that relates to the photograph. For example, a subtle botanical print can complement an outdoor picture, while stripes or geometric patterns can give a modern frame a cleaner appearance.
Paint and Simple Color Changes
Painting the outer edge of a frame can completely change its personality. Warm wood tones can enhance a rustic look, while muted green, cream, charcoal, dusty pink, or other soft shades can create a more contemporary palette.
You do not have to repaint every part of the frame. A contrasting inner edge or lightly distressed finish can provide enough detail to make a plain frame feel customized.
Small Decorative Accents
Small embellishments can add personality when used carefully. Dried flowers, tiny paper shapes, ribbon, simple stickers, pressed botanical elements, or miniature decorative pieces can be placed around a photograph or attached to a frame backing.
Keep the photograph as the focal point. Decorative details should support the image rather than compete with it.
Expert Insight
When combining several DIY frames, repeat one element across the collection. It could be a color, pattern, material, or frame finish. This small connection makes an eclectic group feel intentionally designed.
How to Create a Personalized DIY Photo Frame
Once you have chosen your frame and materials, the project can be kept surprisingly simple. A clean process helps you avoid uneven layers and keeps the finished frame looking polished.
- Select the photograph. Choose an image that has personal meaning and fits the shape of your frame.
- Measure the frame. Check the opening and backing area before cutting paper or fabric.
- Choose a background. Pick a color or pattern that complements the photograph rather than distracting from it.
- Prepare the materials. Cut your paper, fabric, or backing material carefully and test the arrangement before attaching anything.
- Secure the layers. Use an appropriate craft adhesive or mounting method and allow it to dry according to the product instructions.
- Add small details. Introduce decorative accents sparingly for an intentional finish.
- Place the photograph. Center it carefully, check the alignment, and close the frame once everything looks balanced.
How to Combine Different Frames Beautifully
A collection of different frames can look much more interesting than a perfectly matched set. The key is creating balance. Think about the overall group rather than judging every frame individually.
Repeat a Color
Choose two or three core colors and repeat them throughout the collection. For example, warm wood, soft cream, and muted green can create a calm, natural palette. A small amount of darker color can provide contrast and definition.
Mix Patterns With Solids
If every frame has a busy pattern, the display can become visually overwhelming. Balance patterned backgrounds with solid mats or simple frames. This gives the eye places to rest while allowing your favorite decorative frames to stand out.
Vary the Shapes
Combining oval, rectangular, and wavy silhouettes adds movement. Place larger or more distinctive frames toward the center or use them as visual anchors, then surround them with smaller, simpler pieces.
Keep a Consistent Mood
Different frames work best when they share a general aesthetic. A warm vintage-inspired collection might use wood tones, plaid, handwritten-style details, and muted colors. A modern collection could use cleaner lines, minimal patterns, and a more restrained palette.
Pro Tip: Lay all your frames and photographs on a table before attaching anything. Step back and look at the collection from a distance. This makes it much easier to spot colors or patterns that feel out of place.
DIY Frame Ideas for Different Memories
The beauty of personalized photo frames is that each one can tell a different story. Instead of decorating every frame the same way, match the design to the memory inside.
Family Photo Frames
For family photographs, warm fabrics, classic patterns, and natural wood finishes can create a timeless feel. A small collection of family portraits can become a meaningful display on a shelf, console, or bedroom wall.
Friendship Memories
Photos with friends are perfect for playful designs. Try colorful paper, striped borders, polka dots, or an unconventional frame shape. A vertical photo strip can also display several smaller moments in one frame.
Travel Photos
Travel memories can be paired with natural textures and colors inspired by the destination. A simple linen-style background or earthy frame can help the photograph remain the star while still giving the display a handcrafted quality.
Meaningful Gift Ideas
A customized photo frame can make a thoughtful handmade gift because it combines creativity with a personal memory. Choose a photograph that has significance to the recipient and customize the frame using colors or patterns that suit their style.
Easy Ways to Make Your Frames Look More Expensive
You do not need expensive supplies to create an elevated result. Careful preparation often makes a bigger difference than the cost of the materials.
- Keep cuts straight and edges neatly finished.
- Avoid using too much adhesive, especially near visible edges.
- Choose a limited color palette instead of combining too many shades.
- Use texture to create interest without adding excessive decorations.
- Center photographs carefully and check alignment before securing them.
- Leave some visual breathing room around detailed patterns.
Another simple trick is to combine inexpensive frames with one or two more distinctive pieces. This creates the impression of a curated collection without requiring every item to be elaborate.
Creating a Cozy Photo Display
Once your DIY frames are finished, think about how they will interact with the surrounding decor. A small group can be arranged on a tabletop, dresser, bookshelf, or console. Larger collections can become a casual gallery wall.
Do not worry about making everything perfectly symmetrical. Slight variations in height, shape, and orientation can make a display feel relaxed and personal. If you are working with several frames, start with the largest piece and build outward from it.
For a tabletop arrangement, overlap a few frames slightly while keeping the photographs visible. This creates depth and makes the display feel layered. For wall arrangements, leave enough space between pieces to let each frame remain visually distinct.
A Simple Styling Formula to Try
If you are unsure where to begin, use a simple three-part formula: one statement frame, two or three supporting frames, and a consistent color connection.
Your statement frame can have a decorative shape or bold pattern. The supporting frames can be simpler, perhaps using wood, cream, or muted colors. Repeat one pattern or accent color across the group to tie everything together.
This approach works because it creates contrast without losing cohesion. It also makes it easy to expand your collection later. Whenever you find another frame or photograph you love, you can ask whether it complements at least one of the existing colors, textures, or shapes.
At a Glance
- Choose meaningful photographs first.
- Mix frame shapes for visual interest.
- Combine patterns with neutral backgrounds.
- Repeat colors or textures to create cohesion.
- Keep decorations simple so the memories remain the focus.
Conclusion: Turn Favorite Photos Into Personal Decor
DIY photo frames are a simple way to make everyday memories feel like an intentional part of your home. With a few basic materials, you can transform ordinary frames using fabric, patterned paper, paint, texture, and carefully chosen decorative details.
The most appealing displays do not depend on perfection. They feel personal. A mixture of oval and rectangular frames, soft patterns, warm finishes, and favorite photographs can create a collection that feels collected over time while still looking thoughtfully styled.
Start with one photograph that means something to you. Choose a frame shape you enjoy, add a background that complements the image, and experiment with one or two small details. Once you see how much personality a simple frame can gain, you may find yourself creating an entire collection of personalized photo displays.
Final Tip: Let the memory guide the design. The best DIY picture frame is one that feels connected to the photograph, the person, or the moment it was made to celebrate.