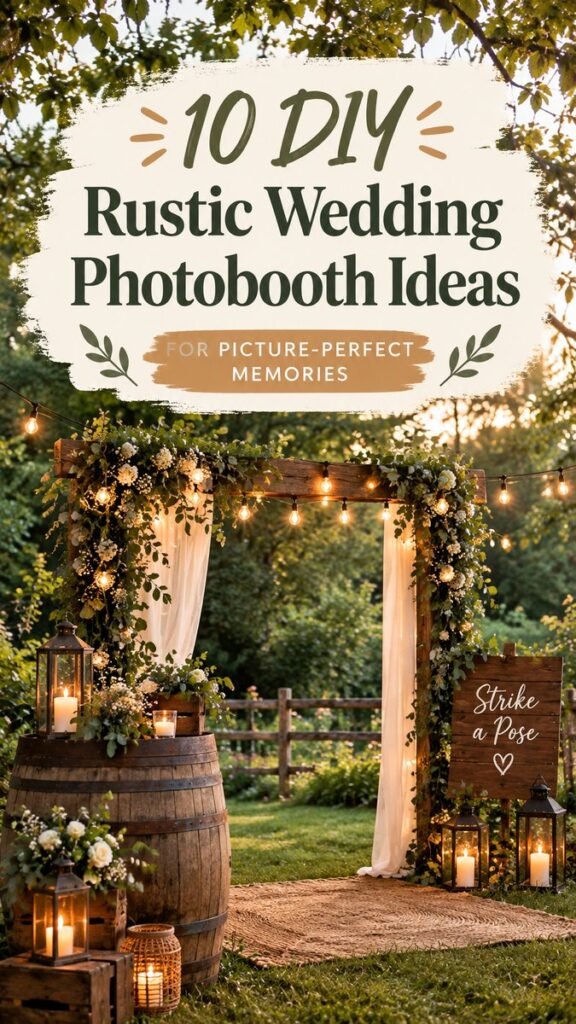
A DIY photo booth can turn a simple wedding setting into one of the most memorable corners of the celebration. The rustic outdoor setup featured here shows how natural materials, warm lighting, greenery, flowers, and thoughtful styling can create a picture-perfect backdrop without making the space feel overly formal. With a wooden frame, soft draping, glowing lanterns, string lights, vintage-inspired barrels, and a garden setting, the look feels romantic, welcoming, and wonderfully personal.
Key Takeaways
- Use a simple wooden frame as the foundation for a rustic wedding photo booth.
- Combine greenery, flowers, fabric, and warm lights for a layered backdrop.
- Lanterns and candles create a cozy glow, especially for evening celebrations.
- Vintage barrels and natural wood add character without overwhelming the photos.
- Keep the posing area open so guests can move, gather, and take photos comfortably.
Why a DIY Photo Booth Works So Well for a Rustic Wedding
A photo booth does more than provide a place for guests to take pictures. It gives everyone an easy activity, creates opportunities for spontaneous group photos, and adds another decorative feature to the wedding venue. A DIY version also gives couples the freedom to match the booth with their overall wedding style.
Rustic weddings are particularly suited to homemade photo booth ideas because the aesthetic naturally embraces imperfect textures and simple materials. Wood, greenery, woven fabrics, glass lanterns, barrels, and soft candlelight can work together beautifully. You do not need elaborate construction or expensive decorations to create an inviting result.
Important: The most effective DIY photo booth is not necessarily the most elaborate one. A strong frame, flattering lighting, a defined photo area, and a few carefully chosen decorative details can create far better pictures than a backdrop crowded with too many props.
Start With a Simple Rustic Backdrop
The wooden structure is the visual anchor of this photo booth concept. A straightforward rectangular frame creates a natural boundary around the photo area while giving you plenty of space to decorate. The beauty of this approach is its versatility. You can build a similar structure from timber, use an existing garden arch, or adapt a sturdy pergola-like feature that is already available at the venue.
Keep the shape relatively simple. The decorations should provide most of the visual interest rather than the structure itself. Natural wood works particularly well because its warm tones complement greenery, cream-colored fabrics, flowers, and candlelight.
Add Soft Fabric for a Romantic Touch
Lightweight white or ivory fabric can soften the hard lines of a wooden frame. Instead of covering the entire structure, let the fabric hang loosely from the upper section or fall along the sides. This keeps the booth open while adding movement and texture.
Neutral fabric is also practical from a photography perspective. It creates a relatively clean background that allows guests, flowers, greenery, and clothing to remain the focus. For a rustic wedding photo booth, linen, cotton, muslin, or sheer draping can all complement the relaxed outdoor atmosphere.
Decorate With Greenery
Greenery is one of the easiest ways to make a DIY photo booth feel connected to its surroundings. In the featured style, leafy garlands frame the wooden structure and add fullness without creating a heavy or formal appearance.
Try arranging greenery asymmetrically rather than making both sides perfectly identical. A fuller arrangement around one corner can make the installation look more organic. Allow a few leaves and stems to extend beyond the frame for a relaxed garden-inspired effect.
You can use fresh foliage when it is practical, or choose high-quality artificial greenery that can be prepared well before the wedding. Mixing different leaf shapes can also create depth and keep a large garland from looking flat.
Create a Magical Glow With String Lights
Lighting can completely change the atmosphere of a photo booth. Warm string lights wrapped around the frame provide a soft glow and help the backdrop remain visually appealing after sunset. They also make the booth feel like a destination rather than simply an empty corner with decorations.
For a rustic wedding, choose warm-toned bulbs rather than harsh white lighting. Wrap the lights loosely through greenery or along the wooden beams. Avoid placing every bulb at exactly the same distance if you want a more relaxed, handcrafted appearance.
Use Lanterns and Candles as Ground-Level Accents
Lanterns add another layer of light while keeping the lower part of the photo booth visually interesting. Place a few lanterns near the entrance or around the sides of the backdrop. Different heights can create a more natural arrangement.
Candles can add a beautiful glow, but outdoor weddings require practical planning. Keep open flames away from fabric, foliage, walkways, and areas where guests may accidentally knock them over. Battery-operated candles can provide a similar visual effect when safety or venue rules make real candles unsuitable.
Expert Insight
Good photo booth lighting should illuminate faces without overpowering the atmosphere.
- Place the strongest decorative lights around the frame rather than directly behind guests.
- Test the booth during the same time of day when most photos will be taken.
- Keep the background softly illuminated so evening photos still show the surrounding details.
Bring in Rustic Wedding Decor
The wooden barrels shown around the photo booth are a great example of how functional-looking rustic pieces can double as decoration. Their rounded shape and natural wood finish add warmth and contrast to the vertical frame.
Barrels can be used as small tables for flowers, lanterns, candles, guest books, or photo booth props. Wooden crates can provide a similar effect. The key is to avoid filling every available surface. Leave some negative space so the setup remains clean and photographs naturally.
Add Flowers Without Overdoing Them
Small clusters of white and neutral flowers work beautifully with greenery and rustic wood. Rather than covering the entire backdrop with blooms, concentrate flowers in a few strategic areas. This gives the arrangement a more natural garden feel and makes each floral detail more noticeable.
Consider placing one larger floral cluster at the top corner of the frame and smaller accents around the base. This creates a visual flow that naturally guides the eye through the photo.
Make the Photo Booth Comfortable for Guests
A beautiful backdrop is only part of a successful DIY photo booth. Think about how guests will actually use the space. The photo area should have enough room for individuals, couples, and small groups to stand comfortably.
Keep the ground as even as possible and make sure guests can approach the booth without stepping over cords, decorations, or loose fabric. If the booth is placed on grass, consider adding a small rug, wooden platform, or other stable surface to define the area.
Position the booth somewhere guests can easily notice it, but avoid placing it directly in a major traffic route. A garden edge, reception lawn, patio, or quiet corner can work well. The surrounding greenery in this design helps the booth feel integrated into the outdoor setting rather than artificially placed in it.
Choose Simple Props That Match the Theme
Props can make photos more playful, but they do not need to be complicated. For a rustic wedding photo booth, choose a small collection that complements the setting rather than distracting from it.
- Wooden signs with short phrases
- Simple floral accessories
- Neutral-colored hats or scarves
- Vintage-style frames
- Small chalkboards
- Natural baskets or wooden crates
A sign such as “Strike a Pose” can instantly communicate what the space is for. Keep wording short and easy to read from a distance. Handwritten or script-inspired lettering can reinforce the rustic aesthetic, while a clean serif font can make the display feel more polished.
Pro Tip: Choose props in the same general color family as your backdrop. Neutral wood, cream, soft green, and warm metallic accents will keep the photos cohesive instead of visually chaotic.
Think About the Best Photo Composition
The arrangement of the booth can influence the final photographs just as much as the decorations. The wooden frame naturally creates a border around the people standing inside it, while the greenery adds texture around the edges.
Leave the center relatively open. This is where guests will stand, so too many decorations in the middle can make the space feel cramped. Use the corners and outer edges for your most detailed styling.
It is also worth considering what guests will see behind the booth. A beautiful garden, trees, lawn, or softly lit outdoor area can become part of the composition. Whenever possible, position the booth so the natural surroundings enhance the photos rather than compete with them.
Plan for Day and Evening Photos
An outdoor photo booth may look completely different depending on the time of day. During daylight, greenery and flowers become the main visual elements. As evening arrives, string lights, lanterns, and candles become increasingly important.
If your wedding extends into the evening, test the setup after dark before the event. Check whether faces are clearly visible, whether the background remains attractive, and whether the lights create unwanted shadows.
DIY Photo Booth Setup Checklist
Creating the booth becomes much easier when you separate the project into a few manageable categories. Start with the structure, then add the background, lighting, decorative elements, and guest-friendly finishing touches.
- Choose the location. Look for a scenic area with enough room for guests and equipment.
- Prepare the frame. Use a sturdy wooden structure that can safely support lightweight decorations.
- Add fabric. Use neutral draping to soften the backdrop.
- Attach greenery. Concentrate foliage around the upper corners and sides.
- Add flowers. Use small floral clusters to create focal points.
- Install lighting. Wrap warm string lights around the structure and add lanterns at ground level.
- Style the surrounding area. Add barrels, crates, rugs, or small decorative tables where appropriate.
- Test the photo area. Take sample photos from several angles before guests arrive.
How to Keep the Design Budget-Friendly
A DIY photo booth does not need a long shopping list. Start by identifying items that can serve more than one purpose. A wooden barrel can become a display table. A crate can hold lanterns. Existing garden greenery can provide part of the backdrop. Reusable string lights can create atmosphere while also functioning as decoration.
Borrowing or repurposing rustic pieces can also make the project more affordable. Look around the venue before buying anything. You may already have wooden furniture, baskets, planters, lanterns, or outdoor structures that can become part of the design.
Spend your effort on the elements that appear most clearly in photographs: the frame, greenery, lighting, and central backdrop. Small details matter, but they should support the overall composition rather than consume the entire decorating budget.
Personalize Your Rustic Wedding Photo Booth
The strongest DIY wedding decor usually has a personal touch. Consider adding a small sign with the couple’s initials, a meaningful date, or a short phrase that fits the celebration. You could also incorporate flowers that coordinate with the wedding arrangements or materials that echo the reception tables.
Keep personalization subtle. The goal is to make the booth feel like part of the wedding rather than a separate themed installation. When the colors, textures, and materials connect with the rest of the venue, the entire celebration feels more thoughtfully designed.
You can also create a small table nearby with instructions for guests. A simple message encouraging everyone to take a photo and share a favorite moment can turn the booth into an interactive part of the celebration.
At a Glance
- Natural wood creates the rustic foundation.
- Greenery and flowers add softness and texture.
- Warm string lights create an inviting evening atmosphere.
- Lanterns and barrels add practical rustic accents.
- An uncluttered center keeps the booth photo-friendly.
Final Thoughts on Creating a Picture-Perfect DIY Photo Booth
A rustic DIY photo booth is a wonderful way to combine wedding entertainment with meaningful decor. The inspiration behind this style proves that a few simple materials can create an atmosphere that feels warm, romantic, and memorable. A wooden frame provides structure, greenery brings the garden indoors, flowers add softness, and warm lighting gives the entire area a magical glow.
The most important thing is to design the booth around the people who will use it. Give guests enough space, keep the center open, make the lighting flattering, and choose decorative details that complement rather than compete with the photographs. From an intimate backyard celebration to a larger outdoor wedding, the same principles can be adapted to fit the venue and budget.
The best photo booth is one guests naturally want to visit. Create an inviting setting with warm light, comfortable space, personal details, and a backdrop that reflects the relaxed beauty of a rustic wedding. Then let your guests turn that little corner into a collection of genuine memories.
Whether you are planning a rustic wedding, garden celebration, engagement party, or outdoor reception, these DIY photo booth ideas offer an easy starting point. Focus on natural textures, warm illumination, thoughtful placement, and a cohesive palette. With a little creativity, an ordinary outdoor corner can become one of the most photographed and loved spaces of the day.