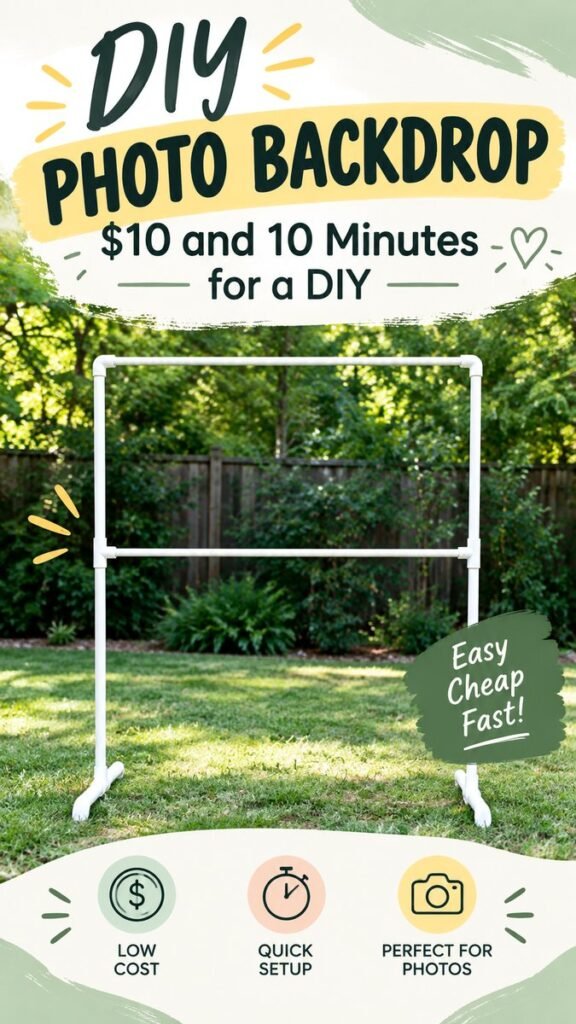
A great photo backdrop does not have to be complicated, expensive, or difficult to store. This simple DIY photo backdrop shows how a few lightweight materials can be turned into a practical frame for parties, portraits, celebrations, crafts, and everyday photography. The clean rectangular structure creates a defined space for adding fabric, balloons, greenery, paper decorations, streamers, or other decorative elements, while the open design keeps the setup flexible.
Key Takeaways
- A DIY photo backdrop can create a dedicated photo area without bulky furniture.
- A simple freestanding frame works as a versatile foundation for many decorating styles.
- Lightweight materials make the backdrop easier to move, customize, and store.
- Choose decorations based on the occasion, color palette, and available space.
- A clean frame can be reused for birthdays, showers, holidays, parties, and photo sessions.
Why a DIY Photo Backdrop Is Such a Useful Project
A dedicated photo area instantly gives an event or gathering a more intentional feel. Instead of taking pictures against a random wall or cluttered corner, you can create a defined backdrop that helps keep attention on the people in the frame. The simple structure shown here is especially useful because it provides a blank foundation that can be dressed up in countless ways.
The beauty of this kind of DIY photo backdrop is its flexibility. The frame itself can remain minimal, or it can become the foundation for a much more decorative display. Add a sheet of fabric for a soft portrait background, attach paper flowers for a cheerful celebration, or layer balloons around the upper portion for a festive photo booth.
Important: The most useful backdrop is one that matches the space where it will be used. Keep the structure stable, leave enough room around it for people to move comfortably, and make sure decorations do not interfere with the camera view.
The Simple Structure Behind This DIY Backdrop
The design features a tall rectangular frame with a horizontal support across the middle and two feet extending outward at the bottom. Its uncomplicated shape is what makes it so adaptable. There is plenty of open space inside the frame, allowing the background material or decorative elements to become the visual focus.
A project like this can be approached as a reusable backdrop stand rather than a one-time decoration. Once the basic frame is assembled, you can change the covering and accessories whenever you want a different look. That makes it practical for anyone who regularly photographs parties, handmade projects, family gatherings, seasonal decorations, or creative content.
Think of the Frame as a Blank Canvas
The open frame does not need to look elaborate by itself. Its purpose is to provide structure. Once you add a backdrop or decorative layer, the overall appearance can change dramatically.
- Use neutral fabric for portraits and simple photography.
- Add colorful paper decorations for birthdays and celebrations.
- Use greenery or faux foliage for an outdoor-inspired setting.
- Hang streamers for a playful party backdrop.
- Layer different textures to create more visual depth.
Materials to Consider for a Budget-Friendly Photo Backdrop
The reference design suggests a lightweight pipe-style frame, making it a good example of how a backdrop can be created without relying on a large permanent structure. The exact materials can be adapted to your needs, but the main idea is to select pieces that are lightweight, easy to assemble, and suitable for the intended setting.
Basic Frame Components
For a similar concept, consider lightweight plastic pipes and compatible connectors designed to create a rectangular frame. You will need vertical sections, horizontal sections, connectors, and a stable base. The measurements should depend on the available space and how large you want the finished photo area to be.
Before purchasing materials, measure the location where you plan to use the backdrop. A frame that works beautifully outdoors may be too large for a small living room, while a compact frame may not provide enough room for group photos.
Backdrop Materials
Once the frame is ready, the creative part begins. Fabric is one of the easiest options because it can be folded away after use and swapped for another color or texture. Other possibilities include paper, lightweight banners, artificial greenery, ribbons, balloons, or decorative panels that can be safely attached to the structure.
Choose materials according to the type of photographs you want. A smooth, uncluttered background works well when the people or subject should remain the main focus. More detailed decorations can be appropriate for parties and themed events where the backdrop itself is part of the celebration.
Why This Matters
A reusable frame gives you more creative freedom than a single-use background. Keep the base structure simple, then change the surface decoration whenever your event, season, or photography style changes.
How to Plan Your DIY Photo Backdrop
Good planning makes this project much easier. Start by deciding where the backdrop will be used and what kind of photos you want to take. Consider the number of people who need to fit into the frame, the camera distance, the amount of available floor space, and whether the setup will be indoors or outdoors.
- Choose the location. Find a clear area with enough room for the frame, photographer, and subjects.
- Decide on the size. Make the frame large enough for the intended photos without overwhelming the space.
- Select the background. Choose fabric or another lightweight covering that complements the occasion.
- Plan the decoration. Decide where accents such as balloons, greenery, ribbons, or signs will go.
- Test the camera view. Take a quick test photo before finalizing the decoration.
DIY Photo Backdrop Ideas for Different Occasions
One of the biggest advantages of a simple backdrop stand is that it can be reused throughout the year. You do not have to build a completely new structure every time you want a different photo setup. Change the decorative layer and you can create an entirely new atmosphere.
Birthday Parties
Create a cheerful birthday photo booth by combining balloons, paper fans, streamers, or a simple fabric background. Keep the most detailed decorations around the edges so the center remains open for photographs.
Baby and Family Celebrations
For showers and family gatherings, soft neutral fabrics, simple greenery, ribbons, and understated decorations can create a warm photo area. A neutral base is especially useful because it can be reused for different events.
Seasonal Events
A reusable frame can also become a seasonal decorating station. Add autumn-inspired textures, winter details, spring flowers, or summer colors without changing the underlying structure.
DIY Content and Product Photos
A clean backdrop can also help create a more consistent setting for photographing crafts, handmade projects, decorations, and other creative work. Keeping the background visually simple can help the subject stand out.
Pro Tip: Before adding lots of decoration, take a test photo with the camera positioned where it will actually be used. This quickly reveals whether an accessory is distracting, whether the frame is visible, and whether the background has enough visual contrast.
How to Make the Backdrop Look More Professional
A professional-looking photo backdrop is not necessarily the one with the most decoration. Balance is more important. Too many competing colors, patterns, or objects can make photographs feel busy. A thoughtful combination of one main background and a few supporting accents often creates a cleaner result.
Consider using a limited color palette. Pick one dominant color, one complementary shade, and perhaps a small accent color. This makes the backdrop feel coordinated while still giving you room to add personality.
Spacing also matters. Leave some open areas instead of covering every inch of the frame. The empty space gives people somewhere to stand and helps the main subjects remain visually prominent.
Keep the Center Clear
If people will stand in front of the backdrop, avoid placing bulky decorations directly behind their faces or upper bodies. Decorative details usually work best around the outer edges, along the top, or in controlled clusters.
Pay Attention to Lighting
Even a beautiful backdrop can look disappointing if the lighting is uneven. Whenever possible, position the photo area where the subject receives consistent light. Outdoors, soft natural light can create a pleasant result. Indoors, avoid strong backlighting that turns people into silhouettes.
Tips for Using a DIY Backdrop Outdoors
The outdoor setting shown with this style of backdrop demonstrates how naturally a simple frame can blend into an open environment. Outdoor setups can provide beautiful natural backgrounds, but they also require extra attention to stability.
- Place the frame on a reasonably level surface.
- Check that the base is stable before allowing anyone to stand nearby.
- Avoid leaving a lightweight structure unattended in windy conditions.
- Keep decorative materials appropriate for the weather.
- Check the background through the camera rather than relying only on what you see in person.
For outdoor photography, the surrounding environment can become part of the composition. Trees, gardens, lawns, patios, and other natural settings can provide texture beyond the main backdrop. If you want a cleaner image, choose a location where the surrounding scenery is less distracting.
Ways to Customize Your Photo Backdrop
Customization is where this DIY project becomes especially fun. The same basic structure can support very different visual styles. You can make it modern, rustic, colorful, minimalist, playful, or seasonal simply by changing the materials placed around it.
- Minimalist: Use a single neutral fabric with very few accents.
- Colorful: Combine balloons, paper shapes, and bright fabric.
- Natural: Add greenery, faux vines, or botanical-inspired decorations.
- Elegant: Choose flowing fabric and a restrained color palette.
- Playful: Mix streamers, paper decorations, and cheerful patterns.
You can also create interchangeable backdrop panels. Instead of permanently attaching one background, keep several lightweight options available. This allows the same frame to serve different purposes without taking up much additional storage space.
Making a Reusable Photo Booth Area
If you host gatherings regularly, consider treating the backdrop as a permanent part of your event supplies. Store the frame components together with folded fabrics and lightweight decorations. When an occasion arrives, you can select a combination that fits the theme.
A small container can hold reusable clips, ties, ribbons, and other attachment accessories. Keeping these pieces organized saves time when you are preparing the backdrop and makes it easier to switch between designs.
The key is to make the system simple. If changing the background takes only a few minutes, you are much more likely to reuse the setup instead of starting from scratch each time.
Common DIY Photo Backdrop Mistakes to Avoid
Even a straightforward backdrop can benefit from a little preparation. One common mistake is making the structure too large for the location. Always consider the full footprint, including the base, before assembling it.
Another issue is adding too much visual detail. Decorations should support the photographs rather than compete with the people or products being photographed. If the image looks crowded through the camera, remove a few elements and test again.
Finally, do not overlook stability. A lightweight structure should be positioned carefully and used responsibly, particularly outdoors. The backdrop should remain secure while people move around it and while decorations are being attached.
At a Glance
- Style: Clean, simple, and highly customizable
- Best use: Parties, portraits, photo booths, and creative photography
- Design: Freestanding rectangular frame with an open center
- Customization: Fabric, balloons, greenery, paper decor, ribbons, and more
- Big advantage: One reusable frame can support many different backdrop designs
Conclusion
A DIY photo backdrop is a practical project that proves a photo area does not need to be complicated to make an impact. A simple freestanding frame provides a flexible foundation that can be transformed for birthdays, family celebrations, seasonal events, portraits, photo booths, and creative projects.
The most successful setup starts with a sturdy, appropriately sized structure and a clear idea of how the space will be photographed. From there, a few carefully selected decorative elements can completely change the look. Because the frame can be reused, you can experiment with different colors, fabrics, textures, and themes without rebuilding the entire project.
Whether you want a quick photo station for a celebration or a reusable background for regular photography, this simple DIY concept offers plenty of room for creativity. Keep the structure practical, the decoration intentional, and the center of the frame uncluttered. With those basics in place, you can create a photo backdrop that looks polished while remaining easy to adapt for whatever comes next.