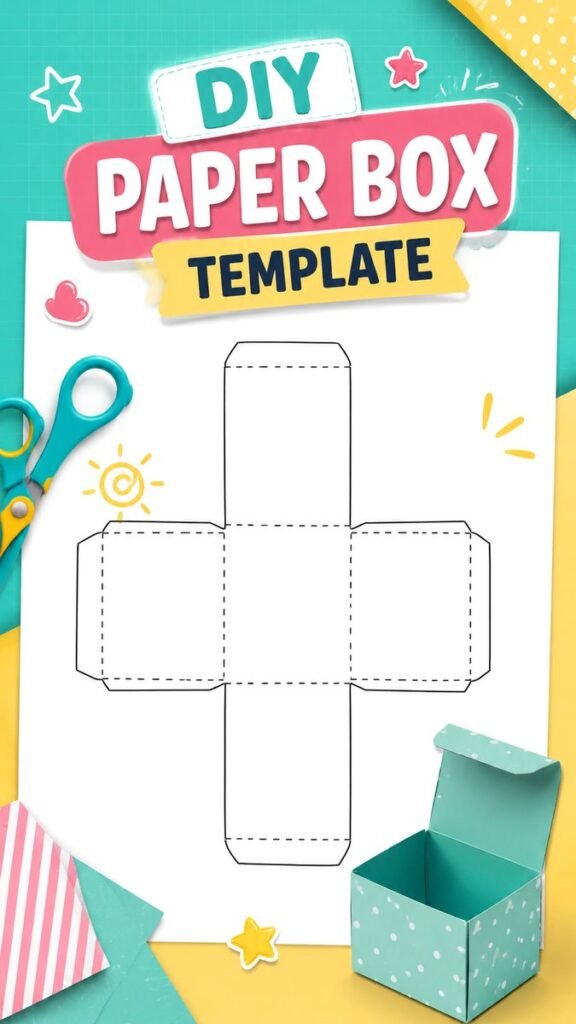
Making a simple paper box is one of those crafts that proves you do not need complicated supplies to create something useful and fun. With a printable box template, a sheet of paper or cardstock, scissors, and a little patience, you can turn a flat piece of paper into a neat three-dimensional container. This type of DIY paper box is especially appealing for kids, beginners, classrooms, party projects, gift packaging, and anyone who enjoys easy paper crafts.
The template shown features a straightforward foldable design with a central base, connected side panels, tabs, and clearly marked fold lines. Once the outline is cut and the indicated sections are folded, the flat template becomes a practical little box. You can keep the design simple or decorate the finished project with colorful paper, stickers, drawings, stamps, or patterned materials.
Key Takeaways
- A printable paper box template makes this craft simple for beginners.
- Dashed lines generally indicate where the paper should be folded.
- Cardstock can provide more structure than ordinary printer paper.
- The finished box can be customized for gifts, crafts, storage, and activities.
- Children can enjoy decorating the template before assembling it.
- Careful cutting and accurate folding help create cleaner edges.
What Makes a DIY Paper Box So Useful?
A DIY paper box combines creativity and practicality in one small project. Unlike crafts that are mainly decorative, a paper box can actually hold lightweight objects. That makes it useful for organizing craft supplies, presenting small handmade items, creating party favors, or simply giving children a hands-on activity.
The flat-template approach also makes the project approachable. Instead of having to measure every panel from scratch, you can work from an established outline. The main challenge becomes understanding which lines are cut, which lines are folded, and where the tabs connect.
Important: The key to a successful paper box is precision. Take your time when cutting around the outer outline and make your folds as straight as possible. A few extra moments of careful preparation can make the final box look much neater.
Understanding the Paper Box Template
A paper box template may look like a collection of rectangles and tabs at first, but each section has a purpose. The central area typically forms the bottom of the box, while the surrounding panels become the walls. Additional flaps or tabs provide surfaces that can be folded inward and secured during assembly.
In the design shown, solid lines define the outside cutting shape while dashed lines help identify folding areas. This distinction is important because cutting along every line would separate the template into individual pieces instead of leaving the connected structure needed for assembly.
Cut Lines and Fold Lines
Before starting, look carefully at the template. Solid outer lines are generally used as the cutting guide, while dashed lines indicate folds. The exact construction can vary between templates, so it is always helpful to inspect the entire pattern before picking up the scissors.
- Solid outline: Follow this line when cutting out the complete template.
- Dashed lines: Use these as guides for folding.
- Tabs: Fold these inward to help connect the box panels.
- Panels: These become the base, sides, and other surfaces of the finished box.
Why Cardstock Can Be a Good Choice
Regular printer paper is convenient and works well for practicing the folding process. However, cardstock can make a more structured paper box because it holds its shape more firmly. If children are making the craft for the first time, ordinary paper can be useful for learning the steps before moving on to a heavier material.
For a decorative project, consider choosing paper with a color or pattern that matches the purpose of the box. Bright colors can make the craft playful, while neutral shades can create a simple handmade look.
Supplies for an Easy Box DIY
One reason this project is so accessible is that the supply list is short. You can start with basic craft materials already found around the house or classroom.
- A printed paper box template
- Paper or cardstock
- Scissors
- A pencil for marking or reinforcing folds if needed
- Glue or double-sided tape for securing tabs
- Optional decorations such as stickers, markers, crayons, or patterned paper
If the project is being completed by young children, adult supervision may be appropriate when scissors or adhesive materials are being used. The decorating stage can then become an opportunity for children to personalize their boxes.
How to Make a Paper Box From a Template
The basic process is simple, but neat results depend on taking each step carefully. Resist the temptation to rush through the cutting and folding stages.
1. Print or Trace the Template
Begin with the box template on a flat sheet of paper. Make sure the complete pattern is visible and positioned comfortably on the page. If you are creating your own reusable version, you can also trace the outline onto cardstock after practicing with a regular sheet of paper.
2. Cut Around the Outer Shape
Use scissors to carefully follow the outside cutting lines. Keep the scissors steady and avoid cutting across the tabs or internal fold lines. Smooth curves or angled corners may require slower movements than long straight edges.
3. Score or Fold the Dashed Lines
Once the template is cut out, gently fold along the dashed guides. Folding the paper before applying glue makes the assembly process easier because you can see how each panel will move into position.
For crisp folds, place the template on a firm, clean surface. Use the edge of a ruler or another smooth tool to help create a straight crease if appropriate. There is no need to press aggressively. A controlled fold is usually enough.
4. Fold the Box Panels Into Position
Bring the surrounding panels upward around the central section. Pay attention to the direction of each fold. The tabs should move into the positions that allow the connected panels to form the walls of the box.
5. Secure the Tabs
Apply a small amount of glue or use double-sided tape on the appropriate tabs. Press each connection firmly for a moment so the adhesive can hold. Avoid using too much glue because excess adhesive can wrinkle lightweight paper.
6. Let the Box Set
After assembling the box, allow the adhesive to settle before putting anything inside. Check the corners and gently adjust any panels that appear uneven while the glue is still workable.
Expert Insight
A test version can save time when you are working with special paper. Make the first box from ordinary printer paper, learn how the folds connect, and then recreate it with your favorite cardstock or decorative sheet.
Creative Ways to Customize Your Box
A plain paper box is only the starting point. Once you understand the construction, there are countless ways to make the finished piece feel personal.
Use Colorful Paper
Choose a bright sheet for a cheerful craft project or a softer shade for a more understated look. Mixing the colors of the paper and decorations can also create an attractive contrast.
Add Simple Doodles
Markers and colored pencils can transform an ordinary box into a personalized creation. Children can draw flowers, stars, geometric patterns, smiley faces, initials, or other simple designs.
Try Patterned Paper
Polka dots, stripes, checks, and other repeating patterns can give a handmade box an instantly finished appearance. If the paper already has a strong pattern, keep additional decorations minimal so the design does not become visually crowded.
Decorate After Assembly
Another approach is to assemble the box first and then decorate the completed shape. This can be helpful when you want to place a sticker or design precisely on a particular side.
Pro Tip: Keep decorations lightweight and avoid covering important fold areas with thick materials. The cleaner the folds remain, the easier it is for the box to keep its intended shape.
Fun Uses for a Homemade Paper Box
Once assembled, a paper box can serve many creative purposes. Its small, handmade character makes it especially suitable for lightweight items and short-term organization.
- Small craft supply containers
- Handmade gift packaging
- Party favor boxes
- Classroom craft projects
- Children’s sorting activities
- Desk organization for lightweight items
- Decorative containers for small keepsakes
- Creative packaging for handmade projects
For children, the finished box can also become part of imaginative play. They can create several boxes in different colors and use them for pretend shops, sorting games, or organizing small craft materials.
Easy Box DIY Ideas for Kids
This craft can be adapted to different ages and skill levels. Younger children may enjoy coloring and decorating a pre-cut template, while older children can practice measuring, cutting, folding, and assembling the complete design.
For a group activity, prepare several templates in advance and provide a selection of safe craft supplies. Let each child choose a color scheme and decoration style. The result is a collection of boxes that follow the same basic construction but look completely different.
You can also turn the activity into a small lesson about shapes. A flat template gives children a visual way to understand how two-dimensional surfaces can become a three-dimensional object through folding and joining.
Common Paper Box Mistakes to Avoid
Even an easy paper craft can become frustrating if the template is cut incorrectly or the folds are rushed. Fortunately, most common problems are easy to prevent.
Cutting Too Quickly
Rushing around corners can produce uneven edges. Slow down whenever the template changes direction, and rotate the paper rather than forcing the scissors into an awkward position.
Folding in the Wrong Direction
Before adding glue, fold the pieces temporarily so you can understand how the box comes together. This dry assembly step makes it easier to correct mistakes.
Using Too Much Adhesive
A small amount of glue is usually enough for paper tabs. Too much adhesive can soften the paper and create messy edges. Double-sided tape can be another convenient option for a clean assembly.
Choosing Paper That Is Too Thin
Thin paper can work for practice, but a finished box may benefit from a sturdier sheet. If the box needs to hold its shape, consider using cardstock or another appropriately firm craft paper.
At a Glance
- Start with a clear paper box template.
- Cut the outside shape carefully.
- Fold accurately along the marked guides.
- Secure the tabs with a small amount of adhesive.
- Decorate the finished box to make it your own.
Why This Simple Craft Is Worth Trying
The appeal of a DIY paper box comes from its simplicity. You begin with a flat sheet and finish with a useful object, making the transformation satisfying even for beginners. The project also offers plenty of room for creativity without requiring a large collection of supplies.
It is easy to adjust the experience depending on your goal. If you want a quick craft, focus on cutting, folding, and assembling. If you want a longer creative activity, spend more time designing the paper, decorating the panels, and experimenting with different finishes.
Most importantly, the template provides a helpful starting point without taking away the creative part of the project. You can follow the basic structure while choosing your own paper, colors, patterns, decorations, and uses.
Conclusion
An easy box DIY project is a practical way to enjoy paper crafting while creating something you can actually use. With a printable template, a few basic supplies, careful cutting, and accurate folds, a flat piece of paper can become a charming little container in just a few steps.
Whether you are planning a kids’ craft session, looking for a beginner-friendly paper project, preparing handmade packaging, or simply searching for a creative afternoon activity, a paper box template is a great place to start. Experiment with cardstock, colorful patterns, stickers, drawings, and other simple decorations to give every box its own personality.
Keep a few favorite templates and paper colors on hand, and you will always have an easy craft idea ready to go. The next time you need a small handmade container or a fun activity, grab some paper, scissors, and your creativity, then turn a simple sheet into a box worth sharing.
Tags
Box DIY Paper Box DIY Paper Crafts Paper Box Template Printable Box Template Kids Crafts Easy Crafts Paper Craft Ideas