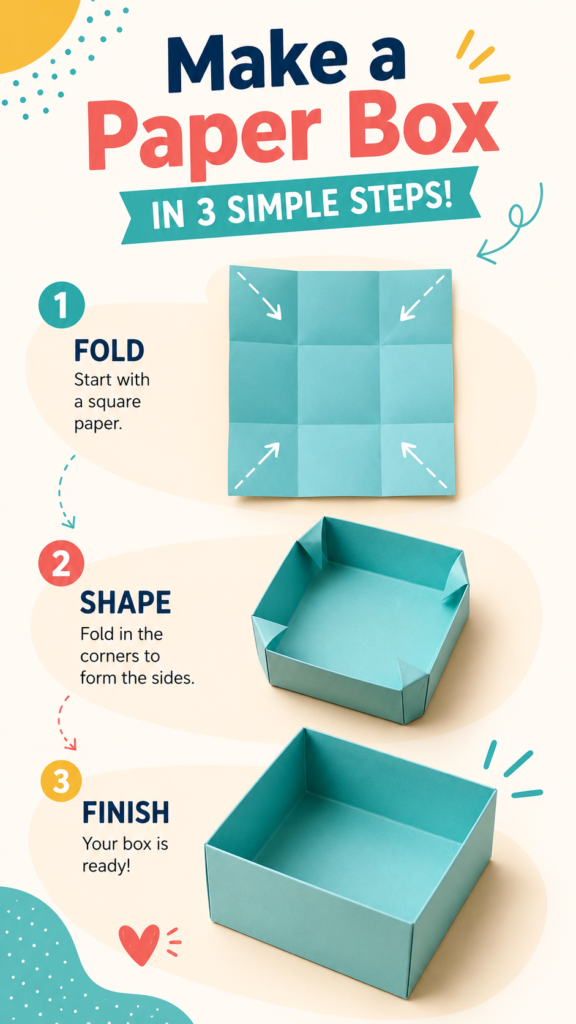
A simple sheet of paper can become something surprisingly useful with just a few careful folds. Learning how to make a DIY paper box is an easy craft project for beginners, families, classrooms, and anyone who enjoys practical handmade ideas. With a square piece of paper and a few simple folds, you can create a lightweight open box that works beautifully for organizing small items, presenting gifts, or adding a handmade touch to everyday spaces.
This paper box tutorial focuses on a straightforward three-step process: fold the paper, shape the sides, and finish the box. The result is a clean, square container with raised walls and a useful open interior. Once you understand the basic technique, you can experiment with different paper colors, patterns, sizes, and finishes to create boxes for many occasions.
Key Takeaways
- A DIY paper box can be made with basic paper and simple folding techniques.
- Clear creases help the finished box hold its shape neatly.
- Square paper makes it easier to create balanced sides and corners.
- Different paper colors and patterns can completely change the finished look.
- Handmade paper boxes are useful for storage, crafts, gifts, and small accessories.
Why Make a DIY Paper Box?
Making a paper box is one of those crafts that combines creativity with practicality. Instead of buying a small container for every little item, you can turn paper you already have into a simple handmade solution. The project also requires very little preparation, which makes it ideal when you want a quick craft that produces something useful.
The finished box can be used on a desk, shelf, craft table, bedside table, or gift-wrapping station. It is especially convenient for lightweight objects such as notes, clips, beads, ribbons, craft supplies, jewelry, and other small accessories.
Important: The quality of the finished box depends heavily on accurate folds. Take a moment to line up each edge before pressing the crease. A few extra seconds of careful folding can make the final container look much cleaner and more balanced.
What You Need to Make a Paper Box
One of the best things about this DIY box idea is how simple the supply list can be. You do not need complicated crafting equipment to get started.
- Square sheet of paper: Choose a color or pattern that matches your project.
- Flat work surface: A clean table makes folding easier and more precise.
- Your hands: Firm fingertips are usually enough to create the necessary creases.
- Optional ruler: Useful if you want to check measurements or create especially precise folds.
For a first attempt, a medium-weight craft or origami-style paper is a practical choice. Very thin paper can work, but the finished box may be softer. Heavier paper can create a sturdier container, although it may require more effort to fold sharply.
Step 1: Fold and Crease the Paper
Begin with a square sheet of paper placed flat on your work surface. The first stage is about establishing the folds that will guide the rest of the project. The reference design shows a grid-like arrangement of creases, creating a central area surrounded by sections that will eventually become the walls of the box.
Fold carefully and press along each crease so the lines are easy to see. Try to keep opposite sides aligned. If the folds are uneven at this stage, the corners may not meet properly when you begin shaping the box.
Keep the Creases Sharp
A crisp crease gives you more control. Run a fingertip firmly along each fold before moving to the next step. If your paper has a patterned side and a plain side, decide which surface you want on the outside before beginning.
It can also help to work slowly rather than trying to complete several folds at once. The goal is not speed. The goal is a set of clear, consistent lines that make the later shaping process much easier.
Step 2: Shape the Sides and Corners
Once the main creases are established, begin bringing the outer sections upward to form the walls. This is the stage where a flat piece of paper starts to look like a container.
The corners require particular attention. Fold the corner sections inward according to the existing crease lines, allowing the paper to overlap and support the raised sides. Work around the box one corner at a time instead of trying to shape everything simultaneously.
Expert Insight
Think of the creases as a built-in construction guide. Rather than forcing the paper into shape, follow the lines you created in the first step. When the folds are aligned, the walls naturally begin to rise and the corners become easier to secure.
Check Each Corner
As you shape each corner, pause and look at the height of the surrounding walls. If one side appears noticeably higher or lower, gently unfold it and adjust the crease. Small corrections are much easier before the box is completely formed.
Do not worry if the paper feels slightly loose at first. The box becomes more stable as all four sides are folded into position. Press the corner folds firmly once everything is aligned.
Step 3: Finish Your Handmade Paper Box
With the sides raised and the corners folded, the basic box is ready. At this point, gently adjust the walls so they sit evenly around the central base. The finished shape should have a flat interior and four raised sides.
Press the bottom and corner folds one more time to strengthen the shape. If necessary, lightly adjust the edges so the box sits flat on the table. A few final touches can turn a basic folded container into a neat handmade organizer.
Pro Tip: If you want a more polished result, make every crease deliberately before assembling the box. Consistent folds create cleaner corners, straighter walls, and a more professional-looking finished piece.
Creative Ways to Use a DIY Paper Box
A handmade paper box is more versatile than it first appears. Because the design is lightweight and easy to customize, you can adapt it to many small organizing and decorating projects.
Small Item Organizer
Place the box on your desk to collect paper clips, sticky notes, craft pieces, or other small supplies. Several boxes can be arranged side by side to create a simple modular storage system.
DIY Gift Box
A paper box can also become part of a handmade gift presentation. Choose a decorative paper and add a small piece of tissue paper or another lightweight decorative element inside. The handmade packaging can make a small gift feel more personal.
Craft Supply Storage
Use several boxes to separate beads, ribbons, paper scraps, stickers, buttons, or other lightweight craft materials. Labeling each box can make a small crafting area easier to keep organized.
Desk and Bedroom Organization
The open design makes it convenient for objects you use frequently. Keep small accessories in one box, notes in another, and miscellaneous items in a third. Matching papers can create a coordinated look, while different patterns can make each container easy to identify.
How to Make Your Paper Box Look Better
The folding technique is only part of the creative process. Paper selection can dramatically change the appearance of the final project.
- Use pastel paper for a soft, modern appearance.
- Choose bold colors for a playful craft-room organizer.
- Try patterned paper for decorative gift packaging.
- Use matching colors when making multiple boxes for a coordinated set.
- Experiment with different paper sizes to create boxes for different purposes.
You can also create a simple color theme. Teal, blue, cream, coral, yellow, and other cheerful shades work particularly well for craft projects because they add visual interest without requiring complicated decoration.
Common DIY Paper Box Mistakes to Avoid
Paper folding is forgiving, but a few common mistakes can make the final box less stable or uneven. Fortunately, most are easy to prevent.
- Skipping the creases: Weak fold lines make the shaping stage more difficult.
- Using an uneven sheet: A properly square starting sheet helps create balanced sides.
- Folding too quickly: Rushing can cause edges and corners to become misaligned.
- Ignoring the corners: The corners play an important role in supporting the box walls.
- Overworking the paper: Repeatedly unfolding and refolding the same area can weaken the paper.
If your first box is not perfectly symmetrical, consider it part of the learning process. Once you understand how the folds interact, your next attempt will usually be much easier.
Tips for Beginners
Start with a reasonably sized square sheet. Very small paper can be difficult to manipulate, especially if you are learning the folding sequence for the first time.
Work on a firm, flat surface and keep your hands clean and dry. Smooth paper is easier to fold accurately when you can clearly see every crease. If a fold needs correcting, open it gently instead of pulling sharply on the paper.
Most importantly, focus on accuracy rather than speed. A simple DIY box can be completed quickly once the technique becomes familiar, but your first few attempts are an opportunity to practice precision.
Why This Simple Craft Is Worth Saving
Paper crafts are easy to revisit because they require few supplies and can be adapted to different projects. A basic paper box tutorial can become a useful reference whenever you need quick handmade storage, creative packaging, or an easy activity for a craft day.
The technique also provides a foundation for exploring more paper-folding projects. Once you become comfortable creating clean creases and shaping corners, you can begin experimenting with lids, layered containers, decorative papers, and more advanced folded designs.
Make It Your Own
The beauty of a DIY box is that there is no single style you have to follow. The basic structure can remain simple while the materials and presentation change completely.
Try making one box in a calm neutral shade for a minimalist desk, then create another using bright patterned paper for a craft corner. For gifts, coordinate the paper with the occasion or the recipient’s favorite colors. Making several boxes in different sizes can also create a practical collection for organizing small objects.
At a Glance
- Start: Use a square sheet of paper.
- Fold: Create clear, even crease lines.
- Shape: Raise the sides and fold the corners inward.
- Finish: Adjust the walls and reinforce the creases.
- Use: Store small items, package gifts, or decorate your space.
Conclusion: A Simple Paper Craft With Plenty of Possibilities
Making a DIY paper box is a simple way to turn an ordinary sheet of paper into something practical and attractive. The process starts with careful folding, moves into shaping the corners and sides, and ends with a lightweight box that can be customized for countless uses.
Whether you are looking for an easy paper craft, a handmade gift box, a small storage solution, or a beginner-friendly folding project, this idea is a great place to start. Keep your creases sharp, take your time with the corners, and experiment with different colors and patterns until you find a style you love.
Once you have mastered the basic technique, keep a few sheets of square paper nearby. You may be surprised by how often a quick folded box becomes the perfect solution for a small organizing or crafting need.
Tags
DIY Box Paper Box Paper Crafts Easy Crafts DIY Storage Origami Box Craft Ideas
Which would you try first: a gift box, desk organizer, or craft-supply box?