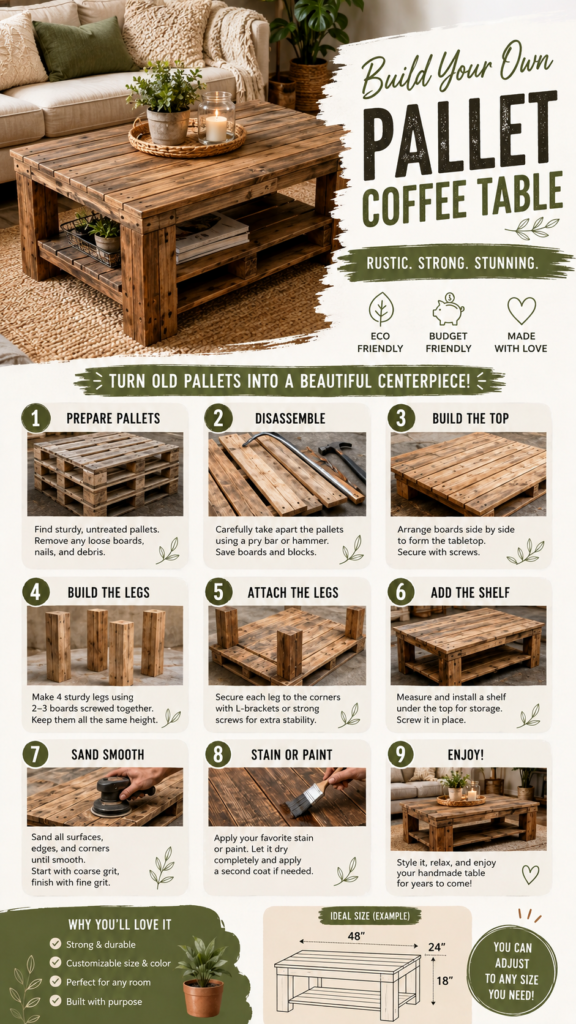
A beautiful coffee table does not have to come with a high price tag. With a few sturdy wooden pallets, basic tools, and some patience, you can create a practical piece of furniture that brings warmth and character to your living space. A DIY pallet table is an especially appealing project for anyone who enjoys rustic decor, upcycling, and hands-on home improvement.
The design featured here combines a substantial wooden tabletop, chunky legs, and a useful lower shelf. Its natural wood appearance works beautifully with cozy interiors, neutral fabrics, woven textures, plants, and other relaxed decorating elements. Even better, the basic construction can be adjusted to suit the size, height, and finish you prefer.
Key Takeaways
- A DIY pallet table can create a rustic focal point without requiring complicated construction.
- Choose sturdy pallets and inspect every board before starting the project.
- Careful sanding is essential for a smoother, safer furniture surface.
- A lower shelf adds storage space while making the table more functional.
- Stain or paint gives you an easy way to personalize the final appearance.
- The dimensions can be adapted to fit your room and seating arrangement.
Why Build a DIY Pallet Table?
A coffee table is one of those furniture pieces that needs to balance appearance and everyday usefulness. It should look good in the room, but it also needs enough strength and surface area for drinks, books, decorative objects, trays, and other everyday items. A pallet table naturally lends itself to this balance because its construction is based on substantial wooden boards and a practical, straightforward shape.
The rustic appearance is another major advantage. Instead of hiding every variation in the wood, a pallet table can celebrate knots, grain patterns, small imperfections, and differences in tone. A warm stain can emphasize those characteristics, while paint can create a cleaner or more contemporary look.
There is also something satisfying about turning reclaimed-looking materials into a finished piece of furniture. The result feels more personal than a generic table because you have chosen the proportions, finish, and details yourself.
Important: The quality of the pallets matters more than simply finding the cheapest ones. Look for sturdy, clean boards with no obvious structural damage, and avoid materials that are visibly contaminated, heavily damaged, or unsuitable for indoor furniture.
Planning Your Pallet Coffee Table
Before picking up a hammer or drill, decide what you want the finished table to accomplish. The reference design has a generous rectangular top and an open lower shelf, making it useful both as a centerpiece and as additional storage.
Think about the available floor space first. A coffee table should leave enough room for people to move comfortably around it. Measure the distance between your sofa, chairs, and other furniture before deciding on the final dimensions.
Consider the Tabletop
The tabletop is the visual focus of the project. Boards should sit closely enough together to create a stable surface, while the overall frame should remain square and properly supported. The example design uses a substantial rectangular profile that gives the table a sturdy, substantial appearance.
Think About Height
The ideal height depends on your seating. A lower coffee table generally feels relaxed and works well with sofas and lounge chairs. The illustrated example shows a compact coffee-table proportion, but there is no need to copy those measurements exactly. Adjust the height to your own furniture and comfort preferences.
Decide on Storage
One of the most useful features of this design is the lower shelf. It creates a convenient place for books, baskets, small storage containers, magazines, or decorative objects. If you prefer a cleaner appearance, the shelf can also be used sparingly so the table retains an open, airy feel.
Materials and Basic Tools
The project shown in the design uses a relatively simple collection of materials. You do not need an enormous workshop to get started, although having the right basic equipment will make the process easier and more precise.
- Two or three sturdy wooden pallets
- Wood screws suitable for the project
- A drill or screwdriver
- A pry bar or claw hammer for dismantling pallets
- A saw if boards need to be trimmed
- Sandpaper or a power sander
- A measuring tape
- Wood stain or paint, if desired
- Nails or additional fasteners where appropriate
The exact amount of material will depend on the dimensions you choose and the condition of the pallets. Measure twice before cutting so you can make the most efficient use of your boards.
Step 1: Find and Prepare the Pallets
Start by selecting pallets that are sturdy enough for furniture construction. Inspect the boards carefully for cracks, loose sections, excessive moisture damage, or other problems that could affect the finished table.
Clean the pallets thoroughly and remove dirt, loose debris, and unwanted nails. If you are unsure about a pallet’s history or treatment, choose another one rather than taking unnecessary chances.
Pro Tip: Do not rush the preparation stage. Straight, clean, sturdy boards will make every later step easier, from assembly to sanding and finishing.
Step 2: Carefully Disassemble the Pallets
If the pallets need to be broken down, work slowly with a pry bar or hammer. The goal is to remove the boards while keeping as much usable wood intact as possible. Pallet nails can be stubborn, so avoid applying excessive force in a way that could split the boards.
Sort the boards as you go. Longer, straighter pieces are useful for the tabletop, while shorter sections can become supports, legs, or shelf components. Keeping the material organized will save time during assembly.
Step 3: Build the Tabletop
Arrange the selected boards side by side on a flat surface. Check the overall width and make sure the boards are aligned before securing them. A square or straight edge can help you maintain clean lines while assembling the frame.
The tabletop should feel solid rather than flexible. Add supporting boards underneath where needed, then secure the structure with suitable screws. Check the surface from several angles to make sure it remains level.
Step 4: Build Strong Table Legs
The illustrated design uses chunky wooden legs made from multiple boards. This creates the substantial rustic appearance that makes the finished table feel sturdy and handcrafted.
Build four legs that are as close to the same height as possible. Uneven legs can make the finished table rock, so accurate measuring is important. Before permanently attaching them, position the legs underneath the tabletop and check the proportions.
Step 5: Attach the Legs Securely
Position each leg near a corner while allowing enough room for the tabletop frame and fasteners. Secure the legs using appropriate screws and supports. L-brackets can provide additional stability where necessary.
Once the legs are attached, turn the table upright and gently test it for movement. If it rocks, check the leg lengths and the alignment of the frame before continuing.
Step 6: Add the Lower Shelf
A lower shelf is optional, but it adds both function and visual weight. Measure the space between the legs and build a shelf that fits comfortably without looking cramped.
The shelf can be positioned low enough to provide generous storage while still leaving plenty of visual space beneath the tabletop. Secure it firmly to the supporting structure so it can handle the weight of books or decorative accessories.
Why This Matters
A good DIY table is not only about appearance. Stability, smooth surfaces, accurate measurements, and strong joints determine whether the furniture remains useful over time. Spending extra attention on these hidden details can make the difference between a decorative project and a dependable everyday table.
Step 7: Sand Every Surface Smooth
Sanding is one of the most important stages of a pallet furniture project. Reclaimed-style boards can have rough areas, splinters, uneven edges, and old surface marks. Run your hand carefully over the wood after sanding to identify areas that still need attention.
Start with a coarser grit when necessary to remove rough imperfections, then move toward a finer grit for a smoother finish. Pay particular attention to the tabletop edges and corners because these are areas people are likely to touch frequently.
You do not necessarily need to sand away every character mark. The goal is to create a comfortable, usable surface while preserving the natural personality of the wood.
Step 8: Choose Stain or Paint
The natural wood finish shown in the design gives the table a warm rustic appearance. A wood stain can deepen the color while allowing the grain to remain visible. Choose a tone that complements your existing furniture rather than treating the finish as an afterthought.
Paint offers a completely different direction. A soft neutral can make the table feel lighter, while a deeper shade can turn it into a stronger accent piece. You can also combine painted sections with natural wood for a more customized appearance.
Important: Always allow the chosen finish to dry properly according to its product instructions before placing the table into regular use. A patient finishing process helps create a cleaner and more durable result.
Styling Your Finished DIY Table
Once the table is complete, styling is where its personality really comes through. The cozy example pairs the rustic wood with a simple tray, a small plant, and a candle. These elements create a relaxed centerpiece without overwhelming the tabletop.
Keep the Center Simple
A shallow tray is a practical choice because it groups decorative objects together and makes the surface easier to clear when needed. Add one or two small plants, a candle, or a carefully chosen decorative piece.
Use the Lower Shelf Wisely
The bottom shelf is ideal for books, baskets, magazines, or small storage boxes. Try to mix practical items with decorative pieces so the shelf feels intentional rather than cluttered.
Match the Surrounding Decor
Rustic pallet furniture works especially well with woven rugs, neutral upholstery, textured cushions, greenery, and warm natural materials. You can emphasize the handmade character of the table by keeping the surrounding decor relaxed and comfortable.
How to Customize Your Pallet Table
One of the best reasons to build furniture yourself is the freedom to change the design. You can make the table longer or shorter, adjust its height, change the shelf position, or create a different leg style.
- Change the dimensions: Scale the tabletop to suit your room.
- Modify the finish: Choose stain, paint, or a natural-looking finish.
- Adjust the shelf: Raise or lower it according to your storage needs.
- Experiment with legs: Use different support shapes for a distinct look.
- Add casters: Consider wheels if you want the table to move more easily.
- Round the edges: Softer corners can create a more refined appearance.
Common DIY Pallet Table Mistakes to Avoid
Even a simple woodworking project can become frustrating if preparation is skipped. One common mistake is choosing boards based only on appearance. Structural condition should come first.
Another mistake is rushing through sanding. Rough wood may look attractive in photographs, but splinters and sharp edges are not practical for a table used every day. Take your time with surfaces that will be touched frequently.
Finally, avoid assembling everything before checking measurements. A few minutes spent measuring and dry-fitting pieces can prevent unnecessary cutting and repositioning later.
A Practical Weekend Furniture Project
A DIY pallet table is appealing because the design can be approached in manageable stages. Preparation, disassembly, construction, sanding, and finishing each have a clear purpose. You do not need to complete every step at once, which makes the project easier to fit around a busy schedule.
The finished table can also become a starting point for other DIY furniture ideas. Once you understand the basic structure, similar techniques can be adapted for benches, side tables, shelves, outdoor furniture, or storage pieces.
At a Glance
- Choose sturdy pallets before beginning construction.
- Measure the room and seating area before setting dimensions.
- Build a strong tabletop and secure the legs carefully.
- Add a lower shelf for practical storage.
- Sand thoroughly and customize the final finish.
Conclusion: Build a Table That Feels Like Yours
A DIY pallet table is more than a simple furniture project. It is an opportunity to create something practical, attractive, and personal using straightforward woodworking techniques. The rustic tabletop, sturdy legs, and lower storage shelf create a versatile design that can work beautifully in a relaxed living room.
The most successful projects are built patiently. Start with good materials, measure carefully, create strong connections, sand the surfaces thoroughly, and choose a finish that complements your home. From there, small styling details can turn the finished piece into a warm centerpiece for everyday living.
Whether you keep the natural wood character or give the table a completely new color, the beauty of this project is its flexibility. Adjust the size, storage, finish, and details until the table fits your space and your style. With thoughtful preparation and a little creativity, a simple pallet can become a distinctive piece of furniture that feels genuinely made for your home.
Tags
DIY Table Pallet Furniture DIY Coffee Table Rustic Furniture Upcycled Furniture Woodworking Projects Home DIY Rustic Decor