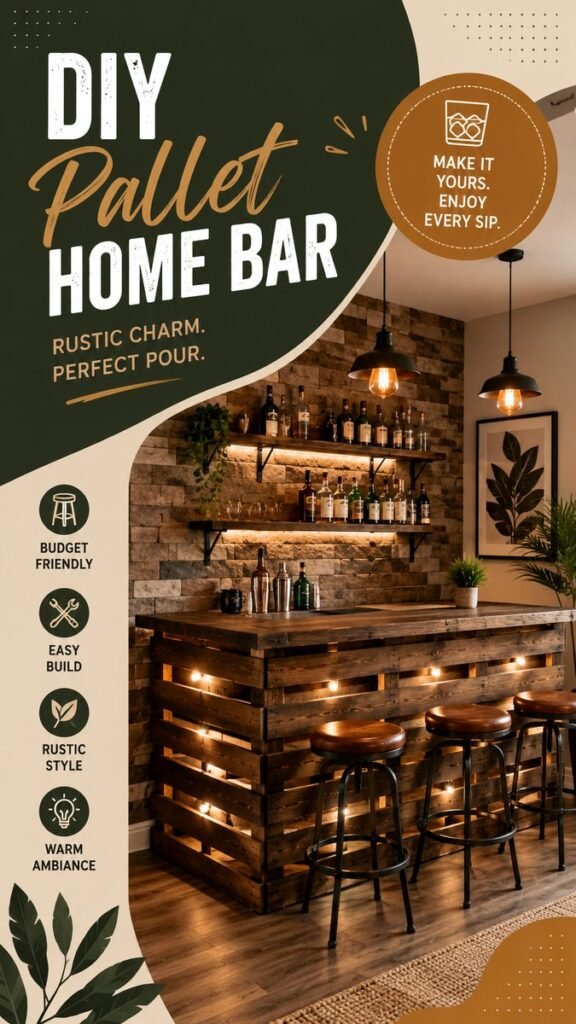
A DIY bar can turn an unused corner of your home into a warm, stylish gathering space without requiring a complicated renovation. A rustic pallet bar, like the one pictured here, combines reclaimed-wood character, practical storage, cozy lighting, and comfortable seating to create a space that feels both functional and inviting. With a few thoughtful design choices, you can build a home bar that works for casual evenings, entertaining friends, or simply adding personality to your living space.
Key Takeaways
- Use pallet or reclaimed wood to create a naturally rustic DIY bar.
- Add open shelves for attractive and accessible storage.
- Warm lighting can make a compact home bar feel especially inviting.
- Industrial-style stools complement rustic wood beautifully.
- Keep the design practical by planning the counter, storage, and seating together.
Why a DIY Bar Is Such a Great Home Project
A home bar does more than provide a place to arrange bottles and glasses. It can become a visual feature that gives a room a clear focal point. The design shown here works especially well because the dark wood, exposed brick, black metal details, and warm illumination create a cohesive rustic atmosphere.
Building the bar yourself also gives you greater freedom than purchasing a ready-made unit. You can adjust the overall size, choose the finish, add as much storage as you need, and tailor the counter height to your space. Even a small bar can make a big difference when its proportions are carefully planned.
Important: The most successful DIY bar designs balance appearance with everyday practicality. Before focusing on decorations, make sure the counter provides enough working space and the storage is easy to reach.
Create the Rustic Pallet Bar Look
The defining feature of this style is its use of warm, weathered-looking wood. Pallet boards create an appealing layered appearance because each plank can have slightly different tones, textures, and markings. That variation makes the finished bar feel handcrafted rather than mass-produced.
You do not necessarily need perfectly matching boards. In fact, small differences in color and grain can add to the rustic character. If your materials look too uniform, you can introduce visual depth with a wood stain, light sanding, or a combination of complementary finishes.
Choose a Strong Countertop
The countertop is one of the most important parts of a DIY bar because it receives frequent use and immediately catches the eye. A thick wooden top creates the substantial appearance seen in the inspiration design. A darker finish can emphasize the rustic mood, while a medium natural stain can create a lighter and more relaxed look.
Keep the surface as smooth as possible, especially around the front and edges. Sanding helps remove rough areas and makes the bar more comfortable to use. A suitable protective finish can also help the wood withstand everyday spills and cleaning.
Build Visual Interest With Layered Boards
Instead of treating the front of the bar as one flat wall, consider arranging boards in horizontal layers. This creates the strong, textured appearance that makes pallet furniture so recognizable. Small gaps can also add depth, although they should be planned carefully so the structure remains stable and easy to clean.
Another option is to vary the direction or tone of selected boards. Use this technique sparingly. Too much variation can make the design look chaotic, while a controlled mix of textures gives the bar an intentional handcrafted feel.
Make Open Shelving Part of the Design
Open shelves are both decorative and practical. In the pictured setup, two wooden shelves sit against a textured wall and provide plenty of room for bottles, glassware, and bar accessories. Because everything remains visible, the shelving becomes part of the overall decor rather than simply serving as hidden storage.
For a DIY bar, open shelving is also relatively easy to incorporate into the design. Wooden boards paired with sturdy brackets can create a simple display area. Black metal brackets work particularly well with rustic wood because they introduce a subtle industrial element.
Arrange Shelves for Function and Style
Place frequently used items where they are easy to reach. Glasses can be grouped together, while bottles or decorative pieces can occupy other sections. Leave enough breathing room between objects so the shelves do not look overcrowded.
Try combining practical items with a few decorative details. A small plant, attractive container, or simple piece of wood decor can soften the hard surfaces and add personality without overwhelming the arrangement.
Use Lighting to Transform the Atmosphere
Lighting is one of the biggest reasons this DIY bar feels so inviting. Warm pendant lights hang above the counter, while small points of illumination around the bar add a soft glow. This layered approach creates depth and makes the wood appear richer.
You can recreate a similar atmosphere with pendant fixtures, under-shelf lighting, or small decorative lights. Warm-toned bulbs generally complement wood and other rustic materials particularly well.
Add Subtle Accent Lighting
Small lights can highlight the structure of the bar itself. String lights placed carefully along the front or underneath the counter can create a cozy effect. Keep wires organized and make sure lighting components are installed safely and appropriately for the space.
The goal is not to make every surface glow. A few carefully positioned light sources can create a much more sophisticated result than excessive illumination.
Expert Insight
Think of your DIY bar as a small room within a room. The strongest designs repeat a few materials and finishes throughout the space.
- Repeat wood tones between the counter and shelves.
- Use matching metal details on stools, brackets, and lighting.
- Add greenery or simple decor to soften the harder textures.
Choose Comfortable Bar Stools
Seating can dramatically influence how your home bar feels. The industrial-style stools shown here feature dark metal frames and rounded wooden or leather-like seats, creating a nice contrast with the heavy timber construction.
When choosing stools, consider more than appearance. Make sure the seat height works comfortably with your counter and leave sufficient space between stools so people can sit and move around easily. If several people will use the bar at once, spacing becomes especially important.
Mix Rustic and Industrial Details
Rustic wood and black metal make an especially effective combination. The wood brings warmth and texture, while metal adds structure and a modern edge. This prevents the bar from feeling overly traditional or visually heavy.
You can repeat this combination through shelf brackets, pendant lights, stool frames, cabinet hardware, and small accessories. Repetition helps the entire setup feel intentional.
Decorate the Wall Behind Your DIY Bar
The wall behind the bar offers an opportunity to reinforce the theme. An exposed brick effect, as shown in the design, creates instant texture and works beautifully with reclaimed wood. If your home does not have a brick wall, you can explore suitable wall treatments that provide a similar visual effect.
Simple artwork, typography-inspired decor, greenery, or a large wall clock can complete the area. Choose pieces that support the rustic atmosphere without competing with the bar itself.
Keep the color palette controlled. Warm browns, natural wood tones, soft neutrals, black accents, and muted green work naturally together. A restrained palette allows the texture of the materials to become the star.
Plan Storage Before You Start Building
One of the easiest mistakes with a DIY bar is concentrating entirely on the exterior. A beautiful bar can quickly become frustrating if there is nowhere convenient to put glasses, tools, bottles, napkins, or other accessories.
Start by deciding what you want the bar to store. Then divide your storage into categories. Open shelves can display attractive items, while enclosed sections can hide less decorative supplies.
Keep Everyday Items Within Reach
Place the items you use most often in the easiest locations. Decorative bottles or rarely used accessories can occupy higher shelves. Glassware and frequently needed tools are better positioned closer to the counter.
This simple approach makes the bar more convenient while also keeping the display organized.
DIY Bar Ideas for Different Spaces
You do not need a large entertainment room to create a home bar. The same design principles can be adapted to many spaces. A compact version could fit against a kitchen wall, dining area, basement, living room, or unused corner.
For a smaller room, reduce the depth of the counter and use vertical shelving to maximize storage. A narrow wall-mounted bar can provide the visual impact of a larger setup while taking up considerably less floor space.
For a larger room, you can create a wider counter with more seating and additional storage. The important thing is to maintain comfortable circulation around the bar so the area does not feel cramped.
How to Give Your DIY Bar a Finished Look
Small finishing touches can make a major difference. Once the main structure is complete, step back and evaluate the balance of wood, metal, lighting, and decor.
- Sand visible wood surfaces for a cleaner handcrafted finish.
- Use a consistent finish on major wood elements.
- Keep shelf arrangements visually balanced.
- Introduce a plant or greenery for a softer natural accent.
- Repeat black or dark metal details for visual consistency.
- Use warm lighting to emphasize the texture of the wood.
Pro Tip: Rustic does not have to mean unfinished. A carefully sanded surface, consistent stain, organized shelves, and coordinated lighting can make reclaimed materials look polished while keeping their natural character.
Simple Ways to Personalize Your Home Bar
The best DIY bar ideas leave room for your personality. You can personalize the design with wall art, favorite colors, decorative containers, plants, custom shelving, or a countertop finish that suits your existing room.
Consider the style of your home before choosing accessories. If your interior already features warm wood and black accents, repeat those elements around the bar. If your room is lighter and more modern, use a softer wood finish and fewer accessories for a cleaner interpretation of the rustic concept.
You can also change the mood seasonally. Keep the main structure neutral and swap small decorative pieces throughout the year. This lets the bar remain visually fresh without rebuilding anything.
Safety and Practical Considerations
Before building, make sure the location is suitable for a permanent or semi-permanent structure. Measure the available area carefully and think about doors, walkways, outlets, and nearby furniture.
Any wall-mounted shelves should be attached securely using appropriate hardware for the wall type. Heavy objects require dependable support, especially when several items will be stored together.
For lighting, follow the manufacturer’s installation requirements and use properly rated components. Keep electrical connections protected from spills and moisture. If electrical work is outside your experience, professional assistance is a sensible choice.
Why Rustic DIY Bar Ideas Stay Popular
There is something naturally appealing about a bar made from warm wood. The material brings texture into a room, while the open shelving and practical counter create an inviting sense of purpose. Pallet-style construction also fits beautifully with popular farmhouse, industrial, rustic, and cozy interior styles.
More importantly, a DIY bar can feel personal. Every board, shelf, stool, and decorative detail contributes to the final result. Instead of looking like a generic piece of furniture, the finished project can become a feature that reflects your taste and creativity.
The inspiration here demonstrates how several relatively simple design elements can work together: textured wood, open shelving, dark metal, comfortable stools, warm lighting, and a few natural accents. None needs to dominate the room. Together, they create a cohesive entertaining area.
At a Glance
- Reclaimed wood creates instant rustic character.
- Open shelves combine display and storage.
- Warm lighting makes the space feel welcoming.
- Industrial stools add contrast and practical seating.
- Thoughtful proportions make the bar work in both large and small rooms.
Conclusion: Build a DIY Bar With Character
A DIY bar is an opportunity to transform an ordinary area into a memorable feature of your home. The rustic pallet approach shown here proves that simple materials can create an impressive result when they are combined with thoughtful proportions, useful storage, comfortable seating, and inviting lighting.
Start with the essentials: determine your available space, plan the counter dimensions, choose durable materials, and decide how much storage you need. From there, layer in the details that give the project personality. Reclaimed wood, open shelving, dark metal accents, greenery, and warm lights can work together to create a cozy atmosphere without making the design feel complicated.
Whether you build a substantial entertaining station or a compact corner bar, focus on making it practical enough for everyday use and attractive enough to enjoy looking at. The result can be much more than a piece of DIY furniture. It can become a welcoming place where conversations happen, guests gather, and your personal style comes through.
The key to a memorable DIY bar is not expensive materials. It is thoughtful design. Combine useful storage, durable surfaces, warm lighting, and personal touches to create a space that feels uniquely yours.