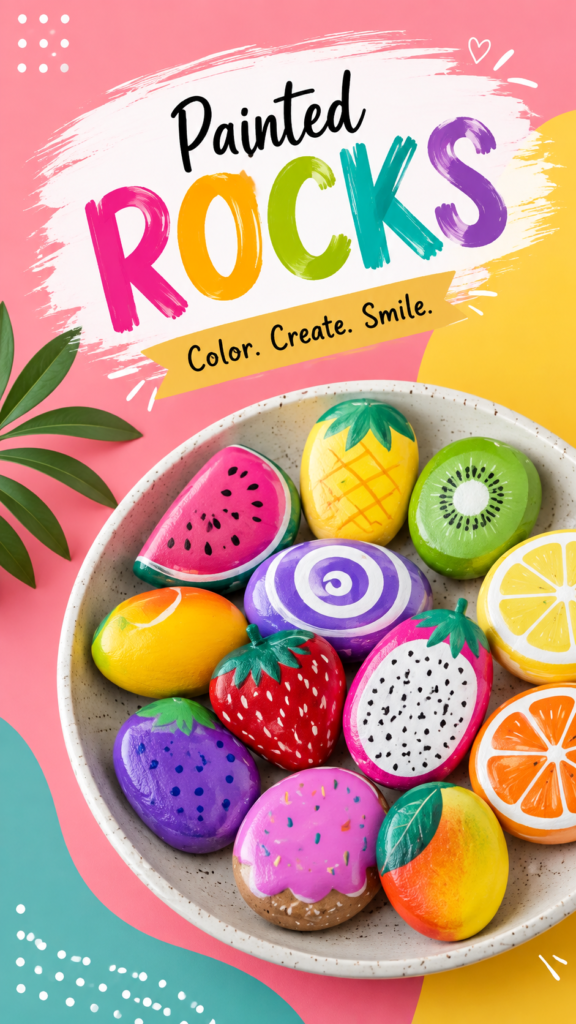
Summer is the perfect season for bright colors, easy crafts, and creative projects that bring a little extra joy to everyday spaces. One especially fun idea is painted rocks, transformed into colorful fruit, playful patterns, and cheerful designs. With a handful of smooth stones, acrylic paint, and a little imagination, you can create charming decorations that look fresh, handmade, and full of personality.
Fruit-inspired rock painting is particularly appealing for summer because it naturally combines bold colors, simple shapes, and recognizable designs. Watermelons, strawberries, lemons, kiwis, oranges, pineapples, and other colorful motifs can turn ordinary stones into miniature works of art. Whether you are looking for a relaxing weekend craft, an activity for children, or a creative way to decorate a garden, these summer DIY painted rocks are an easy project to try.
Key Takeaways
- Painted rocks are an approachable summer DIY project for many skill levels.
- Fruit designs work beautifully because they use bright colors and simple shapes.
- Start with smooth, clean stones for an easier painting surface.
- Layering colors and adding small details can make simple designs look polished.
- Finished rocks can become garden accents, desk decorations, gifts, or colorful display pieces.
Why Painted Rocks Make a Great Summer DIY
There is something wonderfully satisfying about turning a plain stone into something colorful. Rock painting does not require a complicated setup, expensive equipment, or advanced artistic skills. The basic idea is simple: choose a stone, decide on a design, paint it in layers, and add details that bring the image to life.
Summer is an especially good time to explore this craft because bright seasonal themes work naturally with painted stones. A collection of colorful rocks can instantly create a cheerful display. You can experiment with tropical fruit, pops of pink and purple, bold geometric patterns, or simple dots and lines.
The best part is that there is no single right way to paint a rock. A beginner can use basic shapes and a few colors, while a more experienced crafter can build intricate patterns with multiple layers, highlights, and fine details. The goal is to create something that feels playful and personal.
A Creative Project for Beginners
If you are new to painting, rocks provide a forgiving surface for experimentation. You do not need to begin with a complicated illustration. Simple fruit shapes are an excellent starting point because most designs can be broken into recognizable sections.
For example, a strawberry can begin as a red or pink oval with a green leafy top. A kiwi can use a green base, a lighter center, and small dark dots around the middle. A watermelon can be created with a curved red section, a green outer edge, and small black seeds.
These simple construction methods make easy rock painting ideas accessible to children, teens, and adults. Even if the lines are not perfectly symmetrical, the finished piece can still look charming and handmade.
Fruit-Inspired Painted Rock Ideas
The colorful collection of painted stones naturally suggests one of the most enjoyable summer themes: fruit. Fruit designs are visually recognizable, colorful, and flexible enough to work on stones of different sizes and shapes.
Watermelon Rocks
Watermelon is a classic summer motif and one of the easiest fruit designs to adapt to a stone. Start with a bright red or pink center, then create a green rind around the outside. Add small black seeds using a fine brush or dotting tool.
You can paint an entire oval stone like a slice of watermelon or create a rounded design that resembles a wedge. Combining red, green, black, and a small amount of white creates strong contrast that makes the design stand out.
Strawberry Rock Painting
A strawberry is another excellent beginner-friendly idea. Use a rich red base and add a green leafy crown at the top. Small white or cream-colored dots can represent the seeds.
For extra dimension, use two shades of red. A slightly darker tone around one edge can create the impression of depth, while a small lighter highlight can make the painted surface appear glossy.
Kiwi Designs
Kiwis offer a wonderful opportunity to experiment with green shades. Paint the outer portion a deeper green, then create a pale center. A small white area in the middle surrounded by tiny black dots instantly suggests the familiar fruit pattern.
This design is especially effective on flat, rounded stones because the circular composition can follow the natural shape of the rock.
Citrus-Inspired Stones
Lemons, oranges, and other citrus-inspired designs are perfect when you want an energetic color palette. Bright yellow, orange, white, and green can be combined to create cheerful slices and whole-fruit designs.
For a citrus slice, begin with a circular base. Add a lighter center and divide the interior into sections with thin lines. Keeping the segments slightly imperfect can actually make the finished rock feel more handmade.
Pineapple and Tropical Motifs
A pineapple-inspired stone can combine yellow, golden orange, and green. Use simple diagonal lines to create the textured body, then add a cluster of green leaves at the top. You can also adapt the same color palette into tropical abstract patterns if you prefer something less literal.
Supplies for a Colorful Rock Painting Project
You can keep your supply list surprisingly short. The focus should be on having a clean surface and paints that provide strong, even coverage.
- Smooth, clean rocks or stones
- Acrylic craft paint
- Small paintbrushes in several sizes
- A fine detail brush
- A palette or disposable surface for mixing colors
- A cup of water for cleaning brushes
- Paper towels or an old cloth
- Optional protective clear sealer
If you are painting several rocks, organize your colors before beginning. A simple palette containing a few bright shades can be enough to create an impressive variety of designs.
Expert Insight
Strong color contrast often makes simple painted rock designs more eye-catching. Pair bright base colors with darker outlines, small dots, or lighter highlights to help each fruit-inspired pattern remain clear.
How to Paint Rocks Step by Step
Once your materials are ready, the actual process can be quite relaxing. Instead of trying to complete every detail at once, build the design gradually. This approach makes it easier to correct mistakes and create clean layers.
1. Choose and Prepare Your Rocks
Select stones with shapes that suit your intended designs. Rounded stones work well for fruit slices, while elongated stones can be ideal for strawberries, lemons, or decorative patterns.
Clean away dirt and dust before painting. Allow the stones to dry completely. A clean, dry surface helps the paint apply more evenly.
2. Plan the Design
Before opening your paint, look at the shape of each stone. Decide whether it naturally resembles a slice, oval, circle, or another form. You can lightly sketch the basic design if that helps you feel more confident.
For simple projects, you may not need a sketch at all. Begin with the largest shapes and allow the natural curves of the stone to guide you.
3. Paint the Base Layer
Apply the main color first. Depending on the paint and stone, you may need more than one thin coat to achieve an even appearance. Let each layer dry before adding another.
Thin, controlled layers are often easier to manage than one heavy application. They also allow you to keep edges cleaner as you develop the design.
4. Add Secondary Colors
Once the base is dry, add the next major shapes. For a watermelon, this could mean adding the rind. For a kiwi, it might be the pale center. For a strawberry, add the green leafy top.
At this stage, focus on recognizable shapes rather than tiny details. The overall design should be clear before you move on to decorative elements.
5. Add Fine Details
Now comes the fun part. Use a fine brush to add seeds, segment lines, dots, leaves, stripes, or other details. You can also experiment with simple patterns such as swirls, grids, curved lines, and repeating shapes.
A few carefully placed details can completely change the appearance of a painted rock. Take your time and let each section dry when necessary.
6. Protect the Finished Design
If you want to preserve the painted appearance, consider applying a suitable clear sealer after the paint has fully dried. Follow the directions for the particular product you choose, especially if the stones will be displayed outdoors.
How to Make Painted Rocks Look More Professional
You do not need advanced painting skills to create polished-looking rocks. A few simple techniques can make a major difference.
Use a Limited Color Palette
Although the inspiration for this style is wonderfully colorful, each individual rock can benefit from a focused palette. Choose three to five main colors that work well together, then add a contrasting shade for small details.
Build From Large to Small
Start with the largest color areas and finish with tiny details. This prevents small decorative elements from becoming buried under later coats of paint.
Embrace Imperfection
Hand-painted rocks are supposed to feel handmade. Slightly uneven lines, varied dots, and natural stone shapes can add character rather than detract from the result.
Pro Tip: If a design feels too flat, add a small highlight in a lighter shade and a subtle darker area along one edge. These tiny changes can give fruit-inspired painted rocks a more dimensional appearance without requiring complicated techniques.
Creative Ways to Use Summer Painted Rocks
Once your collection is finished, you can use the stones in many decorative ways. Their bright colors make them suitable for spaces that need a playful seasonal touch.
- Garden accents: Place colorful stones among plants or along a garden border.
- Desk decoration: Display a few small designs beside notebooks, craft supplies, or a workspace.
- Centerpiece ideas: Arrange several painted stones in a bowl or tray for a colorful seasonal display.
- Handmade gifts: Create fruit-themed stones for friends, family members, or fellow craft lovers.
- Party decorations: Use coordinated painted rocks as part of a bright summer-themed table arrangement.
Fun Variations Beyond Fruit
Once you have tried fruit designs, there is no reason to stop there. The same painting techniques can be used to create flowers, abstract patterns, colorful hearts, simple landscapes, smiley faces, stars, or geometric compositions.
You can also create a coordinated set by repeating one visual element across multiple stones. For example, use the same background color on several rocks while changing the central design. Another option is to create a rainbow-inspired collection where every stone features a different dominant color.
For a more minimalist approach, paint each stone a single bright color and add only a few contrasting dots or lines. This can be especially effective when several rocks are displayed together.
Tips for a Relaxing Summer Craft Session
Rock painting is not only about the finished decoration. It can also be a simple way to slow down and spend time making something with your hands. Set up a comfortable workspace, gather a few favorite colors, and choose designs that feel enjoyable rather than intimidating.
If you are crafting with children, consider preparing several stones in advance and offering a selection of simple patterns. Let them choose their own colors and designs. The variety of results is often one of the most enjoyable parts of a group painting session.
For solo crafting, create a small collection around one theme. A bowl filled with colorful fruit-inspired rocks can become a cheerful seasonal decoration, while a collection of abstract designs can add personality to a shelf or workspace.
At a Glance
- Pick smooth, clean stones.
- Start with simple fruit shapes and bright colors.
- Paint large areas before adding fine details.
- Use contrast to make small patterns stand out.
- Display your finished collection together for maximum visual impact.
Create Your Own Colorful Summer Rock Collection
A collection of painted rocks can be as simple or elaborate as you want it to be. The colorful fruit-inspired approach shown here is a great starting point because it gives you plenty of recognizable designs while still leaving room for creativity.
Try beginning with three stones. Paint one as a watermelon, one as a strawberry, and one as a citrus slice. Once you are comfortable with the basic process, add kiwi, pineapple, orange, or abstract patterned designs. Before long, you can have an entire bowl of bright handmade pieces.
Do not worry about making every stone identical. Different colors, shapes, and patterns create visual interest when the pieces are displayed together. In fact, variety can make the collection feel more lively and personal.
Conclusion
Summer DIY painted rocks are a simple, colorful way to turn ordinary stones into cheerful handmade art. Fruit-inspired designs make an especially appealing choice because their bold colors and familiar shapes are easy to recreate, even if you are just beginning to explore rock painting.
Start with clean stones, choose a few vibrant colors, and build each design from large shapes to small details. Experiment with watermelon, strawberries, kiwi, citrus, pineapple, or your own imaginative patterns. The most important thing is to enjoy the creative process and let each stone develop its own personality.
Whether you display the finished pieces in a bowl, add them to a garden, use them as seasonal decor, or simply keep them as colorful reminders of a creative afternoon, painted rocks can bring a surprisingly joyful touch to your summer projects. Gather your supplies, pick your favorite colors, and start creating your own collection of bright summer DIY rocks.
Tags
Summer DIY Painted Rocks Rock Painting Summer Crafts DIY Crafts Fruit Crafts Easy DIY Ideas DIY Decor