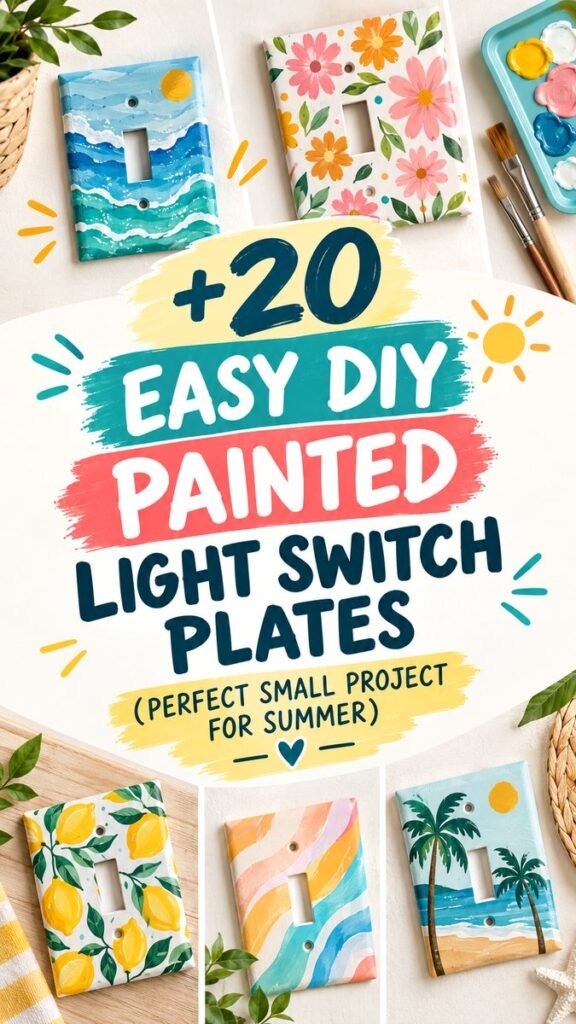
Painted light switch covers are one of those small DIY projects that can make a surprisingly big difference in a room. A plain switch plate may be easy to overlook, but a thoughtfully painted cover can become a colorful little piece of decor. With a few basic craft supplies and a little creativity, you can turn ordinary light switch plates into personalized accents featuring florals, lemons, ocean waves, abstract shapes, tropical leaves, stripes, or cheerful summer-inspired patterns.
Key Takeaways
- Painted light switch covers are an easy way to personalize ordinary home details.
- Simple patterns can create impressive results without advanced painting skills.
- Florals, citrus, waves, stripes, leaves, and abstract designs work beautifully for colorful decor.
- Proper surface preparation helps paint adhere smoothly to the switch plate.
- A protective finish can help preserve your painted design and make the cover easier to maintain.
- Small DIY projects are a great way to experiment with color before tackling larger decor projects.
Why Paint Your Light Switch Covers?
Home decorating often focuses on walls, furniture, artwork, and larger accessories, while small functional details receive very little attention. Painted light switch covers offer an opportunity to change that. Instead of treating the switch plate as something purely practical, you can make it part of your decorating scheme.
This project is especially appealing because the surface is small. You do not need a large collection of supplies or a full weekend of crafting. A single switch plate can become a quick creative experiment, and several matching plates can bring a cohesive look to an entire room.
Important: The most successful painted switch plates balance creativity with simplicity. Because the plate is a functional object, designs with clear shapes, controlled colors, and enough open space often look more polished than overly complicated artwork.
A Small Project With a Big Decorative Impact
A painted light switch cover can echo colors already present in your room. A blue and turquoise wave design can complement a coastal space, while leafy green patterns can work beautifully with botanical decor. Soft pinks, coral, peach, and warm yellow can create a cheerful summer atmosphere.
You can also use the project to introduce a color that appears elsewhere in the room. Repeating one accent shade on a switch plate, vase, frame, or small accessory can make a space feel more intentional without requiring a complete makeover.
20 Easy Painted Light Switch Cover Ideas
The beauty of DIY painted light switch covers is the enormous variety of patterns you can create. The inspiration includes both beginner-friendly designs and more detailed ideas that can be adapted to your own skill level.
1. Ocean Wave Switch Plate
Layer different shades of blue, turquoise, and white to create a flowing ocean-inspired pattern. Uneven horizontal strokes can suggest moving water while keeping the design easy enough to recreate.
2. Colorful Floral Design
Paint simple flowers across a light background using pink, orange, yellow, and green. You do not need realistic botanical details. Rounded petals and simple leaves can create a playful handmade appearance.
3. Lemon and Leaf Pattern
A citrus theme is perfect for kitchens, breakfast areas, craft rooms, or summer decorating. Bright yellow lemons paired with green leaves create an energetic pattern that immediately adds personality.
4. Lavender-Inspired Florals
For a softer look, cover the plate with slender purple flower stems. A white or cream background allows the floral shapes to remain the main attraction while keeping the overall design light.
5. Sunset and Waves
Combine a warm sun with layered curved shapes in coral, peach, pink, blue, and teal. This style works particularly well when you want your painted switch plate to feel like a miniature landscape.
6. Abstract Color Blocks
Not comfortable painting recognizable objects? Try an abstract design instead. Combine rounded shapes, organic curves, and blocks of complementary colors for a modern result.
7. Blue Floral Pattern
Use several shades of blue to create small flowers, leaves, and decorative dots. Keeping the palette limited makes the finished switch cover feel coordinated and sophisticated.
8. Daisy Switch Plate
White daisies with yellow centers are simple, cheerful, and easy to customize. Scatter them across a turquoise, blue, or soft green background for a fresh decorative accent.
9. Rainbow Arches
Paint curved bands in several soft colors to create a rainbow-inspired design. This idea looks especially charming in bedrooms, craft spaces, or cheerful family areas.
10. Tropical Leaf Design
Large green leaves can create a bold botanical effect without requiring many colors. Try overlapping monstera-inspired or palm-style shapes for a tropical look.
11. Beach-Inspired Plate
Bring together sandy beige, ocean blue, turquoise, and white for a relaxed coastal design. Small shell-inspired accents can add extra character without overwhelming the pattern.
12. Scallop Pattern
Rows of overlapping curved shapes can create a decorative scallop effect. Experiment with two or three shades from the same color family for a clean, repeating pattern.
13. Confetti Dots
For one of the easiest designs, cover the plate with colorful dots in different sizes. This is a great option when you want something playful but do not consider yourself a painter.
14. Modern Stripes
Diagonal, horizontal, or wavy stripes can instantly transform a plain switch cover. Try alternating navy and white, teal and cream, or several bright summer shades.
15. Palm Tree Scene
Create a miniature tropical scene with palm trees, blue water, and a sandy base. Keep the shapes simple and graphic for a contemporary handmade appearance.
16. Pastel Organic Shapes
Soft peach, muted blue, cream, blush, and sage can be arranged into irregular shapes for a modern neutral design. This approach is particularly useful for rooms with minimalist decor.
17. Citrus Accent Design
If a full lemon pattern feels too busy, use a few citrus illustrations as focal points. Add small leaves or dots to fill the surrounding space.
18. Painterly Brushstrokes
Visible brushstrokes can become part of the style. Use broad strokes and intentional imperfections to create an artistic, handmade finish rather than trying to make every mark perfectly uniform.
19. Two-Tone Minimalism
Choose two complementary colors and divide the plate with a simple curved or geometric pattern. This is an excellent choice when you prefer subtle DIY home decor.
20. Mix-and-Match Gallery
For a creative collection, paint several switch plates with different designs while keeping a few colors consistent. The result can feel coordinated even when every plate has its own personality.
Supplies for Painted Light Switch Covers
You can keep the supply list simple. The exact materials depend on the design and finish you want, but a basic setup may include:
- Plain light switch plates
- Acrylic craft paint suitable for the surface
- Small detail paintbrushes
- Medium brushes for larger areas
- A pencil for lightly planning designs
- Painter’s tape for crisp lines
- Water and a container for cleaning brushes
- A suitable protective clear finish
- Paper towels or a clean work surface for crafting
If you are painting an existing plate, remove it carefully before decorating and keep all hardware together. Working on a flat surface makes it much easier to control your brush and reach the edges evenly.
How to Paint a Light Switch Cover
Step 1: Prepare the Surface
Start with a clean, dry switch plate. Any dust, grease, or residue can interfere with paint adhesion. Clean the surface appropriately and allow it to dry completely before beginning.
Step 2: Plan Your Design
Decide on your colors and pattern before you start painting. A quick sketch on paper can help, especially for designs involving stripes, flowers, waves, or repeated shapes.
Step 3: Add the Base Color
If your design needs a background color, apply it first. Several thin coats are generally easier to control than one very thick coat. Let each layer dry according to the paint instructions.
Step 4: Paint the Main Details
Add your larger shapes before moving to tiny details. For example, paint the leaves before adding veins, or create broad ocean bands before adding white wave lines.
Step 5: Finish With Small Accents
Dots, tiny leaves, flower centers, highlights, and short brushstrokes can bring the design together. Use these details sparingly so the switch plate remains visually balanced.
Step 6: Protect the Finished Design
Once the artwork is completely dry, consider applying a compatible protective finish. Follow the product instructions carefully and allow the plate to cure fully before putting it back into use.
Expert Insight
A limited color palette is one of the easiest ways to make handmade switch plates look professionally coordinated. Choose three to five colors that already work well together, then repeat those shades across different patterns.
Tips for a More Professional Finish
Small projects can be surprisingly unforgiving because every detail is visible at close range. Taking a little extra time during preparation and painting can make a major difference.
- Keep coats thin. Thin layers generally create cleaner results and help preserve the shape of your details.
- Use the right brush size. A tiny brush is useful for outlines and small accents, while a broader brush is better for backgrounds.
- Leave the hardware openings clear. Plan your design around the switch opening and screw holes so the finished plate remains practical.
- Let layers dry. Rushing can cause colors to blend unintentionally or damage earlier brushwork.
- Repeat colors. Reusing shades throughout a design creates visual harmony.
- Embrace simple shapes. Florals, dots, stripes, leaves, and waves can look impressive without complicated techniques.
Pro Tip: Before committing to a detailed design, test your color combination on a scrap surface or piece of cardboard. It is much easier to adjust the palette before your first coat goes onto the switch plate.
Choosing a Style for Your Room
The best painted light switch cover is one that feels connected to the room around it. Think about the existing wall color, furniture, artwork, textiles, and accessories before selecting your palette.
For Coastal Decor
Use turquoise, ocean blue, white, sandy beige, and soft aqua. Wave patterns, beach scenes, and flowing stripes are natural choices for a relaxed coastal atmosphere.
For Botanical Decor
Choose greens with a neutral cream or white background. Large tropical leaves, delicate stems, or simple floral motifs can complement plants and natural textures.
For Colorful Rooms
Pick a few shades already visible in the room and repeat them on the switch plate. This helps a bright design feel intentional rather than random.
For Minimalist Spaces
Try abstract shapes, two-tone patterns, muted colors, or simple geometric lines. A restrained design can add personality while preserving a clean aesthetic.
Creative Ways to Customize the Project
There is no need to follow one exact pattern. One of the best things about painted light switch covers is how easily the idea can be adapted. You can match the plate to a season, coordinate it with a child’s room, create a kitchen-inspired citrus design, or simply experiment with colors you love.
For a coordinated home, consider choosing one overall palette and giving each room its own motif. A kitchen could feature lemons and leaves, a bedroom could use soft florals, and a creative workspace could feature colorful abstract shapes.
You can also create a small collection of switch plates using the same background color. The repeated base color ties the pieces together, while the individual artwork gives each area a distinct character.
Safety and Practical Considerations
Because light switch plates are associated with electrical fixtures, practical handling matters. Always work on a plate that has been safely removed from the wall, and keep paint away from electrical components. Make sure the finished surface is fully dry and cured before reinstalling the plate.
Do not paint over functional openings, screw threads, or areas where the plate needs to sit flush against the wall. A beautiful design should never interfere with the normal operation or safe installation of the switch.
When selecting a protective coating, make sure it is appropriate for the paint and surface you are using. Always follow the manufacturer’s drying and curing recommendations.
At a Glance
- Project: DIY painted light switch covers
- Style ideas: Florals, lemons, waves, leaves, stripes, abstracts, and beach scenes
- Best approach: Prepare the surface, build thin layers, and allow adequate drying time
- Decor benefit: Adds a personalized accent to an otherwise overlooked detail
- Creative level: Easy to customize for beginners and experienced crafters
Final Thoughts on DIY Painted Light Switch Covers
DIY painted light switch covers prove that home decorating does not always require a major renovation. Sometimes, the smallest details offer the most enjoyable creative opportunities. A plain switch plate can become a miniature canvas for color, pattern, and personality.
Whether you prefer cheerful lemon motifs, delicate flowers, tropical greenery, flowing ocean waves, colorful stripes, or modern abstract shapes, there are countless ways to make a switch plate feel like part of your decor. The key is to choose a design that suits your space, keep your palette intentional, and take your time with the finishing details.
Most importantly, have fun with the process. A small painted light switch cover is an approachable DIY project that lets you experiment without committing to a large decorating change. Create one as a quick summer craft, or paint several to give different rooms their own handmade personality. Once you discover how much character a simple switch plate can add, you may start noticing plenty of other small surfaces around your home that are ready for a creative update.
Tags
DIY Light Switch Covers Painted Light Switch Covers DIY Home Decor Painted Switch Plates Easy DIY Projects DIY Room Decor Summer DIY Crafts Creative Home Projects