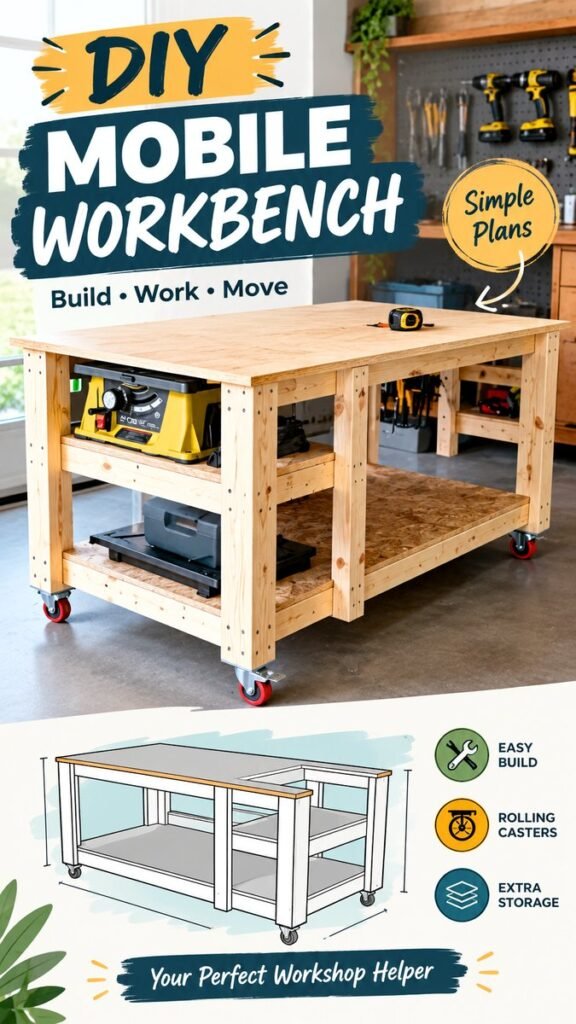
Building a practical carpentry workspace can make every woodworking project more enjoyable, organized, and efficient. A well-designed mobile workbench is one of the most useful additions to a garage or workshop because it provides a large working surface, lower storage, and the flexibility to move your tools wherever they are needed. With a sturdy timber frame, spacious shelves, and rolling casters, this type of DIY workbench combines simplicity with everyday functionality.
Whether you are learning carpentry, improving a home workshop, or looking for your next DIY wood project, a mobile workbench is an excellent project to consider. It gives you a dedicated place for measuring, cutting, assembling, sanding, and organizing materials while also helping you make better use of limited workshop space.
Key Takeaways
- A mobile workbench creates a versatile workspace for carpentry and woodworking projects.
- Heavy-duty casters make it easier to reposition the bench around a garage or workshop.
- Lower shelves provide convenient storage for tools, equipment, and project materials.
- A simple timber frame can create a strong foundation without an overly complicated design.
- Planning the dimensions and layout before cutting helps reduce wasted materials and mistakes.
- The workbench can be adapted with clamps, drawers, pegboards, or other workshop accessories.
Why Build a DIY Mobile Workbench?
A permanent workbench can be useful, but it is not always the best option for a busy garage. A mobile design offers another level of flexibility. Instead of arranging your entire workshop around one fixed station, you can move the bench closer to your tools, materials, or the area where a project is being assembled.
The design shown here focuses on practical woodworking rather than unnecessary decoration. The large top creates plenty of room for working, while the open lower sections make frequently used equipment easy to reach. Casters at the base allow the entire structure to roll when you need to change its position.
Another advantage is that the open construction makes the workbench easy to customize. You can leave the shelves open for large tools, add storage bins for smaller supplies, or install additional supports as your workshop needs evolve.
Important: The most useful workbench is not necessarily the largest one. A good design balances working surface, storage, mobility, and the available floor space in your workshop.
Understanding the Workbench Design
The workbench has a straightforward rectangular structure made from wood framing members. Four primary legs support the upper working area, while horizontal supports connect the frame and provide strength. The lower portions include shelf surfaces that can hold tools and equipment.
The wide top is particularly useful for carpentry because it provides a stable area for laying out boards, measuring pieces, assembling components, and completing finishing tasks. A spacious surface also reduces the temptation to work on the floor or balance materials on smaller tables.
The Main Work Surface
The top should be sturdy and sufficiently flat for the type of projects you expect to complete. Sheet material can provide a practical surface, while a thicker wooden top can create a more substantial feel. The best choice depends on your tools, budget, and the type of carpentry you regularly perform.
Because a workbench often experiences pressure from hand tools, clamps, and heavy materials, the supporting frame underneath should be constructed carefully. A rigid base helps keep the top stable while you work.
Lower Storage Shelves
The lower shelves are one of the most practical features of this design. Instead of using separate cabinets that take up additional floor space, the workbench itself becomes part of the workshop storage system.
Open shelves are especially convenient for larger tools, cases, saws, clamps, and equipment that you want to grab quickly. They also make it easier to see what is available without opening multiple drawers or doors.
Rolling Casters
Adding casters transforms a basic workbench into a mobile workshop station. This is particularly helpful when the same garage is used for several purposes. You can move the bench aside when you need open floor space and bring it back when it is time to work.
When choosing casters, consider the total weight of the workbench plus the tools and materials you plan to store on it. The wheels should be appropriate for the workshop floor and capable of supporting the finished structure safely.
Materials to Consider for a Carpentry DIY Project
A project like this can be approached with relatively straightforward woodworking materials. The visible design uses timber framing and sheet-style panels for the working and storage surfaces. Exact dimensions can be adjusted according to your workshop and the materials you already have.
- Wood boards for the main frame and legs
- A suitable sheet material for the work surface
- Additional sheet material for lower shelves
- Heavy-duty rolling casters
- Wood screws or suitable structural fasteners
- Measuring and marking tools
- A drill and appropriate drill bits
- A saw suited to the materials being cut
- Clamps for holding components during assembly
- Sandpaper or a suitable sanding tool
The exact amount of material will depend on the dimensions you choose. Before purchasing supplies, make a simple cutting list based on your desired workbench size. This helps you estimate costs and can reduce unnecessary offcuts.
Plan the Dimensions Before Cutting
Good carpentry begins with planning. Before cutting any boards, decide where the workbench will live and how much room you need around it. Remember that a mobile bench needs enough clearance to roll comfortably without hitting walls, vehicles, cabinets, or other workshop equipment.
Think about the height as well. Your ideal work surface should feel comfortable for the tasks you perform most often. A bench used primarily for detailed assembly may have different requirements from one used for heavier carpentry work.
Width and depth should also reflect the available workshop area. A very deep workbench may provide a generous surface, but it can make it harder to reach tools or move around the structure. A balanced footprint usually makes the bench more useful in everyday work.
Pro Tip: Mark the intended footprint on the workshop floor with tape before building. This simple step can help you visualize clearance, walking space, storage access, and the direction the bench will move.
A Practical Assembly Approach
Once the dimensions and cutting list are established, organize the construction into manageable stages. Building the frame first makes it easier to check for alignment before adding the shelves and work surface.
1. Prepare and Measure the Components
Measure each piece carefully and mark cuts clearly. Consistent measurements are especially important when several legs or horizontal supports need to match. Labeling similar pieces can also prevent confusion during assembly.
After cutting, lightly sand rough edges. You do not need to completely finish every surface at this stage, but removing sharp splinters makes assembly easier and safer.
2. Build the Main Frame
Start by assembling the primary sections of the frame. Keep the joints square and check alignment frequently. Clamps can be helpful because they hold pieces in position while you drill and fasten them.
Do not rush this stage. A small alignment error in the frame can become more noticeable when the shelves and top are installed. Measuring diagonals or using a reliable square can help confirm that the structure is properly aligned.
3. Add the Lower Supports and Shelves
Once the frame is stable, install the horizontal supports that carry the lower shelves. These components provide useful storage while also contributing to the overall rigidity of the workbench.
Position the shelves according to what you intend to store. Larger equipment may require more vertical clearance, while smaller tools and containers can fit comfortably into tighter spaces.
4. Install the Worktop
The worktop should sit securely on the completed frame. Before fastening it permanently, check that it is positioned evenly and that there is sufficient access to the areas underneath.
A durable top can become the main working zone of the workshop, so it is worth taking the time to ensure the surface is flat, secure, and comfortable to use.
5. Attach the Casters
Install the casters securely at the bottom of the legs. Make sure they are mounted evenly and that the bench sits level when all wheels are supporting the structure.
Locking casters can be especially useful because they combine mobility with stability. When you are ready to work, locking the wheels helps prevent unwanted movement while cutting, drilling, assembling, or sanding.
Expert Insight
A mobile workbench should be treated as both furniture and workshop equipment. Strength matters, but stability matters just as much. Before using the bench for demanding work, check the frame, fasteners, shelf supports, caster mounting points, and wheel locks.
How to Customize Your DIY Workbench
One of the best things about a carpentry DIY project is the ability to modify it as your needs change. The basic open-frame design gives you plenty of opportunities to add useful features without rebuilding the entire bench.
Add a Pegboard Tool Wall
A pegboard can turn unused wall space into accessible tool storage. Keep frequently used drills, measuring tools, clamps, and hand tools within easy reach. A dedicated tool wall can also make cleanup much faster because every item has a designated location.
Create Dedicated Tool Storage
Open shelving works well for larger equipment, but smaller tools can benefit from bins, trays, or shallow drawers. Organizing tools by task can make a noticeable difference when moving between different woodworking projects.
Add a Clamping Area
Clamps are essential for many woodworking tasks, yet they can quickly become difficult to organize. Consider creating a dedicated section for clamps along the side or underneath the workbench. Keeping them visible and accessible can save valuable setup time.
Protect the Work Surface
A workbench top will naturally collect scratches, glue, sawdust, and marks over time. That is part of its purpose, but a replaceable or refinished top can extend the life of the bench. You can also use sacrificial boards when completing projects that may damage the primary surface.
Workshop Organization Tips
A beautiful workbench becomes much more useful when the surrounding workshop is organized. Keep the tools you use most frequently close to the main working area and store less frequently used equipment on lower shelves or in separate storage.
Try to maintain a clear worktop whenever possible. A clean surface gives you more room for the current project and makes it easier to notice measuring marks, small parts, and tools.
Use containers to group related supplies. Screws, sanding accessories, drill bits, measuring tools, and finishing supplies can each have their own storage area. Simple labels can make the system even easier to maintain.
Important: Build storage around the way you actually work. If an item is used every day, it should be easy to reach. If it is rarely used, it does not need to occupy prime space on the workbench.
Safety Considerations for Carpentry DIY
Safety should be part of every woodworking project from the planning stage onward. Use appropriate eye and hearing protection when operating power tools, keep the work area clear, and follow the safety instructions supplied with your equipment.
When building the workbench, make sure every structural connection is secure before loading the shelves. Pay particular attention to the caster attachments because the wheels transfer the weight of the entire structure to relatively small mounting points.
Once the bench is complete, test it gradually. Roll it across the intended workshop surface, engage the wheel locks, and check that it remains stable. Avoid placing unusually heavy loads on the bench unless the structure and hardware have been designed to handle them.
Why This Project Works for DIY Woodworkers
A mobile workbench is a satisfying carpentry project because the finished result is immediately useful. Instead of building something that simply sits on a shelf, you create a piece of workshop equipment that can support countless future projects.
It is also a great way to practice fundamental woodworking skills. Measuring, cutting, drilling, fastening, squaring a frame, installing hardware, and planning storage are all valuable techniques that can be applied to more advanced DIY furniture projects.
The simple visual design also leaves plenty of room for personalization. You can choose a different finish, change the shelf arrangement, add drawers, modify the dimensions, or create specialized areas for the tools you use most.
At a Glance
- Large surface for carpentry and assembly work
- Rolling design for flexible workshop layouts
- Lower shelves for accessible tool storage
- Simple frame that can be customized over time
- Ideal foundation for a more organized DIY workshop
Final Thoughts
A DIY mobile workbench can become the centerpiece of a practical carpentry workshop. Its combination of a generous work surface, open storage, sturdy framing, and rolling casters makes it useful for a wide range of woodworking tasks. More importantly, the design can grow with you as your skills, tools, and projects develop.
Start by planning the size around your available space and the work you do most often. Focus on creating a square, rigid frame, choose appropriate hardware, and make the storage areas work for your tools. From there, you can add features such as a pegboard, drawers, dedicated clamp storage, or a replaceable work surface.
The best DIY projects are the ones that solve a real problem while teaching you something along the way. A well-planned mobile workbench does both. Once it is finished and organized, you will have a dependable workspace ready for your next carpentry project, furniture build, repair job, or creative woodworking idea.
Tags
Carpentry DIY DIY Workbench Woodworking Projects Mobile Workbench DIY Workshop Wood Projects Garage Workshop Woodworking Ideas