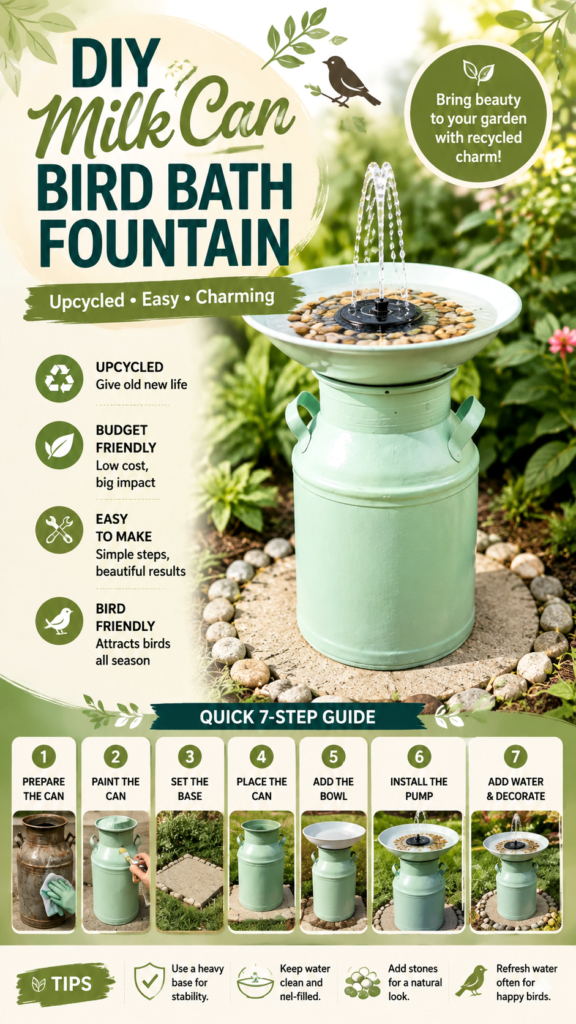
Turn an ordinary old milk can into a charming DIY bird bath fountain and give your garden a beautiful focal point with plenty of character. This creative upcycling project combines a vintage-inspired container, a shallow bowl, a small solar fountain pump, and decorative stones to create an outdoor water feature that feels both practical and decorative. It is an approachable idea for anyone who wants to add more interest to a backyard, lawn, patio, or garden without building a complicated fountain from scratch.
The design shown here uses a softly painted metal milk can as the pedestal for a wide, shallow basin. Water gently circulates through a small fountain pump, creating movement and visual interest while the surrounding greenery and stones complete the natural look. Best of all, the project can be adapted to suit your own garden style, available materials, and preferred color palette.
Key Takeaways
- Reuse an old metal milk can as a creative bird bath pedestal.
- Choose a wide, shallow bowl that works comfortably with the fountain pump.
- Use a stable concrete slab or paver base to keep the structure level.
- Decorative stones can add texture while helping the bowl look naturally integrated.
- Refresh and clean the water regularly to keep the bird bath inviting.
- A solar fountain pump can provide gentle water movement without complicated installation.
Why a DIY Bird Bath Fountain Is a Great Garden Project
A bird bath does more than fill an empty corner. A well-placed water feature can become a natural gathering point in an outdoor space and add the relaxing sound and movement of water. The milk can design takes that familiar garden feature and gives it an unexpected upcycled twist.
Using a reclaimed or previously owned container also makes the project feel personal. Instead of purchasing a traditional pedestal, you can transform an old metal can into something decorative and useful. A fresh coat of outdoor spray paint can completely change its appearance, allowing the finished piece to coordinate with flowers, planters, fencing, furniture, or other garden accents.
One of the biggest advantages of this design is its simple visual structure: the milk can provides height, the shallow bowl creates the water surface, and the fountain pump adds movement. Each element has a clear purpose while still contributing to the overall garden aesthetic.
Materials for an Upcycled Milk Can Bird Bath
The pictured project uses a relatively short list of materials. You can adjust the exact sizes and finishes according to what you already have available.
- Old metal milk can: This forms the main pedestal and gives the bird bath its distinctive vintage character.
- Large shallow bowl or basin: A broad basin creates a useful water surface and provides room for the small fountain pump.
- Outdoor spray paint: Choose a finish designed for the type of surface and outdoor conditions you expect.
- Small solar fountain pump: This circulates the water and creates the fountain effect shown in the design.
- Decorative rocks or glass beads: These provide color, texture, and visual detail inside and around the basin.
- Concrete slab or paver base: A firm base helps keep the milk can steady on the lawn.
- Small garden stones: Use these around the base to create a finished border.
- Cleaning cloth: Useful for preparing the metal surface before painting.
- Optional clear sealer: A suitable outdoor clear finish may help protect the painted surface when compatible with the chosen paint.
Choosing the Right Milk Can
The milk can is the visual centerpiece, so look for one with a stable shape and a reasonably flat bottom. An older metal can with handles and a traditional rounded profile works especially well because it naturally resembles a garden pedestal once painted.
Before using any container, inspect it carefully. Avoid pieces with severe structural damage, unstable bottoms, or sharp exposed edges. Surface imperfections are not necessarily a problem because this is an upcycling project, but the container should be sturdy enough to support the bowl and remain stable outdoors.
How to Make a DIY Bird Bath Fountain
1. Clean and Prepare the Milk Can
Start by cleaning the milk can thoroughly. Remove loose dirt, dust, grease, and other residue from the exterior. A clean surface gives outdoor paint a much better foundation.
Dry the can completely before moving on to painting. If there is loose or peeling material on the surface, gently remove it as appropriate for the condition of the container. Pay particular attention to areas around the handles, rim, and lower section where dirt can collect.
2. Paint the Milk Can
The reference design uses a soft mint-green finish that gives the metal can a fresh garden appearance. You can recreate that feeling with another muted green, cream, sage, blue, or neutral shade depending on your outdoor decor.
Apply the paint according to the product directions and allow each coat to dry properly. Outdoor spray paint can make a dramatic difference because it turns an ordinary metal container into a coordinated decorative feature.
Work in an appropriate well-ventilated area and follow the safety instructions on the paint label. Give the finished paint plenty of time to cure before placing the can outside and adding the bowl.
3. Prepare a Stable Garden Base
Place a concrete slab or paver where you want the fountain to stand. The image shows the milk can positioned on a square slab surrounded by rounded garden stones. This creates a defined foundation instead of placing the entire structure directly on grass.
Choose a relatively level area. A fountain that leans can look unbalanced, and an uneven base may make the bowl more difficult to position securely.
Expert Insight
- Stability should come before decoration. A level, sturdy base helps the bowl sit securely.
- Keep the basin level enough that water can circulate evenly rather than collecting heavily on one side.
- Choose a location where maintenance and water refreshing will be convenient.
4. Position the Milk Can
Set the painted milk can on the prepared slab and check its stability. Gently test it before adding the bowl. If it rocks or shifts, adjust the base rather than trying to compensate later with decorative stones.
The height of the can is important to the overall appearance. It elevates the shallow bowl enough to make the fountain visible among surrounding plants while giving the design a strong vertical shape.
5. Add the Shallow Bowl
Place a large shallow bowl securely on top of the milk can. The bowl should be wide enough to create a visible water surface but proportionate to the can beneath it.
The shallow shape shown in the design gives the fountain a broad, elegant profile. It also allows the water feature to remain visually open instead of looking like a deep container.
Before filling the basin, make sure the bowl is positioned securely and does not slide easily. The finished fountain should feel balanced and stable.
6. Install the Small Fountain Pump
Position the small fountain pump inside the bowl according to its instructions. A solar-powered pump is especially convenient for a simple outdoor project because it can provide water movement without requiring a complicated setup.
Arrange the pump so that the water flows back into the bowl. The goal is gentle circulation rather than an overly forceful spray. The image shows a small central fountain with several streams of water rising above the basin and falling back into it.
Always follow the pump manufacturer’s instructions and use the equipment only as intended for outdoor water features.
7. Add Water and Decorate
Fill the bowl with clean water and test the pump. Once the water is circulating properly, add decorative rocks or glass beads to create a more finished appearance.
The stones shown in the design are especially effective because they introduce earthy colors against the pale green milk can and white basin. You can also arrange rounded garden stones around the concrete base to visually connect the fountain with the surrounding lawn and plants.
How to Choose the Best Location
Location can make a big difference to both the appearance and practicality of a DIY bird bath. A garden setting surrounded by plants gives the project a natural backdrop and makes the water feature feel integrated rather than placed randomly on the lawn.
Choose a spot that is easy to see and easy to reach for cleaning. A location near shrubs or garden beds can provide attractive surroundings, while leaving enough open space around the basin makes maintenance simpler.
Think about the surface underneath the fountain as well. Grass may look attractive around the base, but a solid paver provides much better support. The surrounding stones can then soften the transition between the hard base and the lawn.
Simple Ways to Customize Your Bird Bath
Try a Different Paint Color
The soft green finish creates a calm garden feel, but there is no reason to stop there. Consider a warm white for a cottage garden, muted blue for a cool coastal-inspired space, charcoal for a modern yard, or a warm neutral for a rustic look.
Change the Stone Details
Small stones can make the fountain look more natural. Use one type of stone for a clean appearance or combine subtle sizes and shades for a relaxed garden border. Decorative glass beads can introduce a small touch of color inside the basin.
Create a Coordinated Garden Corner
For a larger garden feature, surround the fountain with complementary plants, containers, stepping stones, or additional natural textures. Keep the fountain as the focal point and avoid overcrowding the immediate area.
Keeping a DIY Bird Bath Clean
A beautiful bird bath also needs regular attention. Outdoor water can collect leaves, dust, pollen, and other debris, particularly when the fountain is placed near trees or dense plants.
Refresh the water regularly and clean the basin when it becomes dirty. Remove visible debris and follow appropriate cleaning practices for the material of your bowl and pump. Keeping the water fresh helps maintain a pleasant-looking garden feature and makes the fountain more enjoyable to maintain.
Regular water changes are one of the simplest habits you can build into your garden routine. A quick refresh can make a noticeable difference in the appearance of the fountain and helps prevent the basin from becoming neglected.
Practical Tips for a Better DIY Bird Bath
- Prioritize stability: Make sure the paver, milk can, and bowl are all secure before adding water.
- Keep the water level appropriate: Follow the pump’s operating requirements and avoid running it without sufficient water.
- Choose outdoor-rated materials: Paint and other finishes should be suitable for their intended outdoor use.
- Keep decorative pieces secure: Stones and beads should not obstruct the pump or interfere with water circulation.
- Make maintenance easy: Position the fountain somewhere you can comfortably reach for cleaning and refilling.
- Refresh the water frequently: Regular attention keeps the feature looking clean and inviting.
Why Upcycling Works So Well in Garden Decor
Garden projects are a natural place to experiment with upcycling because outdoor spaces already combine old, new, natural, and handmade elements. A weathered container can become a planter, an unused bowl can become part of a fountain, and leftover stones can become a decorative border.
This milk can fountain is particularly appealing because the original shape remains recognizable while serving a completely different purpose. The result feels intentional rather than disposable. Painting the container creates a visual bridge between the vintage form and the fresh garden setting.
Why This Matters
The best DIY garden projects do not need to be complicated. A strong focal point can come from combining a few simple elements thoughtfully: one character-filled container, one practical basin, gentle water movement, and natural finishing details.
A Charming Backyard Feature on a Budget
If you enjoy affordable garden decor, this project is a great example of how creativity can have more impact than expensive materials. The old milk can supplies the height and personality, while a simple bowl and small pump provide the functional elements.
The surrounding stones also demonstrate an easy decorating principle: repeat natural textures around a feature to make it feel connected to its environment. Even a small paved area can look intentional when it is framed with rounded stones and greenery.
You can make the project as simple or decorative as you like. A minimal version might include only the painted can, bowl, pump, and water. A more detailed version can include layered stones, colorful beads, coordinated plants, and a carefully designed border.
At a Glance
- Upcycle an old metal milk can into a garden focal point.
- Add a shallow basin and small fountain pump for moving water.
- Use a solid paver to create a stable foundation.
- Finish with stones or glass beads for extra texture.
- Refresh and clean the water regularly.
Final Thoughts on This DIY Bird Bath
A DIY bird bath fountain does not have to involve complicated construction or expensive landscaping materials. This upcycled milk can design proves that an ordinary object can become an eye-catching garden feature with a little preparation, paint, a shallow bowl, and a simple fountain pump.
The combination of vintage-inspired metal, soft garden colors, smooth stones, flowing water, and surrounding greenery gives the project plenty of visual appeal. It is also flexible enough to customize, whether you prefer a rustic backyard, cottage garden, modern patio, or relaxed outdoor space.
Most importantly, focus on the basics first: create a stable foundation, position the bowl securely, use the pump correctly, and keep the water fresh. Once those practical details are handled, the decorative possibilities are wide open.
With a little creativity, an old milk can can become much more than storage. It can serve as the centerpiece of a peaceful garden corner and turn a simple DIY project into a feature you will enjoy seeing every day. If you have an unused metal container waiting for a new purpose, this is a beautiful way to give it one.