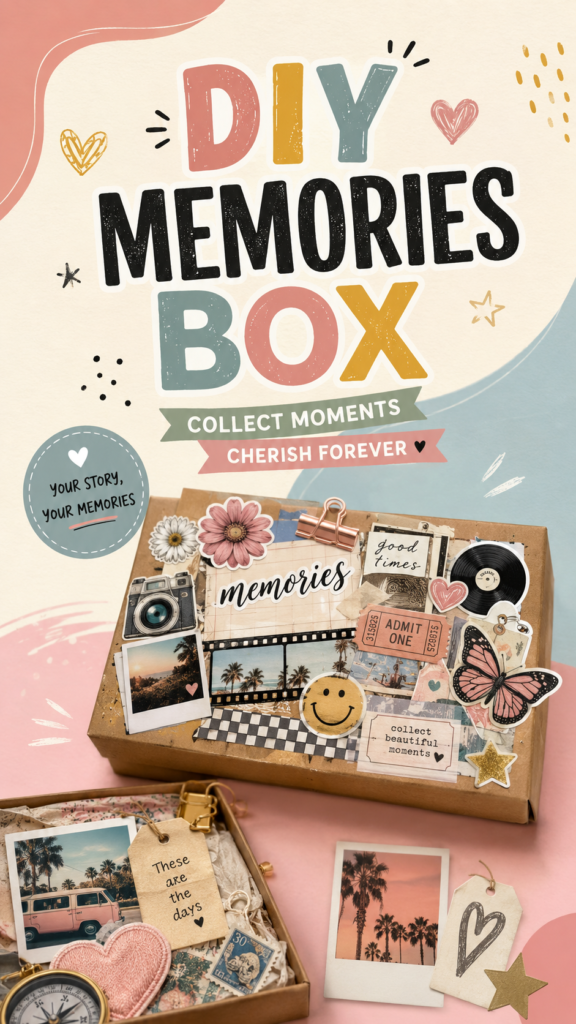
Some memories deserve more than a quick photo on your phone. A DIY memory box gives favorite moments a physical place to live, combining photographs, handwritten notes, tickets, stickers, small souvenirs, and creative details into one meaningful keepsake. The scrapbook-inspired memory boxes shown here prove that you do not need complicated supplies or professional crafting skills to make something personal and beautiful.
Whether you are preserving travel adventures, friendship memories, special celebrations, or everyday moments that matter, a memory box can become a visual collection of your story. With a simple box, a few favorite items, and a little creativity, you can create a keepsake that feels completely your own.
Key Takeaways
- A DIY memory box is an easy way to preserve meaningful moments and small keepsakes.
- Photos, notes, tickets, stickers, tags, and souvenirs can all become part of the design.
- A scrapbook-style collage creates a layered, nostalgic look without requiring advanced crafting skills.
- Mixing textures, colors, shapes, and personal messages makes each memory box unique.
- Memory boxes make thoughtful handmade gifts for friends, couples, family members, and special occasions.
What Is a DIY Memory Box?
A DIY memory box is a decorated container designed to hold meaningful objects and reminders of special experiences. Instead of keeping everything scattered across drawers, notebooks, and photo albums, you can gather those little pieces of life in one thoughtfully arranged place.
The beauty of a memory box is its flexibility. It can be as simple as a decorated cardboard box filled with photographs and handwritten notes, or it can become a highly detailed scrapbook-inspired project covered with layered paper elements, vintage-style labels, colorful stickers, photographs, and small decorative objects.
The visual inspiration for this style combines a kraft-colored keepsake box with a playful collage of cameras, photographs, flowers, tickets, tags, hearts, stars, records, handwritten messages, and other nostalgic motifs. The result feels personal rather than perfectly polished, which is exactly what makes this type of project so charming.
Important: The most meaningful memory box does not need to contain expensive materials. A handwritten note, printed photograph, old ticket, favorite sticker, or tiny paper memento can carry far more emotional value than a store-bought decoration.
Why Memory Box Ideas Are So Special
There is something satisfying about turning memories into a physical collection. Digital photos are convenient, but they can easily disappear among thousands of other images. A memory box encourages you to slow down, choose the moments that matter, and give them a tangible home.
It also creates room for details that a traditional photo album may not capture. A photograph can show where you were, while a ticket can remind you how you got there. A handwritten message can bring back an emotion, and a tiny souvenir can instantly transport you to a particular day.
That combination makes a DIY keepsake box more than a container. It becomes a visual snapshot of a chapter in your life.
What to Put Inside a Memory Box
You do not need to fill your box with dozens of items. A small collection of carefully chosen pieces can tell a complete story. Think about objects that represent a person, place, event, season, or period of your life.
Photographs and Printed Memories
Photographs are one of the easiest starting points for a memory box. Choose a few favorites instead of trying to include every picture from an event or trip. Small printed photos can be layered together, placed inside envelopes, attached to tags, or simply stored loose inside the box.
For a scrapbook-inspired appearance, consider mixing different photo sizes. A combination of square prints, small snapshots, and Polaroid-style images can create visual variety without making the collection feel too structured.
Handwritten Notes and Messages
Handwritten words can make a memory box feel especially personal. Write down a favorite quote, a funny moment, a short thank-you message, or a few sentences about why a particular memory matters.
You can write messages on small cards, kraft tags, patterned paper, or folded notes. Even a simple phrase can become one of the most treasured pieces in the box.
Tickets, Tags, and Paper Ephemera
Small pieces of paper often make wonderful memory box additions. Movie tickets, event passes, travel tags, receipts from meaningful places, postcards, stamps, labels, and other paper ephemera can help recreate the atmosphere surrounding a memory.
If you do not have original pieces, you can also create decorative substitutes using scrapbook paper, printed labels, stamps, or handwritten cards.
Small Souvenirs
Think beyond traditional photographs. A ribbon, pressed flower, fabric scrap, small charm, postcard, shell, packaging label, or other lightweight keepsake may help tell the story behind your collection.
Before adding anything, consider whether it is safe to store long term and whether it can fit comfortably inside the box. The goal is to preserve memories, not overcrowd them.
How to Create a Scrapbook-Style Memory Box
The decorated boxes in this style work because they use layers. Instead of arranging every element in a perfectly symmetrical grid, different shapes overlap slightly to create a collected, nostalgic appearance.
- Choose your box. Start with a sturdy keepsake box in a size that suits the amount of memorabilia you want to store.
- Select a theme. Decide whether the box will focus on travel, friendship, a relationship, a celebration, childhood memories, or a particular period.
- Gather your materials. Collect photos, paper, stickers, tags, ribbons, decorative cutouts, notes, and lightweight souvenirs.
- Pick a color palette. Choose three to five complementary colors to keep the collage visually connected.
- Create a focal point. Add a prominent word, phrase, photograph, or decorative piece that immediately establishes the theme.
- Build layers. Place larger elements first, then add smaller details around and partially over them.
- Add personal messages. Include short handwritten phrases to make the project unmistakably yours.
- Finish with small accents. Use stars, hearts, doodles, labels, stickers, or other simple details to fill awkward spaces.
Pro Tip: Before gluing anything permanently, arrange all your decorative pieces on the lid first. Take a quick photo of the arrangement, then use it as a guide while attaching each layer. This makes experimentation much easier and helps prevent an overcrowded design.
Choosing the Right Color Palette
Color can completely change the mood of a DIY memory box. A soft palette of cream, blush pink, muted blue, warm tan, and mustard creates the cheerful vintage-inspired feeling seen in this design. You can use a similar approach while choosing colors that have personal meaning.
For example, a beach memory box might use sandy neutrals and soft blues. A birthday keepsake could feature brighter colors, while a romantic memory box might use blush, cream, and warm red accents.
The easiest way to avoid a chaotic appearance is to choose a small palette before you begin. Let photographs and meaningful objects provide additional colors naturally, while your paper and decorative elements repeat the main shades.
Creating Visual Interest With Layers
Layering is one of the simplest ways to make a memory box look creative and full. Start with larger background pieces, such as patterned paper or photographs. Add medium-sized elements like tags, tickets, labels, and illustrations. Finish with tiny accents such as hearts, stars, flowers, stickers, or handwritten details.
Try varying the angles of some pieces rather than aligning everything perfectly. A slightly tilted ticket next to a straight photograph can make the arrangement feel collected over time instead of mechanically assembled.
You can also create depth by allowing some pieces to overlap. Just make sure important words, photographs, and focal elements remain easy to see.
Why This Matters
- Layering gives a simple box the visual character of a handmade scrapbook.
- Repeating colors and textures helps different pieces feel like part of one story.
- Leaving a little breathing room keeps the finished design readable and intentional.
DIY Memory Box Ideas for Different Occasions
Friendship Memory Box
Create a collection of photographs, inside jokes, handwritten notes, favorite quotes, small souvenirs, and reminders of adventures you shared. Use playful stickers and colorful paper to keep the design cheerful.
Travel Memory Box
Travel memories are perfect for this type of project. Include postcards, tickets, maps, photographs, luggage tags, small paper souvenirs, and notes about favorite moments. A small envelope inside the box can hold extra photographs or handwritten travel stories.
Birthday Memory Box
Turn a birthday into a keepsake by collecting photographs, cards, party details, notes from friends, and other lightweight reminders of the celebration. You can decorate the lid with the person’s name, age, favorite colors, or a short message.
Couples and Anniversary Keepsake
A memory box can also preserve meaningful moments from a relationship. Add photographs, notes, small mementos from dates, travel memories, and messages that describe favorite moments together. Keeping the design personal and understated can make it feel especially timeless.
Childhood and Family Memories
For family keepsakes, consider including school photographs, drawings, handwritten notes, postcards, small paper crafts, and other lightweight reminders of childhood. A box can become a wonderful way to preserve a particular stage of life without needing to display everything at once.
Simple Materials to Keep on Hand
You can create a beautiful DIY memory box without a huge craft supply collection. Start with the basics and add specialty materials only when you need them.
- Kraft or sturdy decorative box
- Printed photographs
- Scrapbook or patterned paper
- Cardstock and kraft tags
- Decorative stickers
- Paper flowers or cutouts
- Ribbon or twine
- Double-sided tape or craft adhesive
- Scissors and a paper trimmer
- Pens or markers for handwritten messages
- Small envelopes for loose keepsakes
Using what you already have can make the project even more meaningful. Old wrapping paper, unused cards, packaging labels, magazine cutouts, and leftover scrapbook supplies can all contribute to a layered collage aesthetic.
How to Keep a Memory Box Organized
A beautiful box is only useful if the contents remain easy to access. If you are storing a larger collection, divide items into small envelopes or sections. One envelope could hold photographs, another could contain notes, and another could store small paper souvenirs.
Adding a date or short description to certain items can also make the collection easier to understand years later. You do not need to label everything. Focus on pieces where the context might otherwise be forgotten.
It is also helpful to avoid packing the box too tightly. Leave enough room for the lid to close comfortably and for delicate items to remain protected.
Ways to Make Your Memory Box Feel More Personal
The strongest memory box designs contain details that could belong to no one else. Instead of relying entirely on generic decorations, think about the small things that represent the person or experience you are preserving.
- Use favorite colors throughout the design.
- Add a meaningful phrase or inside joke.
- Include photographs that show personality, not just perfect poses.
- Save handwritten notes whenever possible.
- Use small souvenirs that connect directly to the memories inside.
- Write a short description on the back of important photographs.
A slightly imperfect handwritten note can actually add more charm than perfectly printed text. The goal is not to create a flawless display piece. It is to create something that feels genuine.
A Quick Design Formula for Beginners
If you are unsure where to begin, use a simple three-layer formula. Place one large visual element in the background, add two or three medium elements around it, and finish with several small accents.
For example, the lid might start with a large photograph or decorative paper. Add a few tags, tickets, flowers, and labels around it. Then finish with small hearts, stars, stickers, or handwritten words.
Step back occasionally while decorating. Looking at the box from a little distance can help you spot areas that feel too empty or too crowded.
At a Glance
- Choose a sturdy box that gives your keepsakes enough room.
- Start with meaningful photos and paper memories.
- Use a limited color palette for a cohesive look.
- Layer large, medium, and small decorations for depth.
- Finish with personal notes that capture the story behind the memories.
The Beauty of Making Memories Tangible
DIY memory box ideas are appealing because they combine creativity with sentiment. You are not simply decorating a container. You are choosing which moments deserve to be remembered and deciding how you want those moments represented.
The scrapbook-inspired approach makes the process especially flexible. There are no strict rules about how many photographs to use, which decorations belong together, or how perfectly each element needs to be positioned. You can make the design colorful and playful, soft and minimal, vintage-inspired, or completely unique to your personal style.
Most importantly, the finished box becomes something you can return to. Years from now, opening it can bring back photographs, words, places, and little details that might otherwise have been forgotten.
Conclusion: Create a Box That Tells Your Story
A DIY memory box is a simple, creative way to turn ordinary keepsakes into something meaningful. With photographs, handwritten notes, tickets, tags, stickers, souvenirs, and a few thoughtful design choices, you can create a personalized collection that celebrates the moments you never want to forget.
Do not worry about making every detail perfect. Choose items that have meaning, experiment with layers, repeat a few favorite colors, and leave space for your personality to show through. The little imperfections are often what make handmade keepsakes feel special.
Whether you are creating one for yourself or making a sentimental gift for someone else, a memory box offers a beautiful way to collect moments in one place. Start with a box, gather the memories that make you smile, and let the design tell the rest of the story.