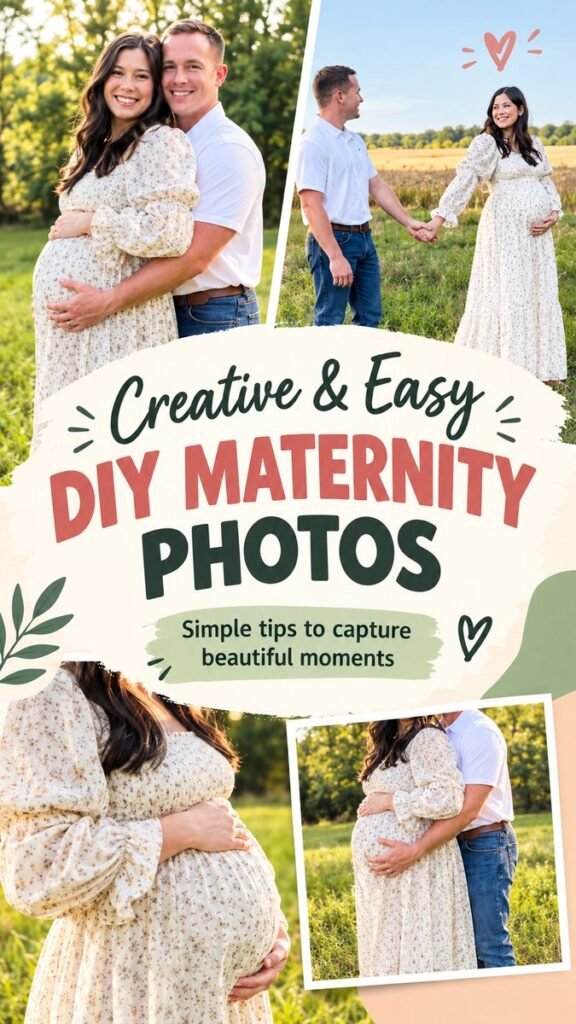
DIY maternity photos can turn a simple pregnancy milestone into a collection of warm, personal memories without requiring a complicated studio setup. With natural light, a meaningful outdoor location, a comfortable outfit, and a few thoughtful poses, it is possible to create maternity pictures that feel relaxed and genuine. The visual style here centers on a couple enjoying an outdoor setting, with a soft floral maternity dress, natural greenery, open fields, affectionate poses, and a bright, timeless atmosphere.
The beauty of a DIY maternity photoshoot is that you can make the experience completely your own. Instead of worrying about elaborate props or perfect poses, focus on connection, comfortable movement, and the little details that make this season of life special. Whether you are taking pictures with a phone, using a camera on a tripod, or asking a partner or friend to take the photos, a thoughtful plan can make the entire session easier.
Key Takeaways
- Choose soft natural light for flattering and atmospheric maternity photos.
- Select an outfit that feels comfortable while creating a beautiful silhouette.
- Use simple couple poses that emphasize connection rather than perfection.
- Try several angles, distances, and compositions for a varied photo collection.
- Keep the location uncluttered so the couple and baby bump remain the focus.
- Plan a few must-have shots, then leave room for spontaneous moments.
Why DIY Maternity Photos Are Worth Trying
A professional maternity session can be wonderful, but DIY maternity photos offer a different kind of freedom. You can choose a familiar location, take breaks whenever needed, change poses at your own pace, and repeat a shot until it feels right. There is also something special about photographs created in a setting that already feels meaningful to you.
A DIY approach does not mean the photos have to look casual or unfinished. Small choices can create a polished result. Consider the time of day, background, outfit, camera position, and overall color palette before taking the first photograph. When these elements work together, even simple equipment can produce beautiful images.
Important: The strongest maternity photographs are often the ones that show genuine connection. A gentle hand on the bump, a shared smile, walking hand in hand, or simply standing close together can communicate more than a complicated pose.
Choose a Beautiful DIY Maternity Photos Location
The setting plays a major role in the mood of maternity photography. An open field, garden, quiet park, backyard, wooded area, or scenic outdoor space can provide a natural backdrop without requiring elaborate decoration. The photographs shown here demonstrate how greenery and an open field can create a peaceful, airy atmosphere.
Look for Simple, Uncluttered Backgrounds
Before starting, walk around the location and look through your camera at different angles. Pay attention to distracting objects such as signs, parked vehicles, bins, fences, or busy structures. A simple background helps keep attention on the couple and the baby bump.
Open spaces are especially useful because they create visual breathing room around the subject. Trees, grass, flowers, and fields can add texture without overwhelming the composition. If the location has several interesting areas, plan to move between two or three spots rather than taking every photograph from one position.
Use Natural Scenery as a Frame
Branches, tall grass, trees, and pathways can naturally frame a maternity portrait. Instead of placing the couple directly in the center of every image, experiment with positioning them slightly to one side while allowing the landscape to fill part of the frame.
This approach can make DIY maternity photos feel more editorial while still keeping the overall mood natural. Look for leading lines, open areas, and layers in the background to create depth.
Find the Best Light for Maternity Photography
Lighting can make a dramatic difference in DIY maternity photography. Natural outdoor light is often the easiest option because it requires no complicated equipment. The goal is not necessarily to find the brightest possible sunlight. Soft, gentle light can create a more flattering and relaxed appearance.
Try Golden-Hour Photography
The period around sunrise or sunset can provide a warm, soft quality of light. If you are photographing outdoors, this can add a beautiful glow to the background and create depth around the couple. The warm atmosphere also works particularly well with neutral, cream, beige, and floral clothing.
If golden hour is not practical, do not worry. An overcast day can provide soft, diffused light that is excellent for portraits. The important thing is to avoid harsh, unflattering light when possible and to check how shadows fall across the face and clothing.
Avoid Extremely Harsh Midday Light
Strong overhead sunlight can create deep shadows and make people squint. If you need to photograph during brighter hours, look for open shade beneath trees or beside a structure. Keep the background bright enough to maintain detail while positioning the couple in comfortable, even light.
Expert Insight
Light direction matters as much as brightness. Take a few test photographs while turning the couple toward and away from the light. Small changes in position can soften shadows, improve facial illumination, and create a completely different mood.
Choose an Outfit That Photographs Beautifully
The outfit shown in this maternity photo inspiration is a long, light-colored floral dress with a soft, flowing shape. This type of clothing works beautifully outdoors because it creates movement while keeping the visual palette calm and cohesive.
Prioritize Comfort
Comfort should come before appearance during a maternity photoshoot. Choose clothing that allows easy movement and feels pleasant throughout the session. A relaxed subject naturally produces more genuine expressions and body language.
Flowing dresses, soft fabrics, and gentle patterns can photograph particularly well because they add texture without requiring additional props. Neutral colors can also blend beautifully with outdoor environments.
Coordinate Without Matching Exactly
For couple maternity photos, coordinating colors can create a more polished result without making the outfits look overly planned. If one person wears a soft floral or neutral outfit, the other can choose complementary tones such as white, cream, beige, denim, muted green, or another understated shade.
Avoid combining too many competing patterns. The goal is to create visual harmony while allowing the maternity outfit and baby bump to remain an important part of the composition.
Easy DIY Maternity Photo Poses
You do not need professional modeling experience to create beautiful maternity pictures. Start with natural movements and build from there. Instead of holding one pose for a long time, move slowly between positions while the camera captures multiple frames.
The Gentle Bump Hold
One of the simplest maternity poses is to place both hands comfortably around the baby bump. Try standing at a slight angle rather than facing the camera directly. This can create a natural silhouette while keeping the photograph intimate.
Take both full-body and closer photographs. A close-up can focus on the hands and bump, while a wider image can include the surrounding landscape.
The Couple Embrace
Have the partner stand behind or beside the expectant parent and gently embrace them. Keep the interaction comfortable and natural. Looking at each other instead of always looking into the camera can create an authentic feeling.
Try several variations. Capture a smile, a quiet moment, a forehead-to-forehead pose, or a simple embrace while looking toward the camera. These small changes can produce an entire collection from one basic setup.
Walking Hand in Hand
Walking photographs are ideal when you want less posing and more movement. Hold hands and walk slowly toward or away from the camera. Ask the photographer to take several images while you move naturally.
This pose works particularly well in open fields, gardens, and paths because the surroundings become part of the story. It can also help anyone who feels uncomfortable standing still in front of a camera.
A Close-Up of the Baby Bump
Not every image needs to include both people from head to toe. Take a few closer photographs that highlight the pregnancy details. Hands resting gently on the bump, the texture of the dress, and a soft side profile can create meaningful supporting images.
The Looking-Away Portrait
For a more candid appearance, look toward the landscape instead of directly at the camera. This can make the photograph feel like a captured moment rather than a traditional posed portrait. Combine this with a relaxed stance and natural hand placement.
How to Take DIY Maternity Photos at Home or Outdoors
You can create a simple setup with equipment you may already have. A smartphone is enough for many DIY maternity photos, especially when combined with good lighting and thoughtful composition.
- Clean the camera lens before starting.
- Set the camera or phone at a comfortable height.
- Use a tripod or stable surface when possible.
- Turn on a timer or use a remote shutter if available.
- Take several photographs for each pose.
- Review the images before changing locations.
- Adjust your position if the background contains distractions.
If someone else is taking the pictures, show them a few pose ideas beforehand. Give simple instructions such as moving closer, turning slightly, walking slowly, or looking toward each other. Clear directions make the session much less stressful.
Create Variety During Your Photoshoot
A common mistake with DIY maternity photos is taking too many nearly identical images. Instead, change one element at a time. Move closer, switch from a full-body shot to a waist-up portrait, change the direction of the gaze, or shift the camera angle.
- Wide shot: Show the couple and the surrounding scenery.
- Full-body portrait: Highlight the outfit and pregnancy silhouette.
- Medium shot: Focus on expressions and connection.
- Close-up: Capture hands, bump details, or facial expressions.
- Movement shot: Photograph walking, turning, or interacting naturally.
Creating this variety makes the final collection feel more complete. You can later choose a few favorites for a photo album, announcement, framed print, or private keepsake.
Small Details That Make Photos Feel Personal
Meaningful maternity photography does not always require elaborate props. Personal details can add emotion while keeping the images simple. Consider including a favorite outdoor location, a meaningful piece of clothing, a blanket, a pair of tiny baby shoes, or another subtle item if it feels appropriate.
However, props are optional. The photographs can be just as beautiful when the focus stays on the couple, the landscape, and the pregnancy itself. The natural outdoor setting in this style of maternity photography provides enough visual interest without needing a crowded arrangement.
DIY Maternity Photography Tips for Better Results
Pro Tip: Take more photographs than you think you need. Expressions change quickly, especially during couple portraits, and having several frames from each pose gives you more natural options to choose from later.
Keep the session relaxed. Take breaks, change positions gradually, and avoid treating every photograph like a formal portrait. Some of the most appealing images may happen between planned poses when the couple laughs, looks at each other, or naturally adjusts their position.
Also remember to check the entire frame before pressing the shutter. Look at the edges of the photograph, not just the people in the center. A distracting branch, bright object, or uneven horizon can often be avoided by taking one step to the side or changing the camera height.
Simple Editing for a Soft, Natural Finish
Editing can enhance DIY maternity photos, but subtle adjustments are usually enough. Start with exposure and brightness, then consider highlights, shadows, contrast, and white balance. The goal is to maintain natural skin tones while preserving the gentle outdoor atmosphere.
If your photographs were taken in different lighting conditions, try to keep the edits visually consistent. Similar brightness and warmth can help multiple photographs look like they belong to the same maternity session.
Avoid relying heavily on filters that dramatically change skin tones or scenery. A clean, natural finish complements the timeless quality of maternity photography and keeps attention on the people and the moment.
Planning a DIY Maternity Photoshoot Checklist
Planning a little ahead can make the experience smoother. Before heading outside, check the weather, choose a location, prepare the outfit, charge the phone or camera, and decide which poses you definitely want to capture.
- Choose one main location and one backup area.
- Prepare a comfortable maternity outfit.
- Charge the camera or smartphone.
- Bring a tripod or stable support if needed.
- Check the lighting before beginning.
- Save a short list of favorite maternity poses.
- Take both posed and candid photographs.
- Review a few images before leaving the location.
You do not need to follow the checklist rigidly. Think of it as a safety net that helps you remember the essentials while leaving plenty of room for spontaneous moments.
At a Glance
- Use natural light whenever possible.
- Choose comfortable clothing that photographs naturally.
- Mix affectionate poses with relaxed movement.
- Capture wide, medium, and close-up compositions.
- Keep backgrounds simple and visually calm.
Conclusion: Make Your DIY Maternity Photos Your Own
DIY maternity photos are ultimately about documenting a meaningful chapter in a way that feels personal. You do not need a professional studio, complicated equipment, or dozens of elaborate poses. A beautiful outdoor setting, comfortable clothing, natural light, and genuine connection can provide everything you need for a memorable maternity photoshoot.
Use the ideas as a starting point rather than a strict formula. Try a few classic poses, walk together, experiment with different camera angles, and let natural expressions become part of the session. Most importantly, choose a pace and setting that feel comfortable.
The result does not have to be perfectly posed. The most valuable photographs are often the ones that preserve the feeling of the moment. With a little preparation and creativity, your DIY maternity photography session can become a collection of warm, timeless memories that you will enjoy looking back on for years to come.
Tags
DIY Maternity Photos Maternity Photography Maternity Photoshoot Pregnancy Photos Maternity Poses Pregnancy Photography Couple Maternity Photos DIY Photoshoot Ideas