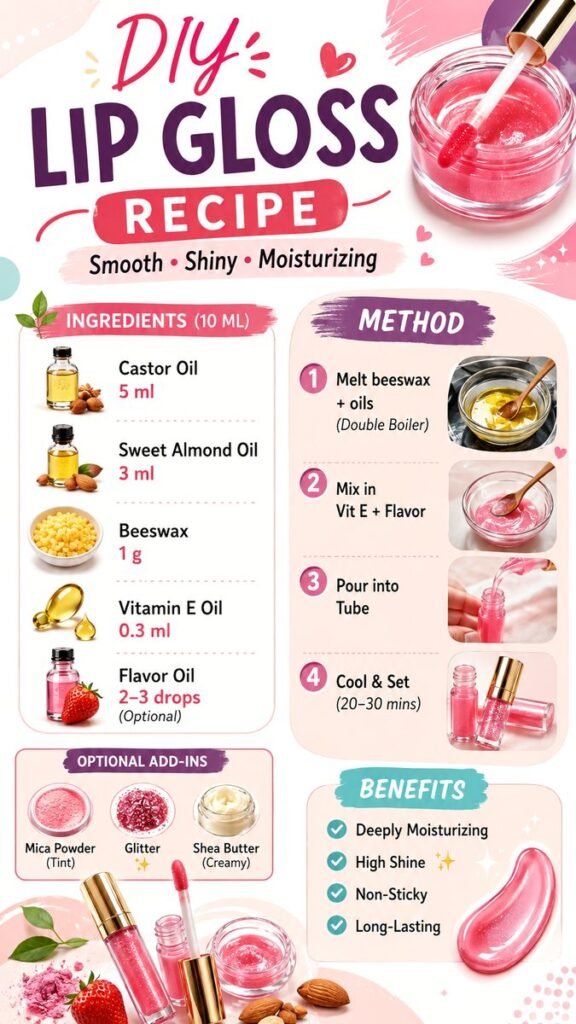
Making your own lip gloss can be a fun way to explore simple beauty DIYs while creating a glossy, moisturizing product you can customize to your preferred finish. This easy DIY lip gloss recipe combines castor oil, sweet almond oil, beeswax, vitamin E oil, and optional flavor oil for a smooth texture and attractive shine. Optional additions such as mica powder, glitter, or shea butter can also help you create a personalized look and feel.
Key Takeaways
- Castor oil helps create the signature glossy appearance of lip gloss.
- Sweet almond oil adds a lightweight, smooth feel.
- Beeswax helps give the mixture more body and structure.
- Vitamin E oil is included as a conditioning ingredient.
- Mica, glitter, and shea butter can be used to customize the finish.
- Clean tools, suitable cosmetic ingredients, and proper storage are important for homemade lip products.
Why Make Your Own DIY Lip Gloss?
DIY lip gloss is appealing because it gives you control over the ingredients, texture, appearance, and fragrance. Instead of choosing from a fixed selection of store-bought finishes, you can experiment with different combinations to create something that suits your preferences.
The recipe shown here has a classic glossy beauty aesthetic, with a transparent pink finish and ingredients commonly associated with homemade lip products. It is also straightforward enough to fit into a beginner-friendly DIY beauty routine.
Another advantage is customization. A clear gloss can remain simple and minimal, while cosmetic mica can add a subtle tint. A small amount of cosmetic glitter can create extra sparkle, and shea butter can make the texture feel creamier. These optional ingredients make the basic recipe more flexible without changing its overall concept.
DIY Lip Gloss Ingredients
The visual recipe is designed around a small batch and lists several straightforward ingredients. Before preparing any homemade cosmetic, make sure every ingredient is specifically suitable for cosmetic use and appropriate for the lips.
Castor Oil
Castor oil is one of the standout ingredients in a glossy lip product. Its rich, smooth consistency makes it especially useful when you want a shiny finish that spreads easily across the lips.
In the pictured recipe, castor oil is the largest liquid component, with 5 ml included in the small batch. Its naturally viscous texture also helps give a lip gloss that characteristic slick appearance.
Sweet Almond Oil
Sweet almond oil is included at 3 ml. It is commonly used in cosmetic formulations because of its smooth, lightweight feel. In a DIY lip gloss, it can help balance the thicker consistency of castor oil.
If you have a known nut allergy, choose an alternative cosmetic oil that is appropriate for lip products rather than automatically substituting another household oil. Always check the ingredient supplier’s intended cosmetic use.
Beeswax
The recipe includes 1 gram of beeswax. Beeswax is useful when creating a gloss that needs more structure than a completely liquid oil blend. When warmed, it melts into the oils and then helps the mixture thicken as it cools.
The amount of beeswax can have a noticeable effect on the final texture. More structure generally creates a firmer product, while a softer formula can feel more fluid. For a first attempt, following the pictured proportions is a practical starting point.
Vitamin E Oil
The visual recipe lists 0.3 ml of vitamin E oil. It is included as a conditioning ingredient commonly found in cosmetic formulations. Adding it toward the later stage of the process also fits the preparation sequence shown in the recipe.
Flavor Oil
Flavor oil is optional, with the recipe suggesting 2 to 3 drops. If you choose to use one, make sure it is specifically formulated and labeled for lip products. Fragrance oils intended for candles, diffusers, soaps, or other applications should not automatically be treated as lip-safe ingredients.
Important: Cosmetic ingredients are not interchangeable simply because they have similar names. For a lip product, use ingredients according to their manufacturer’s recommended application and usage level.
Optional Add-Ins for a Personalized Finish
One of the most enjoyable parts of making DIY lip gloss is choosing the final appearance. The recipe features three optional add-ins: mica powder, glitter, and shea butter.
Cosmetic Mica Powder
Mica can introduce a soft tint or luminous effect. For a delicate everyday gloss, choose a cosmetic-grade mica designed for lip applications and use an appropriate amount. A little can make a noticeable visual difference.
Cosmetic Glitter
Glitter can create a playful, sparkling finish, but the type of glitter matters. Avoid craft glitter or decorative glitter that has not been approved for cosmetic use. Lip products should only contain glitter specifically intended for the lips or the relevant cosmetic application.
Shea Butter
Shea butter can add a creamy element to the formula. Because it is a solid ingredient, it can also influence the consistency of the finished gloss. Use it sparingly when experimenting so you do not accidentally make the mixture much firmer than intended.
Expert Insight
The balance between oils and beeswax is what makes this type of gloss interesting to customize. If the finished product feels too firm, the formulation may need a different oil-to-wax balance. If it feels too runny, additional structure may be needed. Make small test batches rather than changing a large batch dramatically.
How to Make DIY Lip Gloss
The preparation shown in the recipe follows four basic stages: melting the beeswax with the oils, adding vitamin E and flavor, transferring the mixture to a container, and allowing it to cool and set.
Step 1: Prepare Your Workspace
Start with a clean, dry workspace and gather your ingredients, heat-safe mixing container, stirring utensil, measuring tools, and lip gloss tube or cosmetic container. Clean and dry your equipment before beginning.
Because this is a product intended for use on the lips, cleanliness is particularly important. Avoid introducing water, food particles, or other contaminants into the mixture.
Step 2: Melt the Beeswax and Oils
Measure the castor oil, sweet almond oil, and beeswax according to the recipe. Combine them in a heat-safe container and warm them using a gentle double-boiler method.
The purpose is to melt the beeswax into the oils rather than exposing the mixture directly to intense heat. Stir gently until the beeswax has melted and the mixture looks uniform.
Pro Tip: Keep the heating process gentle and controlled. Direct high heat is unnecessary for a small cosmetic batch, and careful temperature management makes it easier to maintain a consistent mixture.
Step 3: Add Vitamin E and Flavor
Once the wax and oils have combined, follow the recipe’s next stage by incorporating vitamin E oil and optional lip-safe flavor oil. Stir thoroughly so the additions are distributed throughout the mixture.
If you are adding mica or another cosmetic colorant, make sure it is suitable for lip products and blend it carefully to prevent visible clumps. The goal is a smooth, even mixture that will look attractive once it cools.
Step 4: Transfer to a Lip Gloss Tube
Carefully transfer the warm mixture into a suitable clean cosmetic container or lip gloss tube. Work slowly to minimize spills and avoid filling the container beyond its capacity.
A small cosmetic funnel or transfer tool can make this step easier, especially when working with narrow tubes. Wipe away any residue around the opening before the product cools and hardens.
Step 5: Cool and Let the Gloss Set
The recipe suggests allowing the gloss to cool and set for approximately 20 to 30 minutes. The exact setting time can vary depending on the container, room temperature, batch size, and amount of wax used.
Once the product has cooled, check the texture before regular use. A properly cooled gloss should have a consistent appearance without obvious separation or unmixed particles.
How to Customize Your Homemade Lip Gloss
Customization is where a simple DIY lip gloss recipe can become much more creative. You can experiment with the appearance and texture while keeping the basic oil-and-wax concept intact.
- For a clear gloss: Keep the formula free from colorants and glitter.
- For a soft tint: Use a small amount of lip-safe cosmetic mica.
- For sparkle: Choose cosmetic glitter specifically approved for lip use.
- For a creamier texture: Experiment cautiously with a suitable amount of shea butter.
- For flavor: Choose a lip-safe flavor oil and follow its recommended usage rate.
Keep notes whenever you experiment. Recording ingredient amounts, texture, appearance, and any changes you make will help you recreate a version you particularly enjoy.
Tips for Better DIY Lip Gloss Results
Measure Ingredients Carefully
Small batches are sensitive to ingredient changes. Measuring oils and wax accurately gives you a more reliable starting point and makes it easier to understand how different ingredients affect the final texture.
Use Cosmetic-Grade Ingredients
Choose ingredients from reputable suppliers and check that they are intended for cosmetic use. This is particularly important for colorants, glitter, flavor oils, and any ingredient that will come into direct contact with the lips.
Keep Water Out of the Formula
The pictured recipe is an oil-and-wax style formula without a water phase. Avoid introducing water into the mixture during preparation or storage. Water can change the stability and preservation needs of a cosmetic product.
Patch Test New Ingredients
Even familiar cosmetic ingredients can cause irritation or allergic reactions in some people. If you are trying a new ingredient, use caution and stop using the product if irritation occurs. Anyone with known allergies should check every ingredient carefully before making or using the gloss.
Important: Homemade cosmetics do not automatically have the same stability, preservation, contamination controls, or testing as professionally manufactured products. Make small quantities, use clean equipment, store the product appropriately, and discard it if its smell, appearance, or texture changes unexpectedly.
Packaging and Storage Ideas
The packaging shown with this style of DIY lip gloss emphasizes clear tubes and small cosmetic jars, which work well for displaying a glossy pink formula. Choose packaging designed for cosmetic use and compatible with oil-based products.
Keep the finished gloss closed when it is not being used. Store it in a clean, dry place away from excessive heat and direct sunlight. Heat can soften a wax-based gloss, while temperature changes may affect its consistency.
If you are making multiple variations, label each container with the date, flavor, color, and key ingredients. This simple habit makes it much easier to track your experiments and identify which formula you prefer.
Common DIY Lip Gloss Mistakes to Avoid
- Using craft glitter instead of cosmetic glitter intended for lips.
- Adding too much beeswax and ending up with a stiff texture.
- Using fragrance oils that are not approved for lip products.
- Overheating the ingredients instead of using gentle indirect heat.
- Introducing water or unclean tools into an oil-based formula.
- Making a large batch before testing the texture of a small sample.
- Ignoring changes in smell, color, texture, or appearance during storage.
Quick Note
The recipe is presented as a small 10 ml-style batch, but the final volume can vary because beeswax and optional ingredients affect the amount and texture. Treat the listed quantities as a starting formula and evaluate the finished consistency before making larger batches.
Creative Ways to Enjoy a DIY Lip Gloss Project
A homemade lip gloss project can be more than simply making a beauty product. It can become a creative activity where you experiment with colors, textures, packaging, and combinations of cosmetic ingredients.
Try creating a clear everyday gloss, a subtle pink version, or a softly shimmery option using lip-safe cosmetic mica. You can also prepare small variations and compare their texture after cooling. This approach makes it easier to discover what works best for your preferences.
DIY lip gloss can also be a thoughtful handmade project when prepared responsibly. If you plan to give homemade cosmetics to someone else, clearly label the ingredients and date made, and consider allergies or sensitivities before sharing them.
At a Glance
- Base: castor oil, sweet almond oil, and beeswax.
- Conditioning addition: vitamin E oil.
- Optional customization: lip-safe flavor, mica, glitter, or shea butter.
- Method: gently melt, combine, transfer, and allow to cool.
- Best practice: use clean equipment and ingredients intended for lip cosmetics.
Conclusion
This DIY lip gloss recipe offers a simple starting point for anyone interested in homemade beauty projects. The combination of castor oil, sweet almond oil, beeswax, and vitamin E creates a versatile foundation, while optional mica, cosmetic glitter, shea butter, and lip-safe flavor can give each batch its own personality.
The key to a successful homemade lip gloss is not simply following a recipe. Careful measuring, gentle heating, suitable cosmetic ingredients, clean equipment, and thoughtful storage all contribute to a better experience. Start with a small batch, make one change at a time, and keep notes as you experiment.
Whether you prefer a crystal-clear shine or a soft pink shimmer, this DIY beauty idea gives you plenty of room to get creative. With a little practice, you can develop a gloss texture and appearance that feels uniquely yours while keeping your process organized and ingredient-conscious.