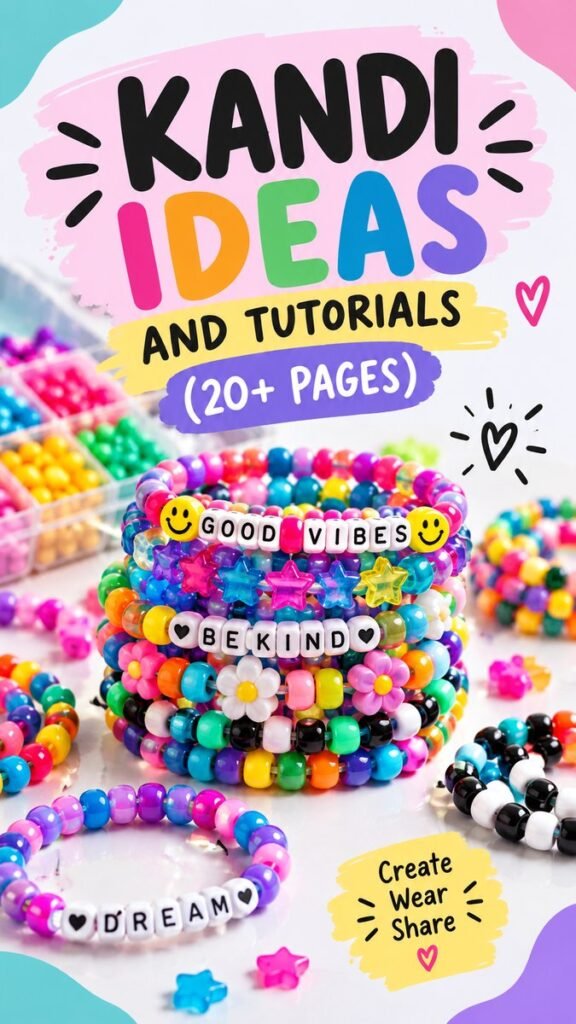
Colorful beads, playful patterns, personalized words, and stacks of bright bracelets make DIY kandi a fun way to turn simple craft supplies into wearable accessories. Whether you are completely new to kandi making or looking for fresh inspiration for your next bracelet stack, there are countless ways to experiment with colors, shapes, letters, and charms. The beauty of DIY kandi is that the finished piece can be as simple or as creative as you want.
Key Takeaways
- Use colorful pony beads to create bright, playful kandi bracelets.
- Alphabet beads make it easy to personalize bracelets with short words and messages.
- Combine different bead colors, shapes, and textures for more visual interest.
- Start with simple patterns before experimenting with more detailed designs.
- DIY kandi can become a creative activity for making gifts, accessories, and coordinated bracelet stacks.
What Makes DIY Kandi So Fun?
DIY kandi is all about creativity without complicated equipment or advanced crafting skills. A basic bracelet can be made with a handful of beads and a length of elastic cord, yet the possibilities for customization are nearly endless. You can choose a favorite color palette, spell out a meaningful word, create a repeating pattern, or mix several styles together.
The colorful bracelet designs shown in this style of craft inspiration demonstrate how much personality can come from combining simple materials. Bright pinks, blues, greens, yellows, oranges, purples, and clear beads can create a lively finished look. Adding flower beads, star shapes, smiley faces, or alphabet beads gives each piece an extra layer of character.
One of the biggest attractions of DIY kandi is that there is no single correct way to design it. A bracelet can be symmetrical and carefully planned, or it can be an energetic mix of colors and shapes. The process is just as enjoyable as wearing the finished creation.
Important: The best kandi designs usually begin with a simple idea rather than an overly complicated plan. Choose a few colors, decide on a word or pattern, and let the rest of the design develop naturally.
Essential Supplies for DIY Kandi
You do not need a large collection of specialist tools to get started. Most kandi projects rely on a few straightforward supplies that are easy to organize and reuse for multiple designs.
- Pony beads: These colorful beads are the foundation of many kandi bracelets and are available in an enormous range of colors.
- Alphabet beads: Use letter beads to add names, short phrases, initials, or cheerful messages.
- Elastic cord: Stretchy jewelry cord makes bracelets comfortable to put on and take off.
- Specialty beads: Flowers, stars, hearts, smiley faces, translucent beads, and other shapes can become eye-catching accents.
- Scissors: A sharp pair of scissors is useful for cutting the elastic cord cleanly.
- Storage containers: Small compartments or containers make it easier to separate beads by color, shape, or letter.
Choosing Your Bead Colors
Color selection can completely change the mood of a DIY kandi bracelet. A rainbow combination feels energetic and playful, while a smaller palette can create a more coordinated look. Try grouping colors that you naturally enjoy together instead of worrying about strict design rules.
For a bright bracelet, combine several contrasting colors. For a softer design, choose a few related shades and add white or clear beads between them. Black and white beads can also help stronger colors stand out, especially when you want alphabet beads to remain easy to read.
Using Alphabet Beads
Alphabet beads are one of the easiest ways to make kandi feel personal. Short words such as “DREAM,” “SMILE,” “KIND,” or “VIBES” can become the focal point of a bracelet. You can also use initials or a short nickname for an even more personalized accessory.
Before stringing the letters, lay them out on a flat surface in the order you want them to appear. This small step can prevent mistakes and lets you experiment with the surrounding colors before committing to the final arrangement.
Easy DIY Kandi Bracelet Ideas
If you are searching for DIY kandi inspiration, start with designs that are easy to repeat. Simple projects allow you to practice stringing beads while leaving plenty of room for creative choices.
1. Rainbow Kandi Bracelet
A rainbow bracelet is an easy starting point because you can arrange bright colors in a predictable sequence. Try repeating several colors around the bracelet, or create a less structured design by mixing the colors together.
Add a few clear or translucent beads to create small changes in texture. If you want a message bracelet, place alphabet beads in the center and use the rainbow colors around them.
2. Good Vibes Bracelet
A positive phrase can become the centerpiece of a bracelet. Choose a short message that fits comfortably across the available alphabet beads, then surround the letters with bright pony beads.
Smiley-face beads make a natural accent for cheerful designs, while stars or flowers can add extra color without competing with the lettering.
3. Flower Kandi Bracelet
Flower-shaped beads can turn a basic bracelet into something more decorative. Place a flower between groups of round beads, or use several flowers to create a repeating pattern.
For a playful effect, give each flower a different center color. Keeping the rest of the bracelet relatively simple will help the flower details remain visible.
4. Star Accent Bracelet
Star-shaped beads are another easy way to add dimension. Use them as occasional focal beads rather than covering the entire bracelet with specialty shapes. A few colorful stars surrounded by simple pony beads can create a balanced design.
5. Mixed Pattern Kandi
For a more energetic look, combine several bead styles in one bracelet. Alternate regular pony beads with translucent beads, specialty shapes, and occasional alphabet beads. This approach works particularly well when you enjoy colorful, maximalist accessories.
Why This Matters
A successful kandi bracelet does not need dozens of different bead types. A small selection of colors plus one or two distinctive details can create a design that feels intentional. Focus on contrast, repetition, and a clear focal point.
How to Make a Basic DIY Kandi Bracelet
Once you have chosen your beads, making a simple bracelet is a straightforward process. Take your time with the arrangement, especially if you are using alphabet beads or a repeating color pattern.
- Choose your design: Decide on your colors, message, specialty beads, or pattern before you begin.
- Measure the cord: Use enough elastic cord to comfortably fit around the intended wrist while leaving extra length for tying.
- Arrange the beads: Place your chosen beads in order on a table or craft mat.
- String the beads: Thread each bead onto the elastic cord according to your planned design.
- Check the arrangement: Before tying the bracelet, hold the ends together and check that the pattern and fit look right.
- Secure the bracelet: Tie the elastic securely, trim excess cord carefully, and make sure the finished bracelet feels comfortable.
Pro Tip: Keep your alphabet beads and specialty beads in separate compartments. When everything is easy to see, it becomes much faster to build new DIY kandi designs and experiment with different combinations.
How to Create Better Color Combinations
Color is one of the most important elements in a kandi design. Instead of choosing every color available, begin with a small group of shades that work well together. Three to five main colors are often enough to create a visually interesting bracelet.
Contrast can help certain beads stand out. For example, bright colors become especially noticeable when surrounded by white, black, or transparent beads. If you are using alphabet beads, choose surrounding colors that make the letters easy to see.
Repeating a color at regular intervals can also make a bracelet feel more organized. Try a pattern such as blue, pink, yellow, blue, pink, yellow. Once you are comfortable with simple sequences, you can introduce specialty beads between the repeated groups.
Try Different Textures and Shapes
Not every bead needs to look the same. Combining smooth pony beads with translucent beads or shaped accents adds visual depth. Flowers and stars can act as focal points, while small round beads help connect the design together.
When using several specialty shapes, give each one enough space to be appreciated. Too many focal elements can make a bracelet feel crowded, while carefully spaced accents create a more balanced result.
Creative Ways to Personalize Kandi
The easiest way to make DIY kandi unique is to give each bracelet a theme. Think about a favorite color combination, a cheerful word, a playful pattern, or a collection of related charms.
- Word bracelets: Build designs around short positive words or phrases.
- Color themes: Choose a specific palette and repeat it throughout the bracelet.
- Initial bracelets: Use one or several letters to create a simple personalized piece.
- Pattern bracelets: Create repeating sequences using two, three, or more colors.
- Charm bracelets: Add flower, star, heart, or smiley-style beads as focal accents.
Making several bracelets as a coordinated stack is another fun option. You can give each bracelet a different pattern while keeping one or two colors consistent across the set. The result feels connected without making every bracelet identical.
DIY Kandi Tips for Beginners
New crafters often try to create an elaborate bracelet immediately. Starting small can make the process more enjoyable. Begin with a simple repeating pattern, then gradually introduce alphabet beads and specialty shapes as you become more comfortable.
It also helps to prepare your workspace before stringing anything. Spread your beads into small groups and keep the elastic cord, scissors, and planned design nearby. A clear workspace makes it easier to spot missing colors and keep track of your pattern.
- Plan the bracelet before cutting the cord.
- Lay alphabet beads out in order before threading them.
- Use a limited color palette when learning patterns.
- Leave enough cord for securely tying the finished bracelet.
- Test your pattern visually before committing to the final arrangement.
Ways to Organize Your Kandi Supplies
A growing bead collection can become difficult to manage quickly, especially when you have many colors and letter beads. Small divided organizers are useful for keeping colors separated and making your supplies easier to browse.
Consider organizing beads by type first, then by color. You might keep regular pony beads in one organizer, alphabet beads in another, and specialty shapes in a third. This system makes it easier to pull together supplies when inspiration strikes.
Keeping a small tray nearby for your current project can also help. Place the beads you plan to use in the tray before starting, so your main collection stays organized while you work.
DIY Kandi Ideas for Gifting and Sharing
Handmade kandi can be a thoughtful way to create small personalized gifts. Instead of making every bracelet identical, consider choosing colors and words that reflect the person receiving it. A favorite color combination or a simple encouraging word can make a handmade bracelet feel especially personal.
You can also create small themed sets. For example, make several bracelets using a shared palette while giving each one a different pattern or word. This approach is useful when preparing several handmade accessories at once.
The process can also be social. Setting out bowls of colorful beads and letting everyone design their own bracelet turns a simple craft session into a creative activity where each person can experiment with their own style.
At a Glance
- Start with colorful pony beads and elastic cord.
- Add alphabet beads for personalized messages.
- Use flowers, stars, hearts, and smiley-style beads as accents.
- Build balanced designs with repetition and contrasting colors.
- Experiment with bracelet stacks once you are comfortable with basic patterns.
Final Thoughts on DIY Kandi
DIY kandi is a colorful, approachable craft that gives you plenty of freedom to experiment. With simple beads, elastic cord, and a little imagination, you can create bracelets that feature bold colors, playful shapes, personalized messages, and patterns that reflect your own style.
The most important part is not following a complicated formula. Start with a few colors you love, choose one interesting detail, and build from there. As your confidence grows, try more elaborate patterns, coordinated bracelet stacks, and combinations of alphabet and specialty beads.
Whether you are making one bracelet for yourself, creating a collection of colorful accessories, or planning a fun craft session with friends, these DIY kandi ideas provide an easy starting point. Gather your beads, arrange your favorite colors, and let your creativity take the lead.
Tags
DIY Kandi Kandi Bracelets Kandi Ideas Pony Bead Crafts Friendship Bracelets Bead Crafts DIY Accessories Alphabet Beads