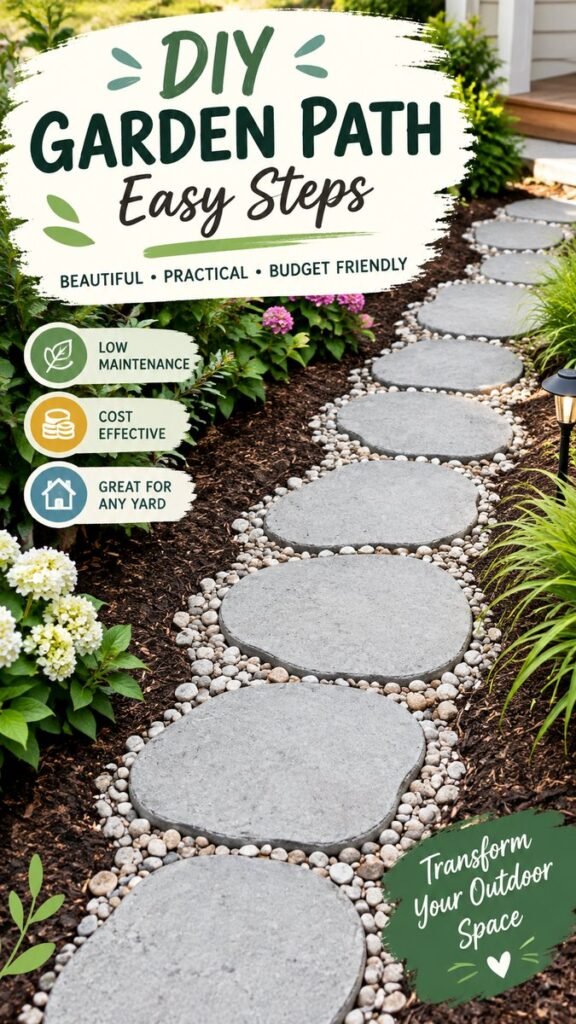
A simple garden path can completely change the way an outdoor space feels. With a little cement, a few practical tools, and some creativity, you can create attractive stepping stones that guide the way through a garden while adding structure and personality. Irregular concrete stepping stones are especially appealing because they have a relaxed, handmade appearance rather than the perfectly uniform look of store-bought pavers.
Key Takeaways
- DIY cement stepping stones can create a personalized garden walkway.
- Irregular shapes give a path a softer, more natural appearance.
- Simple molds can help produce consistent thickness and attractive forms.
- Small stones or gravel can fill the spaces around concrete pavers.
- A thoughtful layout can make even a modest garden feel more finished.
Why DIY Cement Garden Paths Are So Appealing
Cement DIY projects are popular because they combine creativity with practical outdoor improvement. A garden path does not have to be complicated or expensive to make a noticeable difference. Concrete stepping stones can define where people walk, protect planted areas from foot traffic, and create a visual connection between different parts of the yard.
The handmade character is part of the charm. Instead of using identical rectangular pavers, you can experiment with rounded, oval, pebble-like, or organically shaped forms. Slight differences between each piece make the finished walkway feel custom-made.
Important: The most successful DIY garden paths balance creativity with practicality. Think about how people will actually walk through the space before deciding where each stepping stone should go.
Planning Your Cement Stepping Stone Path
Before mixing cement, spend some time planning the route. A good path should feel natural within the garden rather than looking like an object placed on top of it. Look at existing plants, trees, borders, entrances, patios, and other areas you regularly use.
Curved paths can create a relaxed garden atmosphere, while a straighter arrangement often feels cleaner and more structured. The available space should also influence the shape. In a narrow planting area, smaller stepping stones may work better than oversized slabs.
Consider the Walking Pattern
Imagine walking along the proposed route before placing anything permanently. Each stone should provide a comfortable landing area for a normal step. Avoid creating awkward gaps that force someone to stretch or take unusually short steps.
You can temporarily mark the route with small objects or place cardboard shapes on the ground. This simple planning step makes it much easier to adjust the design before committing to the final arrangement.
Choose an Organic Shape
One of the most attractive features of a handmade cement path is its irregular appearance. Organic shapes complement garden beds particularly well because they echo the natural forms of leaves, stones, and planting areas.
You do not need every stepping stone to be identical. A collection of related shapes can actually create more visual interest. Keep the pieces reasonably consistent in scale while allowing small variations in outline.
Materials and Basic Supplies
A cement stepping stone project can be approached with relatively simple materials. The exact supplies depend on the method you choose, but the basic setup typically includes a cement or concrete mix, suitable molds, a mixing container, water, a mixing tool, and a level work area.
- Cement or concrete mix suitable for outdoor projects
- Reusable molds or flexible forms
- Mixing container
- Water according to the mix instructions
- Protective gloves and appropriate eye protection
- Shovel, trowel, or mixing tool
- Leveling tool for preparing the placement area
- Gravel, small decorative stones, or similar landscaping material
If you are new to working with cement, follow the instructions provided with your chosen mix. Different products can have different proportions, working times, curing requirements, and handling recommendations.
How to Make DIY Cement Stepping Stones
1. Prepare the Molds
Start by selecting molds that can produce the shapes and sizes you want. Flexible forms are useful when you want an organic outline because they make it easier to create less rigid shapes.
Prepare the molds on a stable, reasonably level surface. The finished stones will reflect the shape of the mold, so take a moment to make sure everything is positioned correctly before filling them.
2. Mix the Cement
Mix the cement or concrete product according to its package directions. Add water gradually rather than all at once, and work the mixture until it reaches the recommended consistency.
Avoid guessing at the water ratio. Too much water can affect the final result, while an overly dry mixture may be difficult to place and compact properly.
3. Fill the Forms
Carefully transfer the mixture into each mold. Work around the edges first and then fill the center. Gently settle the mixture into the form so there are fewer visible air pockets.
Use a trowel or similar tool to smooth the top surface. You can keep the surface very smooth for a contemporary appearance or leave subtle texture for a more handcrafted garden style.
4. Allow the Pieces to Cure
Allow the stepping stones to cure according to the instructions for the specific product you are using. Resist the temptation to remove or move them too early. Proper curing is an important part of producing durable concrete pieces.
Keep the curing area protected from unnecessary disturbance. The exact curing process can vary depending on the material, weather, temperature, and moisture conditions.
5. Prepare the Garden Bed
Once the stepping stones are ready to place, prepare the path area. Remove loose debris and create a stable surface for each piece. Depending on the ground conditions and the intended use of the path, some leveling and base preparation may be necessary.
The goal is to create stones that sit securely rather than rocking when stepped on. Take your time with this stage because careful placement makes the finished pathway look much more polished.
6. Arrange the Stones
Place the stepping stones along the route you planned earlier. Try several arrangements before settling on the final pattern. Rotating an irregular stone can completely change how it fits with its neighbors.
Leave enough space for comfortable movement while keeping the stones visually connected. A slightly varied arrangement often feels more natural than a perfectly straight row.
Creating a Natural Look With Gravel
Small stones or gravel can be an excellent finishing material around cement stepping stones. The contrast between smooth gray concrete and lighter aggregate creates definition and helps individual pavers stand out.
Gravel also helps visually connect the stepping stones with surrounding garden beds. For a more relaxed appearance, use a consistent aggregate throughout the path. For a more decorative design, you can experiment with different sizes and textures while keeping the overall palette cohesive.
Expert Insight
A simple material combination can have a surprisingly strong visual impact. Gray cement, pale gravel, dark soil, and green foliage create natural contrast without requiring complicated decoration.
Ways to Customize Your Cement DIY Project
The basic stepping stone concept can be adapted to suit many garden styles. The easiest way to personalize the project is through shape, arrangement, surface finish, and the materials surrounding the path.
Experiment With Shapes
Try rounded forms for a softer appearance or elongated shapes for a more directional path. Mixing several organic outlines can make the walkway feel handmade and playful.
Add Texture
A subtle textured surface can complement rustic or natural landscaping. A smoother finish can work beautifully in a contemporary yard. Always prioritize a practical walking surface when choosing decorative finishes.
Frame the Path With Plants
Plants can soften the hard lines of cement and make the path feel integrated into the garden. Low-growing greenery, flowering plants, ornamental grasses, and shrubs can all contribute to a layered outdoor design.
Pro Tip: Let the surrounding landscape provide most of the decoration. Simple concrete stepping stones often look their best when paired with rich soil, natural gravel, and abundant greenery rather than excessive accessories.
Common Mistakes to Avoid
DIY cement projects become much easier when you anticipate a few common problems. Planning, careful mixing, and proper placement can prevent many avoidable issues.
- Skipping the layout stage: Always test the path arrangement before final placement.
- Making the spacing uncomfortable: Consider natural walking stride when positioning stones.
- Using an unstable base: Each stepping stone should sit securely on prepared ground.
- Rushing the curing process: Follow the recommended curing guidance for your cement product.
- Overcomplicating the design: Let the shape and surrounding landscape create most of the visual interest.
- Ignoring the garden’s existing style: Choose forms and materials that complement the surrounding plants and hardscape.
How to Make the Path Feel More Finished
A successful garden path is about more than the stepping stones themselves. The surrounding space has a major influence on the final appearance. Keep the edges tidy, maintain the planting areas, and use repeated materials to create visual consistency.
For example, repeating the same gravel around several sections of the garden can make separate areas feel connected. Similarly, repeating a particular plant type along the route can create rhythm and guide the eye through the landscape.
You can also consider subtle outdoor lighting if the path needs to be visible after sunset. Small landscape lights can highlight the route and make the walkway feel intentional while adding another layer of atmosphere.
Cement DIY Ideas Beyond Garden Paths
Once you become comfortable with basic cement projects, the same creative approach can inspire many other outdoor improvements. Cement can be shaped into practical or decorative pieces that complement a garden, patio, or backyard.
- Small garden stepping stones
- Decorative outdoor pavers
- Simple plant stands
- Garden edging elements
- Minimalist outdoor décor
- Custom concrete-style accents
The key is to start with manageable projects and learn how your chosen material behaves. Once you understand mixing, molding, finishing, and curing, you can experiment with more ambitious designs.
Quick Points
- Plan the walking route before making permanent placements.
- Use organic shapes for a relaxed, garden-inspired appearance.
- Give cement pieces enough time to cure properly.
- Combine concrete with gravel and greenery for natural contrast.
- Keep the finished path practical, stable, and easy to maintain.
Conclusion
Creating a DIY cement garden path is a rewarding way to give an outdoor space a custom look without relying entirely on ready-made landscaping materials. Organic stepping stones can bring structure to a garden while still feeling relaxed and natural, especially when they are surrounded by gravel, soil, and lush planting.
The most important part is to combine creativity with thoughtful planning. Choose shapes that complement the garden, arrange the stones for comfortable walking, prepare a stable surface, and allow the cement to cure according to the product instructions. With those fundamentals in place, even a simple collection of handmade stepping stones can become a standout feature.
Whether you are refreshing a small garden corner or giving a larger backyard a new focal point, cement DIY projects offer plenty of room to experiment. Start with a simple stepping stone design, build confidence with the process, and let your landscape inspire the final arrangement.
Tags
Refine your cement DIY article
Add a step-by-step materials checklist
Create an SEO title and meta description