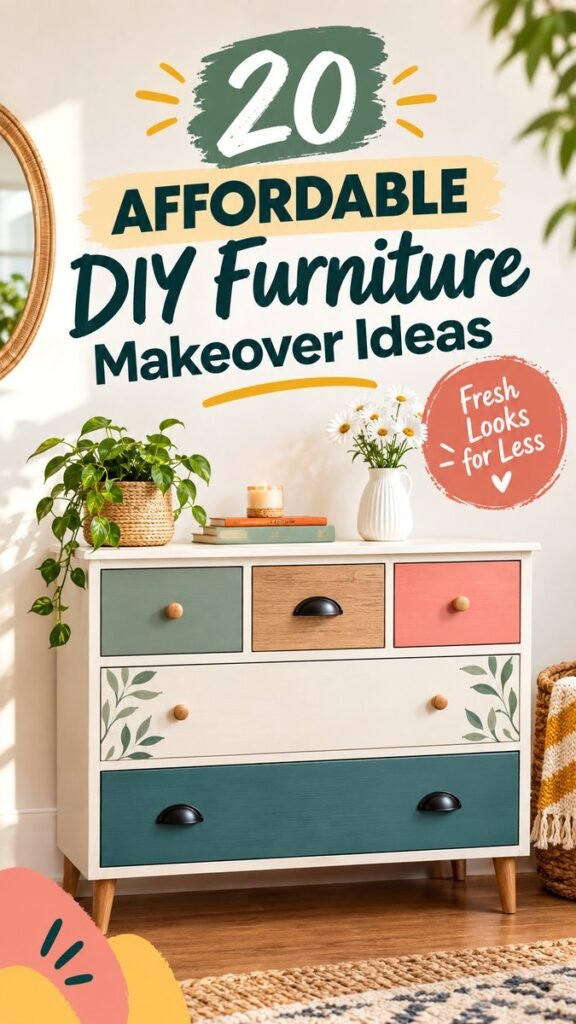
Giving old furniture a fresh start does not have to mean spending a fortune. A tired dresser, dated nightstand, or plain cabinet can become a colorful statement piece with a little creativity, basic supplies, and a willingness to experiment. The inspiration here shows just how much personality can be added through paint, contrasting colors, decorative details, updated hardware, and thoughtful finishing touches.
Key Takeaways
- Paint is one of the easiest ways to completely change the character of old furniture.
- Mixing complementary colors can make a simple dresser feel custom and artistic.
- Decorative patterns, stencils, and hand-painted details add personality without requiring expensive materials.
- New knobs and drawer pulls can make a surprisingly noticeable difference.
- Good preparation helps a DIY furniture renovation look cleaner and last longer.
Why DIY Furniture Renovation Is So Inspiring
Furniture renovation is a creative way to refresh your home while making better use of pieces you already have. Instead of replacing a functional dresser simply because its finish feels outdated, you can rethink its appearance and create something that suits your current style.
The colorful dresser featured in this design demonstrates an especially playful approach. Different drawer fronts use shades of coral, turquoise, pink, white, and natural wood, while painted flowers, leaves, borders, and small decorative motifs bring the piece to life. The result feels cheerful, handmade, and intentionally imperfect rather than mass-produced.
Important: The biggest transformation often comes from changing the visual identity of a piece rather than changing its structure. A thoughtful color palette, fresh hardware, and a few decorative details can turn an ordinary dresser into a focal point.
Start With the Right Furniture Piece
Almost any solid piece of furniture can become a candidate for renovation, but choosing the right starting point makes the project easier. Look for pieces with a useful shape, sturdy construction, and surfaces that can be cleaned and prepared properly.
Dressers are particularly versatile because their drawers provide several individual surfaces for experimenting with color and pattern. A nightstand can be transformed with a single bold shade, while a larger cabinet can become a statement piece with contrasting panels.
- Check that drawers open and close properly.
- Look for loose joints, damaged legs, or missing hardware that can be repaired.
- Choose a piece with enough visual interest to complement your intended design.
- Consider the furniture’s location before choosing colors and patterns.
Plan Your Furniture Makeover Color Palette
Color is one of the most powerful tools in a DIY furniture renovation. The reference-inspired design uses a lively combination of soft turquoise, coral red, pink, white, green, and warm wood tones. You do not need to copy those exact colors to achieve a similar sense of energy.
Instead, choose two or three main colors and one or two accent shades. A muted green paired with cream and natural wood can create a relaxed look. Coral and dusty pink can feel warm and playful. Deep teal with warm white can provide more contrast while remaining inviting.
Using different shades across drawers can also make a single furniture piece look like a collection of carefully coordinated elements. This works particularly well on dressers with multiple drawers.
Prepare Before You Paint
A beautiful finish starts before the first brushstroke. Preparation may not be the most exciting part of furniture renovation, but it can have a major effect on the final result.
- Remove drawer pulls, knobs, and other hardware where practical.
- Clean the furniture thoroughly to remove dust, dirt, and surface residue.
- Repair loose joints, chips, or small imperfections.
- Lightly sand surfaces when needed to create a suitable painting surface.
- Remove sanding dust before applying primer or paint.
- Protect the surrounding floor and workspace before beginning.
Not every piece requires exactly the same preparation. Existing finishes, surface condition, and the type of paint you choose can affect the process. Always follow the preparation and curing instructions recommended for your specific materials.
Experiment With Painted Drawer Designs
Drawers offer an easy opportunity to introduce visual variety. Rather than painting the entire dresser one color, consider giving each drawer a slightly different treatment while keeping the overall palette consistent.
One drawer could feature a solid teal finish, another a soft pink, and another a warm coral. A natural wood drawer can provide a visual break between painted surfaces. White or cream can help balance brighter colors and prevent the finished piece from feeling too busy.
For an artistic effect, use simple borders around drawer fronts. Small dots, curved lines, leaves, petals, and geometric shapes can be repeated across different drawers to create a cohesive design.
Expert Insight
- Repeat one or two decorative motifs throughout the piece to make different colors feel connected.
- Leave some areas simple so the patterned sections have room to stand out.
- Test your color combinations on scrap material or small hidden areas before committing.
Add Floral and Botanical Details
Floral and botanical designs are a natural match for furniture makeovers because they soften hard surfaces and create a handmade appearance. The featured style uses flowers, leaves, dots, and decorative borders to make the dresser feel more expressive.
You do not need advanced painting skills to introduce botanical details. Start with simple leaf shapes made from a small brush. Add rounded petals around a central dot to create basic flowers. Small clusters of dots can work as accents along a drawer border.
For a more controlled design, use reusable stencils. Stencils can help create repeated shapes while keeping patterns consistent across several drawers. If you prefer a more artistic result, hand-painted imperfections can become part of the charm.
Refresh the Hardware
Paint gets most of the attention during a furniture makeover, but hardware can completely change the finished appearance. Drawer pulls, knobs, and handles act like jewelry for a piece of furniture.
Traditional cup pulls can reinforce a vintage-inspired look, while simple round knobs can make a colorful dresser feel more casual. Dark hardware can provide contrast against pale drawers, while brass or warm metallic finishes can complement coral, cream, and natural wood.
Before purchasing replacements, measure the existing hardware and check the distance between mounting holes if you are replacing drawer pulls. This small planning step can prevent unnecessary drilling or adjustments.
Create a Cohesive Look With Small Details
The most memorable furniture makeovers often succeed because the details work together. A colorful dresser can feel polished when its surrounding décor supports the same visual language.
Natural baskets, greenery, simple ceramics, books, woven textures, and warm wood tones can complement a painted furniture piece without competing with it. The image’s styling demonstrates this principle by pairing the colorful dresser with understated decorative objects and greenery.
When styling your renovated furniture, avoid filling every available surface. Leaving some breathing room helps the renovated piece remain the main attraction.
Pro Tip: If your furniture already has several bold colors, keep the surrounding accessories relatively simple. A calm backdrop allows the painted details to become the focal point.
Affordable DIY Furniture Renovation Ideas to Try
You can adapt the colorful makeover concept to many different furniture projects. The key is choosing an approach that matches the condition and shape of your piece.
- Two-tone dresser: Paint the frame a neutral shade and use a contrasting color on the drawers.
- Color-blocked nightstand: Divide the piece into simple sections using two or three coordinated colors.
- Floral drawer fronts: Add hand-painted flowers to otherwise simple surfaces.
- Botanical cabinet: Use leaves and vines around the edges of doors or drawers.
- Patterned hardware: Combine updated knobs with painted borders for a custom look.
- Natural and painted mix: Keep selected wood areas visible while adding color to the rest.
- Stencil makeover: Apply a repeated geometric or botanical pattern to one or more surfaces.
- Statement drawer: Keep most of the furniture neutral and make one drawer the colorful focal point.
How to Keep a Bold Makeover Looking Balanced
More color does not automatically mean more visual impact. Balance is what makes an expressive furniture design feel intentional. If several drawers are colorful, consider using a neutral frame. If the drawer fronts feature elaborate patterns, simple hardware may work best.
Repetition is another useful design principle. Repeating a particular shade, flower shape, border style, or hardware finish helps connect separate areas of the furniture. You can also repeat a color from the furniture elsewhere in the room through a cushion, artwork, plant pot, or small accessory.
Protect Your Finished Furniture
Once the painting and decorating are complete, allow the finish to cure according to the product instructions. Avoid immediately placing heavy objects on freshly finished surfaces or repeatedly opening and closing drawers before the coating has had adequate time to harden.
A suitable protective topcoat may be useful for some projects, particularly furniture that receives frequent handling. The appropriate product depends on the paint and finish you have chosen, so check compatibility before applying it.
Regular gentle cleaning can also help keep a renovated piece looking fresh. Use cleaning methods appropriate for the finish rather than aggressive products that could damage decorative details.
Why Renovated Furniture Adds Personality to a Home
New furniture can be attractive, but a renovated piece can feel more personal because the design reflects the maker’s choices. Every color, pattern, knob, and brushstroke contributes to its story.
This is particularly valuable in rooms that need a little more character. A colorful dresser can brighten a bedroom, entryway, creative workspace, or guest room. Even when the overall room remains neutral, one expressive furniture piece can introduce warmth and individuality.
DIY furniture renovation also encourages a different way of looking at older pieces. Instead of asking whether something is currently fashionable, you can ask what it could become with a little imagination.
Quick Points
- Start with sturdy furniture worth refreshing.
- Plan your palette before opening the paint cans.
- Use patterns and botanical details to add personality.
- Update hardware for an easy finishing touch.
- Balance bold colors with neutral elements.
Conclusion: Give Old Furniture a Fresh New Life
DIY furniture renovation is a simple way to turn an overlooked piece into something that feels fresh, useful, and uniquely yours. A colorful dresser like the one that inspires this makeover approach shows how far a few thoughtful changes can go. Paint, decorative patterns, botanical motifs, refreshed hardware, and a coordinated color palette can completely transform the personality of a familiar piece.
You do not need an enormous budget or a professional workshop to begin. Start with one manageable piece, choose a palette you genuinely enjoy, and build the design gradually. Whether you prefer subtle two-tone furniture or an exuberant combination of flowers and color, the goal is to create something that feels at home in your space.
The best furniture makeover is not necessarily the most complicated one. It is the piece that combines practical function with a design you are excited to see every day. Gather your supplies, choose a tired piece, and give it a new chapter through your own creativity.
Tags
Take the makeover a step further
Write SEO metadata for the post
Create a DIY furniture supply list