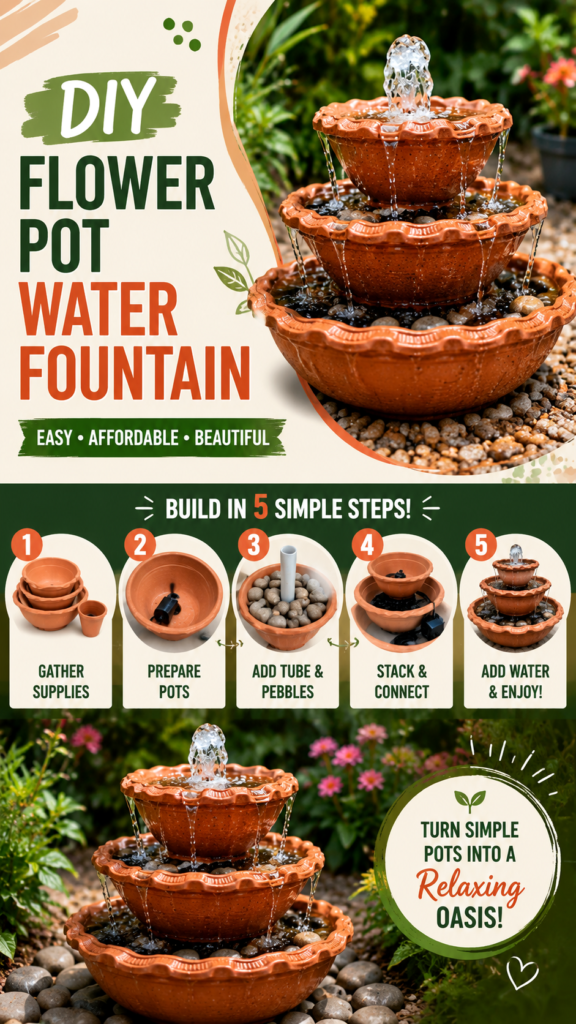
Want to add the soothing look and sound of running water to your garden without spending a fortune? A DIY water fountain made from simple flower pots can be a charming and surprisingly approachable weekend project. With a few terracotta pots, smooth stones, flexible tubing, and a small water pump, you can create a decorative outdoor feature that brings movement, texture, and a relaxing atmosphere to your space.
Key Takeaways
- A flower pot fountain can create an attractive garden water feature on a budget.
- Choose stable pots that can safely hold water and support the stacked design.
- A small submersible pump keeps the water circulating through the fountain.
- Decorative pebbles can hide tubing, add texture, and give the fountain a natural appearance.
- Regular cleaning helps keep the water feature looking fresh and working properly.
Why Make a DIY Water Fountain?
Garden fountains are an easy way to make an outdoor area feel more inviting. The gentle movement of water can turn an ordinary corner into a relaxing focal point, while the pots themselves add a warm, handcrafted character. The design shown here uses several flower pots arranged in tiers, allowing water to move from the upper section into the lower basins before being recirculated.
The beauty of this project is its flexibility. You do not need a large garden, complicated plumbing system, or elaborate construction skills. A small fountain can fit beside a patio, along a garden path, near a seating area, or in a compact backyard space.
Important: The most successful DIY water fountains balance appearance with stability. Before adding water, make sure every pot sits securely and that the overall structure cannot easily tip or shift.
Materials for a Simple Flower Pot Fountain
You can adapt the materials to the size and style of your garden, but a basic flower pot water fountain generally requires only a handful of supplies. The reference design uses multiple terracotta-style pots, a small pump, flexible tubing, and rounded stones to create the finished effect.
- Flower pots: Use several pots or bowls that can be arranged in a tiered formation.
- Small submersible water pump: This provides the circulation needed to move water upward.
- Flexible tubing: Choose tubing that fits securely onto the pump outlet.
- Smooth pebbles or decorative stones: These can cover the base, disguise components, and enhance the garden aesthetic.
- Water: Clean water fills the lower basin and circulates through the fountain.
- Optional waterproof sealant: Depending on the pots and their existing openings, a suitable sealant may help prevent unwanted leakage.
Choosing the Right Pots
The pots are the main visual element, so their shape and size make a big difference. A wide, shallow pot works well as the bottom basin because it provides a stable foundation and gives the water room to collect. Smaller pots can be placed higher to create the cascading effect.
Matching pots create a coordinated appearance, while slightly different shapes can give the fountain a more relaxed, collected look. Terracotta tones work especially well with greenery, natural stone, and wooden garden features.
How to Build a DIY Water Fountain
Building a flower pot fountain is mostly about arranging the components carefully and creating a reliable path for the water. Take your time with each stage instead of rushing to assemble everything at once.
1. Gather and Test Your Supplies
Start by placing all of your materials together. Check the pump and tubing before assembling the fountain so you know the pump operates correctly and the tubing fits securely. It is much easier to identify a problem before the pots are stacked.
Choose an outdoor location with a reasonably level surface. The fountain will be easier to stabilize and adjust when the ground is firm. Consider how the finished fountain will look from the areas where you normally sit or walk.
2. Prepare the Flower Pots
Arrange the pots from largest to smallest. The largest container generally works best at the bottom, while smaller pieces can create the upper levels. Check that each pot is centered and stable before continuing.
If the pots have drainage holes, plan how water and tubing will move through them. The exact arrangement will depend on the pots you use. The goal is to keep the pump and tubing positioned safely while allowing water to flow visibly from one level to another.
3. Add the Pump and Tubing
Place the submersible pump in the lowest water-holding section according to the pump manufacturer’s instructions. Attach the flexible tube to the pump outlet and guide the tubing toward the upper portion of the fountain.
The tubing should remain secure and should not be sharply bent or pinched by the pots. A smooth path helps maintain consistent water movement. Keep electrical connections and plugs positioned according to the pump’s outdoor-use instructions, away from standing water.
4. Use Pebbles to Finish the Interior
Rounded stones are more than decoration. They can help conceal parts of the pump or tubing while giving the fountain a natural garden appearance. Spread the stones carefully so they do not interfere with the pump intake.
A mixture of pebble sizes can create visual interest, but avoid packing stones tightly around components that need clear water flow. You want the finished arrangement to look organic without compromising how the fountain operates.
Expert Insight
A fountain does not need to have a powerful water stream to be attractive. A gentle, controlled flow can create a more peaceful appearance and may reduce excessive splashing around the fountain.
5. Stack and Secure the Fountain
Carefully position the upper pots so they create the desired tiers. Look at the fountain from several angles before filling it with water. Adjust the placement until the structure feels balanced and visually centered.
This is an important stage because uneven pots can make the fountain look unstable. If necessary, use appropriate outdoor supports or a stable base to prevent movement. Do not rely solely on the weight of water to hold a tall arrangement in place.
6. Add Water and Test the Flow
Once the structure is secure, add enough water for the pump to operate properly. Turn the pump on and observe the water as it moves from the upper section down through the lower levels.
Watch for areas where water splashes outside the fountain. You can often correct minor problems by adjusting the position of a pot, changing the placement of a stone, or slightly repositioning the tubing.
Pro Tip: Test the fountain before adding decorative finishing touches. It is easier to adjust the water flow when you can clearly see the tubing and pump rather than trying to work around a fully decorated arrangement.
How to Make Your Flower Pot Fountain Look Better
Once the fountain works, the fun part begins. Small styling choices can make a basic DIY water fountain look like an intentional garden centerpiece.
Surround It With Natural Materials
Place smooth river stones, gravel, or other garden-safe decorative materials around the base. This can visually connect the fountain to the surrounding landscape and make it feel less like a standalone object.
Plants are another excellent addition. Green foliage and flowering plants can soften the edges of the fountain and create a lush backdrop. Leave enough room around the equipment for easy maintenance.
Create a Relaxing Garden Corner
A water fountain works particularly well near an outdoor chair, bench, patio table, or garden path. Positioning it where you can hear the water can make the feature more enjoyable than placing it in a distant corner that is rarely used.
For a cohesive look, repeat the fountain’s colors elsewhere in the garden. Terracotta can pair beautifully with warm stone, green foliage, wooden accents, and neutral outdoor furniture.
DIY Water Fountain Maintenance Tips
A small fountain needs regular attention to keep it attractive and functional. Because the same water is typically circulated repeatedly, leaves, dirt, algae, and other debris can gradually accumulate.
- Check the water level regularly, especially during warm or dry weather.
- Remove leaves and visible debris from the water.
- Clean the pump according to its manufacturer’s maintenance instructions.
- Inspect the tubing occasionally for blockages or kinks.
- Refresh the water when it becomes noticeably dirty.
- Keep decorative stones free from excessive buildup.
Important: Never allow the pump to run without sufficient water. Maintaining the proper water level is one of the simplest ways to help protect the pump and keep the fountain circulating properly.
Common DIY Fountain Mistakes to Avoid
Even a simple fountain can run into problems if the setup is rushed. Fortunately, most issues are easy to prevent.
Using an Unstable Base
A tiered fountain becomes heavier once it is filled with water. Make sure the bottom container sits on a stable, level surface before adding the upper tiers.
Blocking the Pump
Decorative rocks should not obstruct the pump’s intake. Leave adequate space around the pump and follow the manufacturer’s installation guidance.
Ignoring Splashing
A fountain that splashes too much can quickly lose water and create a wet area around the base. Observe the fountain while it runs and make small adjustments to reduce unnecessary splashing.
Choosing Style Over Function
It is tempting to focus entirely on making the fountain look beautiful, but the pump needs adequate water flow and access for cleaning. Keep the practical components accessible even after decorating the fountain.
Where to Place a DIY Water Fountain
The best location depends on your garden layout and how you want to use the feature. A patio fountain can become a relaxing backdrop for outdoor meals, while a fountain beside a walkway can add visual interest to an otherwise plain section of the yard.
Consider sunlight, nearby plants, access for maintenance, and the stability of the ground. A partially shaded location may also make it easier to manage water evaporation, although the ideal placement depends on your specific garden conditions.
Think about the fountain as part of the overall landscape rather than simply placing it wherever there is empty space. A few surrounding plants and stones can make even an inexpensive fountain feel thoughtfully designed.
Easy Ways to Customize the Design
One of the best things about a DIY water fountain is that you can make it match your personal style. Try using different pot shapes, changing the number of tiers, or selecting decorative stones that complement your existing garden.
For a rustic appearance, keep the materials earthy and natural. For a cleaner contemporary look, choose simple containers and a restrained stone palette. You can also create a smaller version using only two levels if you have limited space.
The basic concept is adaptable, so there is no need to duplicate one exact arrangement. Start with the size and materials available to you, then build a fountain that fits your outdoor space.
At a Glance
- Choose stable flower pots in graduated sizes.
- Use a small submersible pump for circulating water.
- Guide tubing toward the upper level.
- Use pebbles to decorate and conceal components.
- Test the fountain carefully before final styling.
Create Your Own Relaxing Garden Oasis
A DIY water fountain made from flower pots is a simple way to give an outdoor space more personality. The combination of terracotta, flowing water, smooth stones, and surrounding greenery creates a welcoming garden feature without requiring an elaborate construction project.
The project also leaves plenty of room for creativity. You can scale the design up or down, choose different containers, change the decorative stones, and experiment with the placement until the fountain feels right for your garden.
Most importantly, focus on a secure foundation, reliable water circulation, and easy maintenance. Once those basics are handled, the decorative details become much more enjoyable. With a thoughtful setup and a little regular care, your flower pot fountain can become a beautiful focal point and a relaxing addition to your outdoor space.