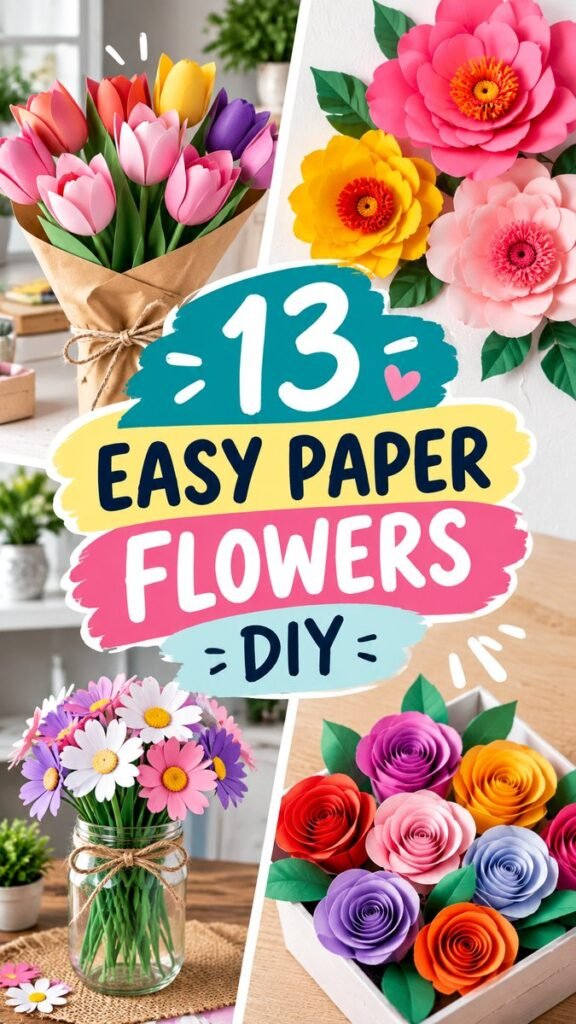
Bring a cheerful handmade touch into your home with colorful flower decorations DIY projects that are simple, creative, and full of personality. Paper flowers are a wonderful way to add color to a room without relying on fresh blooms, and they can be arranged in bouquets, wall displays, centerpieces, or decorative containers. From soft pastel daisies to bold layered blooms and tightly rolled paper roses, there are countless ways to turn ordinary craft paper into eye-catching floral decor.
The ideas featured here are especially inspiring for anyone who enjoys easy paper crafts, DIY home decor, or handmade decorations. The combination of bright colors, different flower shapes, green paper leaves, and simple containers creates displays that feel playful yet polished. Whether you are decorating a living room, bedroom, craft space, party table, or seasonal display, handmade paper flowers can be customized to suit almost any style.
Key Takeaways
- Paper flowers are an affordable way to create colorful DIY home decorations.
- Different folding, curling, and layering techniques create unique flower shapes.
- Mixing several colors and flower sizes makes arrangements look fuller and more interesting.
- Handmade blooms work well for bouquets, wall decor, centerpieces, and craft displays.
- Simple materials such as paper, scissors, glue, and floral stems can create beautiful results.
- Personalizing colors and sizes makes each flower arrangement completely your own.
Why Choose DIY Flower Decorations?
DIY flower decorations are a fun alternative to buying ready-made decor. They give you the freedom to choose the exact colors, shapes, and sizes you want while allowing you to create something by hand. Paper flowers are particularly appealing because they do not require watering, sunlight, or regular maintenance. Once finished, they can be displayed for a long time and rearranged whenever you want to refresh your space.
Another advantage is versatility. A single paper flower design can become part of a bouquet, a garland, a wall arrangement, a table centerpiece, or a decorative accent. Large flowers can make an impressive statement, while smaller blooms can be grouped together for a delicate arrangement.
Important: The most attractive DIY flower displays usually combine variation rather than making every bloom identical. Try mixing large and small flowers, different petal shapes, and several coordinating colors to create depth and visual interest.
13 Easy Paper Flower Ideas to Try
There are many ways to transform paper into flowers, and the best method depends on the look you want. Some techniques create soft, rounded petals, while others produce crisp folds or spiral shapes. The colorful examples in this collection demonstrate how dramatically different flowers can look when you change the paper, shape, and construction method.
1. Colorful Paper Tulip Bouquet
Paper tulips are a lovely starting point for beginners. Their recognizable cup-shaped blooms can be created using folded or shaped paper and paired with long green stems. Use several shades of pink, coral, yellow, purple, and red to create a cheerful bouquet.
Wrap the finished stems in kraft paper and tie them with simple twine for a relaxed handmade appearance. A mixed-color tulip bouquet works beautifully as a tabletop decoration or a bright accent for a shelf.
2. Oversized Paper Wall Flowers
Large paper flowers are perfect when you want your DIY project to become a focal point. Layer several large petals around a central detail, then attach green paper leaves behind the bloom. Oversized flowers can be grouped on a wall to create a colorful floral backdrop.
Choose two or three coordinating colors for a sophisticated arrangement, or use contrasting shades for a more playful craft-room look. Large paper blooms are also useful for parties, photo backdrops, and special celebrations.
3. Paper Daisy Bouquet
Daisies are among the easiest paper flowers to recreate because their shape is simple and instantly recognizable. Cut repeated petals, arrange them around a circular center, and attach the flower to a green stem.
White petals with yellow centers create a classic appearance, but pastel pink, lavender, blue, and peach flowers can make the arrangement feel more colorful. Place several daisies together in a clear jar for an easy handmade centerpiece.
4. Rolled Paper Roses
Rolled paper roses have a distinctive spiral appearance and can add an elegant touch to DIY flower arrangements. The technique involves shaping paper into a spiral form and gradually rolling it to create layered petals.
Try several colors in one arrangement. Pink, orange, purple, red, yellow, and blue can be combined to create a vibrant display. These flowers also look attractive when grouped tightly together in a decorative box or vase.
5. Layered Paper Peonies
For a fuller floral appearance, experiment with layered petals. Peony-inspired paper flowers can be made by stacking multiple petal layers and shaping their edges slightly. The result is a lush bloom with plenty of volume.
Soft pinks and warm yellows work particularly well for this style, while brighter shades can create a more modern decorative effect. Add a detailed center to make the flower stand out even more.
6. Bright Paper Poppies
Paper poppies can bring bold color into a handmade arrangement. Their open petals make them especially suitable for bright orange, red, pink, and yellow paper. A contrasting center helps define the flower and gives the design more visual character.
Use poppy-inspired flowers as individual statement pieces or mix them with smaller blooms to create a varied bouquet.
7. Mini Paper Flowers
Not every flower needs to be large. Miniature paper flowers are useful for filling gaps between larger blooms and creating detailed arrangements. They can also be attached to cards, gift wrapping, wreaths, or small decorative projects.
Use leftover paper scraps for tiny flowers. This is a practical way to reduce waste while adding extra detail to your craft projects.
8. Paper Flower Centerpieces
Turn your handmade flowers into a centerpiece by arranging several stems inside a jar, vase, box, or other decorative container. The container does not need to be complicated. A simple glass jar can provide a clean background that lets colorful flowers become the main attraction.
For a fuller centerpiece, place taller flowers toward the back and shorter blooms toward the front. This simple arrangement technique creates a more natural sense of height.
9. Paper Flower Wall Art
Large flowers can be mounted directly onto a wall or arranged as part of a decorative display. Create a collection of different blooms and position them at varying heights rather than lining them up evenly.
This idea works especially well above a desk, behind a craft station, in a bedroom, or as a colorful party backdrop. Removable hanging methods can make it easier to reposition the flowers later.
10. Multicolor Floral Arrangements
One of the easiest ways to make DIY flowers look exciting is to experiment with color. Instead of using a single shade, combine several colors that complement one another. A bright palette can include pink, yellow, orange, purple, blue, and green.
If you prefer a calmer appearance, choose different shades from the same color family. For example, several tones of pink can create a soft monochromatic arrangement while still providing plenty of dimension.
11. Paper Flowers With Green Leaves
Adding leaves is a simple way to make paper flower arrangements feel more complete. Cut basic leaf shapes from green paper and attach them behind the flowers or along the stems.
Vary the leaf sizes and angles to avoid a repetitive appearance. A few strategically placed leaves can help balance strong flower colors and make an arrangement look fuller.
12. Paper Flowers for Seasonal Decor
Paper flowers can be adapted for different seasons by changing the colors and shapes. Bright yellow and orange blooms can create a sunny spring or summer display, while deeper pinks, reds, and warm tones can work beautifully for autumn-inspired arrangements.
The flexibility of paper makes it easy to update your decorations without replacing an entire collection. Simply create new blooms that match the season or your current room decor.
13. Mixed Paper Flower Bouquets
For the most dynamic look, combine several flower styles in one bouquet. Pair tulip-inspired blooms with roses, daisies, layered flowers, and simple filler flowers. The contrast between different shapes makes the arrangement much more interesting.
Keep the colors connected by repeating a few shades throughout the bouquet. This helps a large variety of flowers feel intentional rather than random.
Expert Insight
A convincing paper flower arrangement is all about variation. Combine different flower sizes, rotate the direction of the blooms, and leave small spaces between some petals. These small choices help handmade flowers look dimensional instead of flat.
Materials for Easy Paper Flowers
You do not need a large collection of specialist supplies to start making flower decorations DIY. Many projects can be completed with basic craft materials you may already have at home.
- Colored craft paper or cardstock
- Scissors
- Craft glue or a suitable adhesive
- Green paper for leaves
- Floral wire, craft stems, or sturdy paper strips
- Pencils for marking shapes
- Rulers for measuring when needed
- Decorative jars, vases, boxes, or containers
- Optional markers, textured paper, or embellishments
The exact supplies depend on the flower style you choose. Rolled flowers may need different paper thicknesses than folded blooms, while oversized wall flowers often benefit from larger sheets of paper.
How to Make Paper Flowers Look More Professional
Simple crafts can have a polished appearance when a few design details are considered. Start by choosing a color palette before cutting your paper. This prevents the finished arrangement from becoming visually chaotic.
Next, pay attention to proportion. If every flower is the same size, the arrangement may look flat. Use a few large statement blooms, several medium flowers, and smaller accents to create a layered effect.
Petal shaping is another important detail. Carefully curling, folding, or bending paper can give individual petals a more natural appearance. Even a small amount of shaping can add depth.
Choose Coordinating Colors
Pick a main color, one or two supporting colors, and a small amount of green for foliage. Repeating these colors throughout the arrangement helps everything work together.
Vary the Flower Shapes
Mix rounded flowers with pointed petals, open blooms with tightly rolled flowers, and large flowers with tiny accents. Shape variation creates visual movement and makes the arrangement more engaging.
Create Natural-Looking Height
Arrange stems at different heights instead of keeping every flower at the same level. Taller blooms can frame shorter flowers, while leaves can extend outward to soften the overall silhouette.
Pro Tip: Before gluing your final arrangement, lay the flowers out on a table and experiment with the placement. Taking a few minutes to test the composition makes it much easier to create balanced DIY floral decor.
Creative Ways to Display DIY Paper Flowers
Once your flowers are finished, the display is just as important as the crafting process. A beautiful handmade bouquet can become a focal point simply by placing it in the right container or setting it against a complementary background.
- Glass jars: Use clear jars to create simple rustic-style flower arrangements.
- Decorative vases: Choose a neutral vase so colorful blooms remain the focus.
- Wall displays: Arrange oversized flowers in clusters for bold DIY wall decor.
- Gift decorations: Attach small paper blooms to wrapped gifts for a handmade finishing touch.
- Party backdrops: Combine large and small flowers to create a colorful decorative wall.
- Craft room displays: Keep finished flowers visible as cheerful handmade accents.
Do not be afraid to move your flowers around as your decor changes. Because paper arrangements are lightweight and flexible, they can be refreshed or rearranged whenever you want a new look.
Tips for Beginners Making Paper Flowers
If you are new to paper flower crafts, start with a simple design such as a daisy, basic tulip, or rolled flower. Once you understand how the paper responds to folding, cutting, curling, and gluing, you can move on to more detailed designs.
Work slowly when cutting petals. Consistent shapes will help the finished flower look more balanced. However, do not worry about making every petal perfectly identical. Small differences can actually make handmade flowers feel more natural.
Test your adhesive on a small piece of paper before assembling the final flower. Some papers absorb glue differently, and heavier cardstock may need a stronger hold than lightweight craft paper.
Finally, save your paper scraps. Small pieces can become leaves, flower centers, miniature blooms, or decorative accents. Keeping scraps organized can make future projects easier and more economical.
Why Paper Flower Crafts Are Great for Home Decor
Paper flowers combine creativity and practicality. They allow you to introduce bright colors and handmade character into your home without needing a complicated decorating project. A small bouquet can brighten a tabletop, while a collection of oversized blooms can completely transform a blank wall.
They are also highly customizable. You can choose colors that match your furniture, create flowers in your favorite shades, or make a special arrangement for an event. Unlike natural flowers, handmade paper blooms can be stored and reused when you want to change your decor.
Most importantly, the process itself can be enjoyable. Cutting petals, shaping flowers, experimenting with colors, and arranging the finished pieces turns a simple craft project into a creative activity that can be shared with family and friends.
At a Glance
Quick Points
- Choose colorful paper that is easy to fold, cut, or roll.
- Combine large, medium, and small blooms for dimension.
- Add green leaves to make bouquets feel fuller.
- Use jars, vases, boxes, or walls to display finished flowers.
- Save scraps for smaller flowers and decorative details.
Conclusion: Create Your Own Colorful Paper Flower Decor
Flower decorations DIY projects are a wonderful way to make your home feel brighter, more creative, and more personal. With simple paper, basic craft supplies, and a little imagination, you can create everything from elegant rolled roses and cheerful daisies to colorful tulip bouquets and dramatic oversized wall flowers.
The key is to experiment. Try different paper colors, change the size of your petals, mix several flower shapes, and test new ways to arrange your finished blooms. There is no single correct way to make a paper flower display. Your favorite combination of colors and shapes can become a completely unique piece of handmade decor.
Whether you are looking for an easy weekend craft, colorful room decoration, party inspiration, or a creative way to use leftover paper, these DIY flower ideas offer plenty of possibilities. Start with one simple bloom, build a small bouquet, and let your creativity grow from there.
Ready to start crafting? Choose your favorite colors, gather your paper and scissors, and create a cheerful handmade flower arrangement that is uniquely yours.