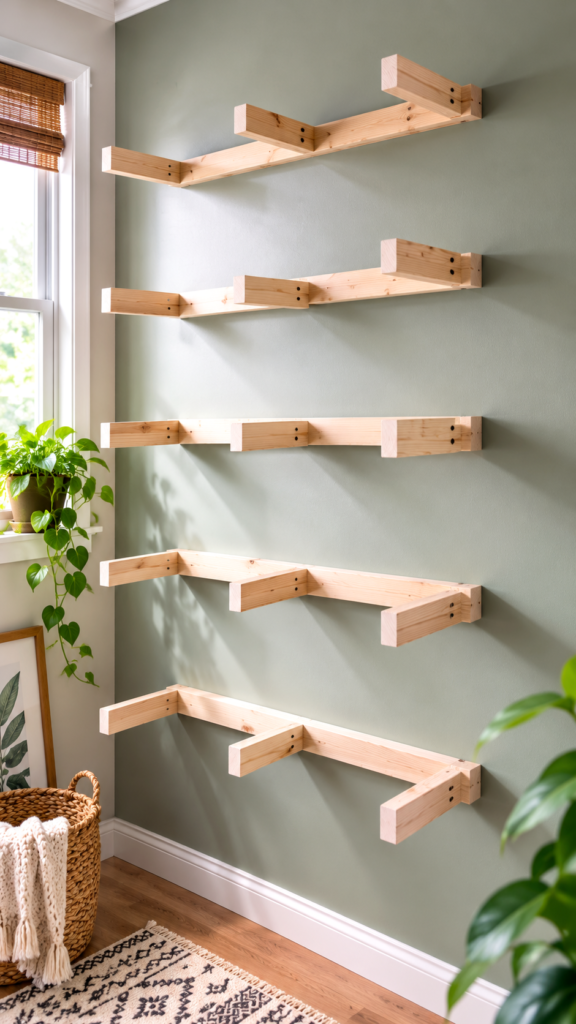
DIY floating shelves are one of the easiest ways to turn an unused wall into practical, attractive storage. This design takes the idea a step further by using staggered wooden shelves that wrap around a corner, creating a useful display area without taking up valuable floor space. The natural wood finish adds warmth, while the simple construction keeps the overall look clean and approachable.
Whether you want a cozy spot for plants and books, a practical storage solution for a small room, or a simple weekend woodworking project, DIY floating shelves can make a surprisingly big difference. A corner shelf arrangement is especially useful because it takes advantage of wall space that often goes unused.
Key Takeaways
- Corner floating shelves maximize vertical and wall space.
- Natural wood creates a warm, timeless DIY look.
- A level is essential for straight, professional-looking shelves.
- Staggered shelves can make a small wall feel more balanced.
- Plants, books, baskets, and small decor work beautifully on open shelving.
- Secure mounting is important before adding weight to any shelf.
Why DIY Floating Shelves Work So Well
Open shelving combines storage and decoration in one simple feature. Instead of hiding everything behind cabinet doors, floating shelves give you a place to display the items you actually enjoy seeing. The result can feel lighter and more personal than a large piece of furniture.
The design shown here is particularly effective because the shelves are arranged at several heights. This draws the eye upward and makes use of vertical space. The corner configuration also creates a continuous visual flow across two walls, making the shelving feel like an intentional part of the room rather than a collection of separate shelves.
Important: The most attractive floating shelf arrangement is not necessarily the one with the most shelves. Leaving breathing room between levels gives each shelf space to stand out and prevents the wall from looking crowded.
A Smart Solution for Awkward Corners
Corners can be surprisingly difficult to decorate. A standard bookcase may not fit comfortably, and a large cabinet can make a room feel cramped. Corner floating shelves provide another option by using the wall itself as the storage area.
This approach is useful in living rooms, bedrooms, home offices, entryways, kitchens, and other compact areas. You can keep the shelves shallow for lightweight decorative objects or make them deeper when you need more practical storage, provided the wall structure and mounting system can safely support the intended load.
Planning Your DIY Floating Shelves
A little planning before cutting wood can make the entire project easier. Start by deciding exactly where the shelves should go and what you want to place on them. This determines the ideal shelf length, depth, spacing, and overall arrangement.
Choose the Right Wall
Look at the wall from several angles before deciding on the layout. Consider nearby windows, doors, furniture, outlets, trim, and other features. The shelving should complement the room rather than interfere with how people move through it.
If you are working around a corner, measure both walls carefully. Even a small difference in wall dimensions can affect how the shelves meet. It is also helpful to mark the proposed shelf positions with painter’s tape. This gives you a chance to step back and evaluate the proportions before drilling.
Decide on Shelf Spacing
Think about the tallest objects you expect to display. Plants, baskets, books, framed pieces, and decorative containers all need enough vertical clearance. Shelves that are too close together can limit what you can display, while shelves that are too far apart may leave the wall feeling unfinished.
A staggered arrangement gives you more flexibility. Instead of making every shelf line up exactly, you can vary the lengths or positions slightly while maintaining a consistent visual rhythm.
Create a Simple Layout First
Sketch the wall on paper or use removable tape to create a rough outline. You do not need professional design software. A simple drawing can help you compare different shelf lengths and spacing before committing to the final layout.
Materials and Tools for a Simple Shelf Project
The visual appeal of this project comes from its straightforward construction. Natural wood boards and sturdy supports create a clean foundation that can later be stained, painted, or left unfinished.
For a basic DIY floating shelf project, you may need:
- Wood boards sized for your desired shelf dimensions
- Wood for the supporting brackets or cleats
- Appropriate screws and wall fasteners
- A drill or screwdriver
- A measuring tape
- A pencil for marking positions
- A level
- A saw if boards need to be cut
- Sandpaper for smoothing cut edges
- Wood finish, paint, or stain if desired
The exact hardware should depend on your wall construction and the weight you expect each shelf to carry. Drywall, wood studs, masonry, and other wall types require different fastening approaches.
Expert Insight
A beautiful shelf is only as good as its mounting. Before styling the finished project, make sure the supports are properly secured to suitable structural points or appropriate wall anchors for the expected load.
How to Build a DIY Floating Shelf Arrangement
The basic construction can be broken into a few manageable stages. Taking your time with measurements and alignment will have a bigger impact on the finished appearance than adding complicated decorative details.
1. Measure the Space
Measure the available wall area and determine the length of each shelf. For corner shelving, measure both directions independently rather than assuming the corner is perfectly square.
Mark the desired shelf heights lightly with a pencil. Check the layout from across the room before moving forward.
2. Prepare the Wood
Cut the boards to the required lengths if necessary. Sand rough edges and surfaces so the wood feels smooth to the touch. Natural pine or similar light-colored wood can look beautiful without heavy finishing, especially in rooms that already use neutral colors.
If you prefer a different style, consider a clear protective finish, warm stain, muted paint color, or crisp white finish. The choice can dramatically change the character of the shelves while keeping the basic construction the same.
3. Build the Supports
The supporting structure is the functional foundation of the shelves. The reference design uses simple wooden support pieces that create an L-shaped profile. This gives the shelves a handmade appearance while keeping the construction visually straightforward.
Make sure the support pieces are securely joined and positioned consistently. Pre-drilling can help reduce the chance of splitting when working with wood, particularly near board ends.
4. Mark and Mount the Supports
Use your layout marks to position each support. A level is one of the most useful tools for this stage. Check the horizontal alignment before tightening the hardware completely.
For a corner design, work carefully from one wall to the other. The goal is to create a cohesive arrangement rather than having one section appear noticeably higher or lower than the adjoining section.
Pro Tip: Check every shelf with a level before moving on to the next one. Correcting a small alignment issue during installation is much easier than trying to fix an entire arrangement after everything is mounted.
5. Add the Shelf Boards
Once the supports are firmly installed, position the shelf boards on top. Check that each board sits evenly and that the corners meet as planned.
Depending on the construction method, the boards may be secured to the supports from underneath or through another appropriate fastening system. Follow a method suitable for your materials, wall type, and intended load.
6. Finish and Inspect
Before adding decor, inspect the entire installation. Look for loose hardware, uneven boards, sharp edges, or visible movement. Make any necessary adjustments before placing heavier objects on the shelves.
This is also the perfect time to decide whether you want to leave the wood natural or add a finish. The unfinished appearance shown in this style works especially well with neutral interiors, greenery, woven textures, and warm wood flooring.
How to Style Floating Shelves
Once the construction is complete, styling becomes the fun part. The open design gives you plenty of opportunities to change the look throughout the year without rebuilding anything.
Add Greenery
Plants are a natural match for light wood shelving. Small potted plants can soften the straight lines of the boards, while trailing greenery can add movement and visual interest.
Vary the height and shape of your plants instead of placing identical pots on every level. This keeps the arrangement relaxed and organic.
Mix Books and Decorative Objects
Books bring color and texture while framed art, ceramics, candles, and small decorative pieces provide personality. Avoid filling every inch of every shelf. A few carefully chosen objects often look more polished than a crowded display.
Use Baskets for Practical Storage
Woven baskets can make open shelves more functional. They are useful for small everyday items while adding texture and warmth to the room. Place a basket on one of the lower shelves and balance it with lighter decorative pieces above.
Create Visual Balance
Think about the entire wall rather than styling each shelf independently. If one side contains a large basket, balance it with greenery or a group of smaller objects elsewhere. Repeating a few materials, such as natural wood, woven fibers, greenery, and neutral ceramics, can make the arrangement feel cohesive.
Ideas for Different Rooms
DIY floating shelves are flexible enough to work in many areas of the home. The same basic construction can serve very different purposes depending on what you display.
- Living room: Display plants, books, framed artwork, and favorite decorative objects.
- Bedroom: Create a light display area for small plants, books, baskets, and accessories.
- Home office: Organize notebooks, small containers, books, and useful supplies.
- Kitchen: Use appropriate shelf materials and mounting for dishes, jars, or lightweight kitchen items.
- Entryway: Create a decorative landing area for small everyday essentials.
- Small spaces: Take advantage of vertical walls when floor space is limited.
Common DIY Floating Shelf Mistakes to Avoid
Floating shelves may look simple, but a few common mistakes can affect both appearance and performance.
Skipping the Level
A shelf that is slightly crooked can be surprisingly noticeable. Always check the position during installation rather than relying on the eye alone.
Ignoring Wall Structure
Do not assume every part of a wall can support the same amount of weight. Identify suitable structural points or choose wall anchors designed for the specific wall material and load.
Overloading the Shelves
Open shelving can quickly become a place where everything gets stored. Resist the temptation to pile on heavy objects. A lighter display is usually more attractive and reduces unnecessary strain on the installation.
Making Every Shelf Identical
Uniformity can look great, but a little variation can make a wall feel more dynamic. Consider staggered lengths, varied decor heights, and intentional empty space to create a more interesting composition.
A Simple Project With a Big Visual Impact
The appeal of DIY floating shelves is that they do not require an elaborate design to transform a room. A few carefully constructed wooden shelves can add storage, display space, warmth, and character all at once.
The natural wood style works particularly well with modern, minimalist, farmhouse, Scandinavian, and cozy neutral interiors. Keeping the wood light allows the surrounding decor to provide most of the color, while the simple supports add subtle architectural interest.
For anyone looking for DIY home decor ideas that combine function and style, this is a project worth considering. The design can be adapted to different wall sizes, shelf lengths, finishes, and decorating preferences, making it easy to create something that feels personal.
Quick Points
- Measure twice before cutting or mounting.
- Use a level for every shelf.
- Match wall fasteners to the wall and expected load.
- Leave open space when styling for a cleaner look.
- Mix plants, books, baskets, and small decor for texture.
Conclusion
DIY floating shelves are a practical way to make better use of empty wall space while adding a warm, personalized touch to your home. A staggered corner arrangement is especially useful because it turns an overlooked area into a feature that can hold both everyday storage and beautiful decor.
With thoughtful measurements, secure supports, simple natural materials, and balanced styling, you can create shelving that feels intentional rather than bulky. Start with a small layout, take your time with installation, and let the finished shelves evolve as you add plants, books, baskets, and pieces you love.
Whether your goal is better organization or a fresh home decor update, this DIY floating shelf idea proves that a simple woodworking project can have a major impact. Save the idea, plan your wall, and create a shelf arrangement that makes your space work harder while still looking beautifully put together.
Tags
DIY Floating Shelves Floating Shelf Ideas DIY Home Decor Wall Storage Woodworking DIY Corner Shelves Home Organization Small Space Ideas