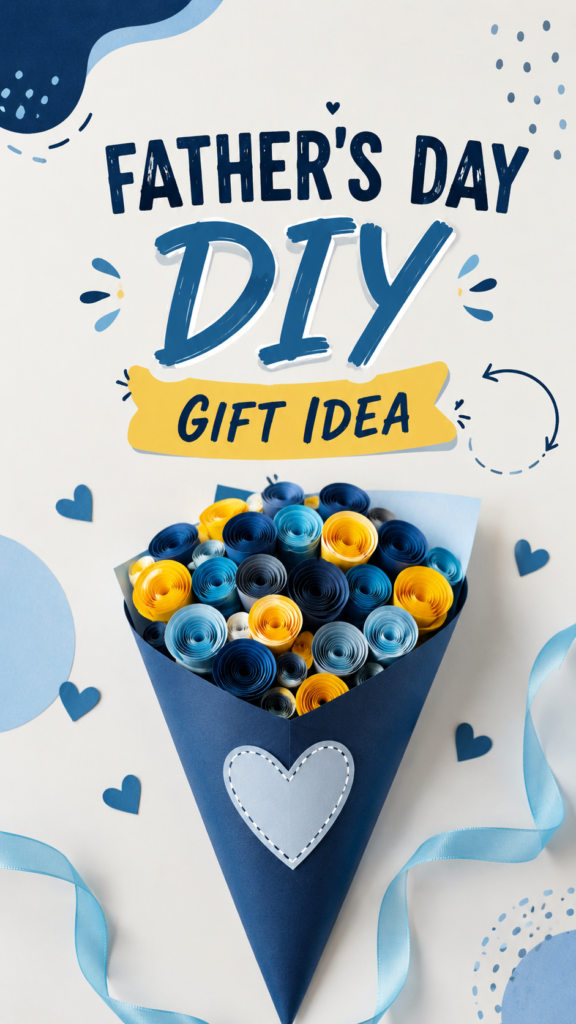
Finding the right Father’s Day gift does not have to mean spending a lot of money or searching for something complicated. A handmade present can feel much more meaningful because it gives you the chance to create something with your own hands. This DIY Father’s Day gift idea combines colorful paper, a simple cone-shaped arrangement, and a cheerful bouquet design to create a thoughtful homemade surprise for Dad.
The finished craft has the look of a colorful flower bouquet, but instead of traditional flowers, it uses tightly rolled paper pieces arranged in shades of blue, navy, yellow, gray, and white. The paper cone adds structure and makes the project easy to display. A decorative heart on the front gives the gift an extra personal touch without requiring advanced crafting skills.
Key Takeaways
- Create a thoughtful Father’s Day gift with inexpensive craft materials.
- Use rolled paper flowers to build a colorful handmade bouquet.
- Customize the colors to match Dad’s personality or favorite shades.
- Add a heart, note, or personalized message for a meaningful finish.
- Adjust the size of the cone and flowers to create a small or large gift.
Why Handmade Father’s Day Gifts Feel So Special
Store-bought gifts can certainly be useful, but handmade Father’s Day gifts have a different kind of charm. They show that time, creativity, and thought went into the present. Even a simple craft can become a keepsake when it includes colors, messages, or decorative details chosen specifically for the person receiving it.
This project is especially appealing because it combines a familiar gift shape with a creative twist. The bouquet is recognizable at first glance, while the rolled paper flowers make it feel playful and original. The cone also creates a neat presentation, so the finished craft looks like a complete gift rather than a collection of individual paper pieces.
Important: The most valuable part of a DIY Father’s Day gift is not perfect craftsmanship. Personal details make the project meaningful. A favorite color combination, handwritten message, or small decoration can turn a simple paper craft into something Dad will remember.
Materials for This DIY Father’s Day Gift
You do not need an extensive craft collection to make a paper bouquet like this. The project can be adapted depending on what you already have at home. Keeping the materials simple also makes this a practical choice when you want an easy Father’s Day craft that does not require a large budget.
- Colored paper or lightweight cardstock
- Blue, navy, yellow, gray, white, or other coordinating paper colors
- Scissors
- Glue or double-sided tape
- A ruler for measuring paper strips
- Pencil for marking paper
- Decorative paper for the bouquet cone
- Ribbon or additional paper accents, if desired
- Optional heart-shaped paper decoration
- A small card or paper strip for a personal message
The exact colors are completely flexible. The pictured arrangement uses a cool blue palette with bright yellow accents, creating a modern and cheerful appearance. You could follow a similar combination or replace the colors with Dad’s favorites. Green and blue can create a fresh look, while black and silver can feel more sophisticated.
How to Make Rolled Paper Flowers
The rolled flowers are the main visual feature of this homemade Father’s Day gift. Their spiral shape creates texture and makes the bouquet look full even though it is made from simple sheets of paper.
Step 1: Choose Your Paper Colors
Start by selecting three to five coordinating colors. A combination of navy, medium blue, pale blue, yellow, gray, and white works beautifully for a Father’s Day theme. Using several shades of the same color can create depth without making the arrangement look chaotic.
For a more personalized project, think about the recipient before choosing your palette. If Dad likes bold colors, use deeper shades and brighter accents. If he prefers a minimalist style, stick with two or three colors and plenty of neutral paper.
Step 2: Cut Paper Strips
Cut your colored paper into long strips. The width of each strip will influence the size and appearance of the finished spiral. Wider strips can create larger, more substantial flowers, while narrower strips are useful for smaller details and filling gaps.
Try to keep your strips reasonably consistent. They do not need to be perfectly measured, especially for a handmade project, but similar widths will help the bouquet look balanced.
Step 3: Roll the Strips
Take one end of a paper strip and begin rolling it tightly. Continue winding the paper around itself until you reach the opposite end. Keep the center firm while allowing the outer layers to remain slightly relaxed if you want a softer spiral.
Once the paper is fully rolled, secure the end with a small amount of glue. Hold it briefly until it stays in place. Repeat the process with several colors and sizes until you have enough paper flowers to fill your cone.
Step 4: Vary the Flower Sizes
One of the easiest ways to make the bouquet look more interesting is to avoid making every rolled flower exactly the same size. Create a mixture of larger, medium, and smaller spirals. The larger pieces can become focal points, while smaller ones can fill open spaces around them.
Arrange a few different colors together as you work rather than completing every flower in one color first. This makes it easier to see whether the overall palette feels balanced.
How to Make the Paper Bouquet Cone
The cone is what turns the individual paper flowers into a finished Father’s Day gift. It is simple to make and can be customized with different papers, patterns, textures, or decorative details.
Create the Cone Shape
Begin with a large sheet of paper or lightweight cardstock. Bring the edges together to create a cone shape, adjusting the overlap until the opening is the size you want. Secure the overlapping section with glue or strong double-sided tape.
Keep the bottom point firmly closed. The top opening should remain wide enough to hold the rolled paper flowers. If the paper feels too soft, use cardstock or reinforce the inside with another layer.
Decorate the Front
The example uses a heart-shaped detail on the front of the cone, which creates a simple focal point. You can recreate this idea with a paper heart or choose another shape that fits the theme. A star, circle, initial, or simple geometric design can work just as well.
Another lovely option is to attach a small handwritten message. Something as simple as “Best Dad,” “Love You, Dad,” or “Happy Father’s Day” can make the craft feel much more personal.
Pro Tip: Build the bouquet arrangement before permanently attaching the flowers. Place the largest rolled pieces first, then use medium and small pieces to fill the gaps. This makes it much easier to create a full, balanced shape.
How to Arrange the Paper Flowers
Once your cone is ready, it is time to assemble the bouquet. Start by placing a few of the largest rolled flowers toward the center and upper portion of the opening. These pieces will establish the main shape of the arrangement.
Add medium-sized flowers around them, alternating colors as you go. Try not to place all the yellow pieces together or all the dark blue pieces in one section. Spreading accent colors throughout the bouquet creates a more cohesive appearance.
Use the smallest rolls to fill remaining gaps. They are particularly useful around the edges and between larger flowers. The goal is not necessarily to create a perfectly symmetrical bouquet. A slightly varied arrangement often looks more natural and handmade.
Personalizing Your DIY Gift for Dad
A DIY Father’s Day gift becomes much more memorable when it reflects the person receiving it. The paper bouquet gives you plenty of opportunities to add personal touches without making the project significantly more difficult.
Choose His Favorite Colors
Color is one of the simplest ways to personalize a handmade present. If Dad has a favorite sports team, hobby, car color, or general color preference, use those shades throughout the bouquet.
Add a Personal Message
A short note can be attached to the bouquet or tucked inside the cone. Consider writing a favorite memory, a thank-you message, or a simple sentence explaining why you appreciate him.
Include a Small Extra Gift
If the cone is sturdy enough, you can adapt the concept into a presentation holder for a small lightweight surprise. A handwritten coupon, favorite photo, or tiny handmade card can complement the paper bouquet.
Why This Matters
A successful handmade gift combines creativity with personalization. You do not need complicated techniques to make something impressive. A simple paper structure, coordinated colors, and a thoughtful message can create a finished present that feels intentional and unique.
Easy Variations for Different Ages
This Father’s Day craft can be adapted for different skill levels. Younger children can focus on choosing colors, decorating the cone, and making simple paper rolls with adult assistance. Older children and teenagers can experiment with more detailed arrangements, layered decorations, and personalized messages.
Adults can take the basic concept further by using textured cardstock, patterned paper, layered shapes, or a more refined monochromatic color scheme. The basic bouquet structure remains simple, but the final appearance can be changed dramatically through material and color choices.
Tips for a Neat and Professional Finish
- Use a sharp pair of scissors for cleaner paper edges.
- Choose paper with enough weight to hold its shape.
- Apply glue sparingly to avoid visible marks.
- Keep the cone edges aligned before the adhesive sets.
- Mix flower sizes to create depth and visual interest.
- Repeat accent colors throughout the arrangement.
- Let glued pieces dry completely before moving the bouquet.
Important: Avoid overcrowding the bouquet too early. It is easier to add small paper rolls to fill empty spaces than to remove a large number of pieces after they have been secured. Build the arrangement gradually and check it from several angles.
Making the Craft More Budget-Friendly
One of the best things about DIY Father’s Day gifts is that you can often use materials you already have. Scraps from previous craft projects can become small rolled flowers, while leftover cardstock can be used for the cone and decorative heart.
Old magazines, unused wrapping paper, paper bags, and colorful craft-paper leftovers can also provide interesting textures and patterns. If you use thinner paper, consider layering pieces together or reinforcing the cone so it remains sturdy.
Buying a large assortment of specialty supplies is not necessary. A carefully selected palette of a few colors can actually create a cleaner and more modern result.
When to Make Your Father’s Day Craft
Give yourself enough time to make the bouquet without rushing. The rolling process is straightforward, but creating many individual flowers can take longer than expected. Making the paper flowers ahead of time is a smart way to spread the project over several sessions.
You can also involve family members in different stages. One person can cut the strips, another can roll the flowers, and someone else can decorate the cone. This turns the gift-making process into a shared creative activity.
At a Glance
- Simple paper materials create an eye-catching bouquet.
- Rolled flowers add texture and dimension.
- A cone-shaped holder keeps the presentation tidy.
- Favorite colors and handwritten notes make it personal.
- The project can be adapted for kids, teens, or adults.
Conclusion
A handmade Father’s Day present does not need to be complicated to make a lasting impression. This DIY paper bouquet combines simple crafting techniques with a cheerful presentation, making it an approachable project for anyone searching for creative Father’s Day gifts.
The rolled paper flowers give the bouquet plenty of visual interest, while the cone provides an easy way to present the finished arrangement. Best of all, you can personalize nearly every part of the project, from the colors and flower sizes to the decorative heart and handwritten message.
Whether you are making this craft with children or creating it yourself, focus on the thought behind the gift rather than making every detail perfect. Choose colors Dad will love, add a meaningful message, and enjoy the process of creating something especially for him. This simple DIY Father’s Day gift can become a cheerful reminder of a thoughtful moment long after the holiday is over.
Tags
DIY Father’s Day Gifts Father’s Day Crafts Gifts for Dad Handmade Gifts Paper Crafts Homemade Father’s Day Ideas Easy DIY Gifts