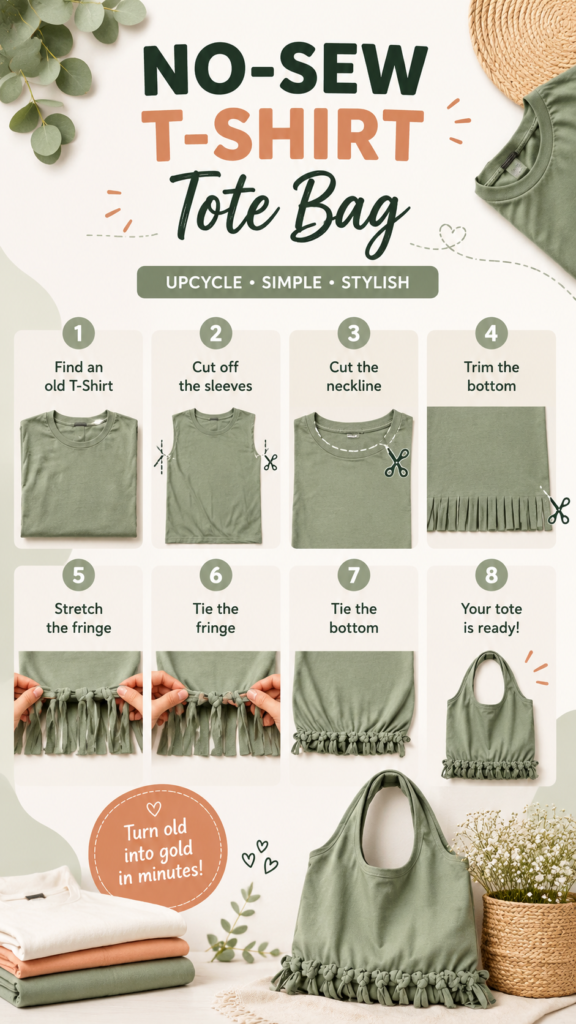
DIY fashion does not have to mean complicated sewing projects, expensive materials, or a closet full of specialized tools. One of the easiest ways to create something useful and stylish is to give an old T-shirt a second life. With a few simple cuts and knots, an ordinary shirt can become a practical no-sew tote bag that is perfect for everyday errands, casual outings, craft supplies, or carrying small essentials.
This simple T-shirt upcycling project is especially appealing because it combines creativity with sustainability. Instead of letting an unwanted shirt sit unused, you can transform it into a reusable bag with very little equipment. The finished tote also has a relaxed, handmade look, while the knotted fringe at the bottom adds texture and personality.
Key Takeaways
- Turn an old T-shirt into a useful tote bag without sewing.
- Choose a soft, sturdy shirt for the best everyday result.
- Use simple cutting, stretching, and knotting techniques.
- Customize the tote with different shirt colors, fringe lengths, and finishes.
- Upcycling gives unwanted clothing a practical second purpose.
- This beginner-friendly DIY fashion project requires only a few basic supplies.
Why Make a No-Sew T-Shirt Tote Bag?
A T-shirt tote bag is one of those DIY fashion projects that feels surprisingly rewarding because the transformation happens quickly. You start with a familiar piece of clothing and finish with an entirely different item. The basic concept is simple: remove the sleeves, reshape the neckline, trim the bottom, and secure the lower edge with knots.
There is no need for a sewing machine, complicated pattern, or advanced crafting experience. The project is accessible to beginners and can easily become a fun weekend activity. It is also a great way to experiment with clothing that may be too worn, outdated, oversized, or simply no longer fits your personal style.
The finished bag shown in this style of project has a soft, casual appearance. Its fabric handles remain connected to the original upper portion of the shirt, while the bottom becomes a decorative knotted fringe. That detail gives the tote a handmade character instead of making it look like a plain fabric shopping bag.
Important: The success of a no-sew T-shirt tote depends largely on the fabric and the quality of your cuts. Take a little extra time to make the neckline and bottom edge even, because those areas determine both the appearance and usability of the finished bag.
What You Need for This DIY Fashion Project
The beauty of this project is that the supply list is short. You mainly need an old T-shirt and a pair of sharp fabric scissors. A measuring tool can be helpful if you want symmetrical cuts, but it is not absolutely necessary for a relaxed, casual design.
- One clean old T-shirt
- Sharp fabric or craft scissors
- A ruler or measuring tape, optional
- A washable fabric marker, optional
- A flat surface for cutting
Choose a shirt made from fabric that is comfortable and flexible but not extremely thin. Cotton T-shirts are particularly convenient because the fabric can stretch after cutting, allowing the raw edges to curl slightly and giving the finished tote a softer appearance.
Choosing the Right T-Shirt
Before cutting, inspect the shirt carefully. Look for stains, holes, or weak areas that could become larger once the fabric is stretched. A shirt with a solid lower section is useful because the bottom fringe needs enough fabric to create secure knots.
Color is another opportunity for customization. Neutral shades such as cream, beige, gray, olive, and white create a minimalist tote, while brighter colors can produce a more playful DIY fashion accessory. Graphic T-shirts can also make interesting bags because an existing design may become the focal point of the finished tote.
Step 1: Prepare the Old T-Shirt
Start by washing and drying the shirt if necessary. Place it flat on a clean surface and smooth out wrinkles. Align the side seams so the shirt lies as evenly as possible.
This preparation step may seem minor, but it makes cutting much easier. Wrinkles can cause the scissors to follow an uneven path, which may result in an asymmetrical neckline or bottom edge.
Step 2: Cut Off the Sleeves
Use sharp scissors to remove the sleeves. Follow the natural armhole area rather than cutting deeply into the main body of the shirt. The goal is to create two openings that will eventually form the upper sides of the tote.
Try to make both sides similar in shape. You can fold the shirt in half before cutting if you want a quick way to create more symmetrical arm openings.
Do not throw away the sleeves immediately. They can be saved for another upcycling project, such as small fabric pouches, cleaning cloths, patches, or decorative pieces.
Step 3: Reshape the Neckline
Next, cut around the neckline to create a larger opening. The original collar is usually too small for a tote bag, so widening it gives you a comfortable opening for placing items inside the bag.
A rounded neckline works well because it creates a smooth handle area. If you want a deeper opening, mark the shape lightly with a fabric marker before cutting.
Keep the Handles Balanced
Pay attention to the width of the fabric between the neckline and sleeve openings. This section becomes the handles of the tote. Avoid cutting away too much material from the shoulder area because narrower handles may be less comfortable and may stretch more under weight.
Step 4: Create the Bottom Fringe
Lay the shirt flat again and decide how deep you want the fringe. A row of evenly spaced strips creates the knotted bottom visible in the finished design. You can make the strips relatively narrow for a delicate fringe or wider for a chunkier appearance.
Cut upward from the bottom edge, creating multiple vertical strips. Stop at the same height for each strip so the finished fringe looks neat.
The strips do not need to be perfectly identical for a handmade project. In fact, slight variations can contribute to the relaxed charm of an upcycled fashion accessory. However, extremely uneven strips may make the bottom difficult to knot consistently.
Expert Insight
Think of the bottom strips as the foundation of your tote. Consistent strip length and spacing will make the knots easier to manage and help the finished bag keep a balanced shape.
Step 5: Stretch the Fringe
Once the strips have been cut, gently stretch each one. Pulling the fabric helps the edges curl and gives the strips a softer, more cord-like appearance. This also makes the fringe easier to manipulate when tying the knots.
Use gentle pressure rather than pulling aggressively. T-shirt fabric can stretch considerably, and excessive force may make some strips much longer than others.
Why Stretching Changes the Look
Stretching is a small step that can have a noticeable visual effect. The freshly cut fabric initially looks flat and unfinished. After stretching, the edges can curl inward, creating a cleaner and more textured appearance.
Step 6: Tie the Fringe
Now comes the most recognizable part of the project. Take neighboring strips and tie them together securely. Continue across the entire bottom until the opening is closed.
The exact knotting method can be adjusted to suit your preferred look. Simple knots create a clean fringe, while layered or repeated knots can produce a more decorative finish.
As you work, gently check the fabric above the knots. If the bottom bunches unevenly, loosen and adjust a few knots before continuing. This is much easier than trying to correct the shape after the entire row is finished.
Pro Tip: After tying the first few knots, lift the shirt slightly and inspect the opening from both sides. This quick check helps you spot gaps before they run across the entire bottom of the tote.
Step 7: Secure and Shape the Bottom
Continue tying until the bottom edge is closed. The knots should sit close together so there are no large openings between them. Once complete, gently pull the handles and sides to help the tote settle into its new shape.
The bottom will naturally gather around the knotted fringe. This creates the distinctive casual shape of the no-sew T-shirt tote and adds visual interest to what was once a basic piece of clothing.
At this stage, inspect every knot. If one feels loose, retie it. You can also trim any excessively long fabric ends if you want a more polished appearance.
Easy Ways to Customize Your DIY Tote
One of the best parts of DIY fashion is the ability to make a basic project feel personal. Once you understand the basic construction, there are plenty of simple ways to change the appearance of your T-shirt tote.
Experiment With Color
Try different shirt colors to create different moods. Earthy green, cream, tan, and muted shades create a natural minimalist aesthetic. Bright shirts can make the tote feel energetic and playful.
Change the Fringe Length
Short fringe creates a subtle decorative edge, while longer strips create a more noticeable bohemian effect. If you are making your first tote, a moderate fringe length is a good place to start because it gives you enough fabric for comfortable knotting.
Use Graphic Shirts
A T-shirt with an interesting graphic, phrase, or pattern can become a statement tote. Before cutting, consider where the existing design will sit on the finished bag. Positioning matters because the original shirt artwork can become the main decorative element.
How to Make Your Tote Look More Polished
Although this is intentionally a simple no-sew project, a few finishing habits can make a big difference. Work on a flat surface, use sharp scissors, and keep the cuts smooth. Take your time around the neckline and sleeve openings because these areas are highly visible.
Another useful technique is to stretch the finished bag gently before using it. This allows the fabric to settle and helps reveal the final proportions. If the handles feel too long, you may be able to adjust the neckline shape, but it is best to make smaller cuts initially and enlarge the opening gradually.
Important: Remember that a T-shirt tote is best suited to lightweight and moderate everyday items. Test your finished bag with lighter objects first and inspect the knots and handles before carrying anything heavy.
Creative Ways to Use a T-Shirt Tote Bag
A handmade tote can become much more than a shopping bag. Keep one near the door for quick errands, use one to organize craft supplies, or carry lightweight personal items when heading out.
- Carry lightweight groceries and market finds.
- Store yarn, fabric, or other craft supplies.
- Use it as a casual everyday accessory.
- Pack small items for a picnic or day out.
- Give it as a handmade gift to someone who enjoys DIY fashion.
Because the project starts with an existing garment, every tote can have its own story. A favorite old shirt that is no longer wearable can become something useful instead of being forgotten in the back of a drawer.
Why T-Shirt Upcycling Is a Great DIY Fashion Habit
Upcycling encourages a different way of looking at clothing. Instead of immediately treating an unwanted garment as waste, you can consider what else its fabric might become. A simple project like this can introduce beginners to the idea that fashion can be creative, practical, and resource-conscious at the same time.
It also encourages experimentation. Once you become comfortable cutting and reshaping fabric, you can start exploring other clothing DIY ideas. Old shirts can become pouches, headbands, cleaning cloths, decorative pieces, or other useful items depending on the fabric and design.
The no-sew approach is particularly approachable because it removes one of the biggest barriers beginners face. You do not need to learn complicated stitching techniques before starting. The focus is instead on basic cutting, fabric handling, and knotting.
At a Glance
- Start with a clean, suitable old T-shirt.
- Remove the sleeves and enlarge the neckline.
- Cut evenly spaced strips along the bottom.
- Stretch the strips and tie them securely together.
- Customize the color, fringe, and shirt design to match your style.
Conclusion
Creating a no-sew T-shirt tote bag is a simple way to explore DIY fashion while giving an old garment a fresh purpose. With just a T-shirt, scissors, and a little patience, you can create a practical handmade accessory without complicated sewing techniques.
The beauty of this project is its flexibility. You can keep the design minimalist, experiment with colorful shirts, create longer fringe, or turn a favorite graphic T-shirt into a personalized statement bag. Every small choice can change the final look.
Most importantly, this project shows how accessible creative upcycling can be. You do not need a large craft room or an extensive collection of supplies to make something useful. Start with one old T-shirt, make a few careful cuts, practice your knots, and enjoy watching a familiar piece of clothing become something completely new.
Tags
DIY Fashion T-Shirt Upcycle No-Sew DIY DIY Tote Bag Clothing Upcycling Sustainable Fashion Easy DIY Crafts Upcycled Clothing