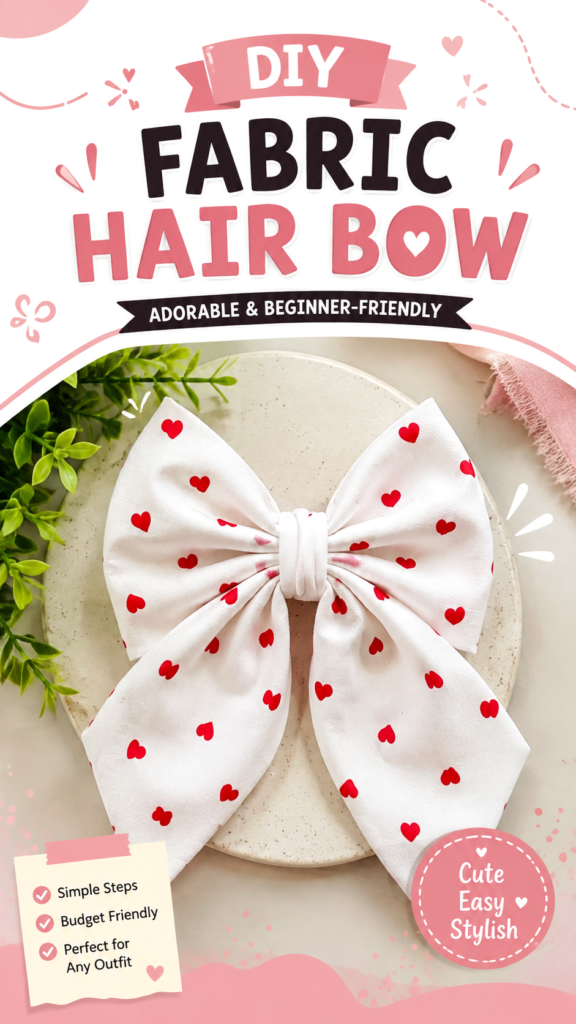
There is something irresistibly charming about a handmade fabric hair bow. This DIY bow combines a soft white fabric with cheerful red heart prints, creating an accessory that feels playful, feminine, and surprisingly easy to recreate. Whether you are new to sewing or simply looking for a quick fabric craft, a handmade bow is a wonderful project for turning a small piece of fabric into something useful and beautiful.
The oversized shape shown here gives the bow plenty of visual impact, while the wrapped center keeps the finished piece neat and polished. You can recreate the same general idea with heart-print fabric, floral cotton, polka dots, gingham, or a solid color that matches your wardrobe.
Key Takeaways
- A DIY fabric hair bow is a simple and rewarding sewing project.
- Patterned fabric can instantly give a handmade bow more personality.
- A neatly wrapped center creates a polished, finished appearance.
- You can adjust the bow size to suit children, teens, or adults.
- This project is a practical way to use leftover fabric.
- Handmade bows make charming accessories and thoughtful gifts.
Why Make a DIY Fabric Hair Bow?
A DIY fabric hair bow is one of those crafts that looks more complicated than it really is. The finished bow has multiple folds and flowing tails, but the basic concept is straightforward. Fabric is shaped into loops, gathered or secured in the middle, and finished with a narrow strip around the center.
Making your own bow also gives you complete creative control. Instead of searching for the perfect accessory in a store, you can choose the fabric, dimensions, colors, and overall style yourself. A bold printed cotton can create a playful statement piece, while a muted fabric can produce something more subtle and versatile.
Important: The most noticeable feature of a handmade bow is not complicated construction. It is careful shaping. Taking a little extra time to straighten the fabric, balance the loops, and position the center wrap can make a simple project look professionally finished.
Choosing Fabric for Your DIY Bow
Fabric choice has a major influence on the personality and structure of a hair bow. The heart-print fabric in this design creates a bright, cheerful appearance and works especially well for a playful accessory. If you are making a bow for a particular outfit, start by choosing a print or color that complements the clothing.
Look for Fabric With Some Structure
A lightweight woven cotton is a practical choice because it is easy to cut, fold, and sew while still providing enough structure for the bow to hold its shape. Fabric that is extremely thin may create softer loops, while a heavier fabric can produce a more dramatic and structured bow.
Before committing to a large piece, fold a small section of the fabric into a loop. This simple test helps you see whether it has enough body for the look you want.
Patterns Add Personality
Small repeating prints are particularly effective for fabric bows because the pattern remains visible across the different sections. Hearts, flowers, stars, dots, checks, and tiny geometric designs can all work beautifully.
For a more timeless accessory, consider solid white, cream, blush, navy, black, or pastel fabric. For something more seasonal, choose colors and prints that reflect the occasion.
Supplies You May Need
You do not need an extensive collection of sewing supplies to create a fabric hair bow. The exact materials depend on the construction method you prefer, but a basic project can be approached with a few common craft essentials.
- Fabric of your choice
- Fabric scissors or sharp craft scissors
- Sewing machine or hand-sewing needle
- Matching or coordinating thread
- Measuring tape or ruler
- Fabric clips or pins
- A small piece of fabric for the center wrap
- A suitable hair clip, barrette, or elastic attachment
Keeping your materials organized before you begin makes the project more enjoyable. It is also helpful to press the fabric beforehand so your folds and seams are easier to manage.
How to Make a DIY Fabric Hair Bow
The beauty of this project is that you can adapt the dimensions to create anything from a small everyday bow to an oversized statement accessory. The general construction remains similar regardless of the final size.
1. Prepare and Measure the Fabric
Begin by deciding how large you want the finished bow to be. An oversized design will need a larger piece of fabric, while a smaller accessory can be made from a relatively modest amount.
Cut the main fabric into a long rectangular piece suitable for forming the bow. Then prepare a much narrower strip for the center. Keep your cuts as straight as possible because uneven edges can make the finished bow look unbalanced.
2. Create the Main Bow Shape
Fold and shape the main fabric so that the two sides form symmetrical loops. The goal is to create a balanced silhouette with enough fullness in each side.
At this stage, do not worry about making everything perfect immediately. Arrange the fabric, check the proportions, and adjust the loops until both sides look similar.
3. Secure the Center
Once the bow has the desired shape, bring the center together. This gathered section creates the characteristic bow silhouette and separates the upper loops from the flowing tails.
Depending on your preferred sewing technique, the center can be secured with stitches before the finishing strip is added. Keep the stitching firm enough to hold the folds in place without crushing the fabric.
4. Add the Center Wrap
The narrow center strip is one of the most important finishing details. Wrap it around the gathered middle of the bow to conceal the securing stitches and create a clean, tailored appearance.
Position the wrap carefully so it sits evenly around the center. Secure it neatly at the back where the attachment will be less visible.
5. Attach the Hair Hardware
The completed bow can be attached to a suitable hair clip, barrette, or elastic depending on how you want to wear it. Make sure the attachment is securely stitched so the bow stays in place during normal use.
Before wearing it, gently adjust the loops and tails. Small adjustments to the folds can make a surprisingly big difference in the final appearance.
Expert Insight
A balanced bow usually looks more polished than a perfectly identical one. Focus on similar volume on both sides, a centered middle wrap, and smooth fabric rather than trying to eliminate every tiny natural fold.
Tips for a Fuller, Prettier Bow
The dramatic shape of an oversized bow comes from the way the fabric is folded and arranged. If your first attempt looks flat, there are several simple adjustments you can try.
- Use fabric with enough body to support the loops.
- Make the loops slightly fuller before securing the center.
- Press folds carefully for cleaner lines.
- Keep the center wrap snug but not excessively tight.
- Trim uneven edges before assembling the bow.
- Fluff and reshape the finished loops before attaching it to hair.
Pro Tip: If the bow feels too flat, do not immediately make it larger. First try loosening and reshaping the folds. Better fabric distribution can add fullness without changing the overall dimensions.
Creative Ways to Customize Your Bow
One of the best things about a DIY bow is how easily you can personalize it. The heart pattern shown here gives the accessory a sweet and playful character, but there are countless ways to create a completely different look using the same basic idea.
Experiment With Size
A small bow can be subtle enough for everyday outfits, while a large bow can become the focal point of a hairstyle. Try several proportions to discover what works best for your preferred hairstyle and personal style.
Mix Prints and Solids
For an interesting handmade accessory, combine a patterned main fabric with a solid center wrap. You can repeat one of the colors from the print in the center to make the design feel coordinated.
Try Different Tail Shapes
The long tails can be cut straight, angled, rounded, or finished with a decorative point. Changing the tail shape can completely alter the personality of the finished bow without changing the basic construction.
Great Occasions for Handmade Hair Bows
A fabric hair bow is versatile enough for many occasions. A heart-print version can add a cheerful touch to an everyday outfit, while a more understated fabric can work beautifully for school, casual gatherings, parties, or family photos.
Handmade bows can also make thoughtful small gifts. Because the fabric can be customized to suit different tastes, you can create individual versions for friends, children, family members, or anyone who enjoys handmade accessories.
If you are preparing several accessories for an event, consider using the same pattern in different fabrics. This creates a coordinated collection while allowing each bow to have its own personality.
Using Fabric Scraps for DIY Bows
Small sewing projects often leave behind fabric remnants that are too useful to throw away but too small for larger projects. A DIY fabric bow is a great way to give those pieces a second life.
Instead of keeping scraps hidden in a drawer, sort them by color, pattern, and size. When you have enough suitable pieces, you can turn them into a collection of handmade accessories.
This approach is especially useful when you have leftover fabric from clothing, quilting, home projects, or previous sewing crafts. Even a simple remnant can become something attractive when carefully folded and finished.
Common DIY Bow Mistakes to Avoid
Beginners sometimes focus so much on the sewing that they overlook the shaping. The finished appearance of a bow depends heavily on proportion and positioning.
- Uneven loops: Check both sides before permanently securing the center.
- Loose center: Make sure the gathered section is held firmly.
- Wrinkled fabric: Press the material before assembly for a cleaner result.
- Unbalanced tails: Compare the length and angle of both sides.
- Messy center wrap: Take time to position the finishing strip neatly.
The goal is not perfection on the first attempt. Handmade accessories often improve dramatically once you understand how your chosen fabric behaves.
Quick Points
- Choose fabric with enough structure for your desired shape.
- Keep both loops balanced and full.
- Use a neat center wrap to hide the gathered middle.
- Customize the size, print, and tail shape to suit your style.
- Save fabric scraps for future handmade accessories.
Conclusion
Creating a DIY fabric hair bow is a simple way to combine creativity, sewing, and personal style in one satisfying project. The heart-print design offers a cheerful example of how a basic piece of fabric can become a statement accessory with thoughtful shaping and a polished center finish.
Once you understand the basic construction, you can experiment with different fabrics, colors, dimensions, and tail shapes to create bows for almost any occasion. It is also an approachable project for using fabric scraps and making personalized handmade gifts.
Start with a fabric you love, take your time with the folds, and remember that the smallest finishing details can make the biggest visual difference. With a little practice, you can build your own collection of cute handmade bows that feel completely unique.