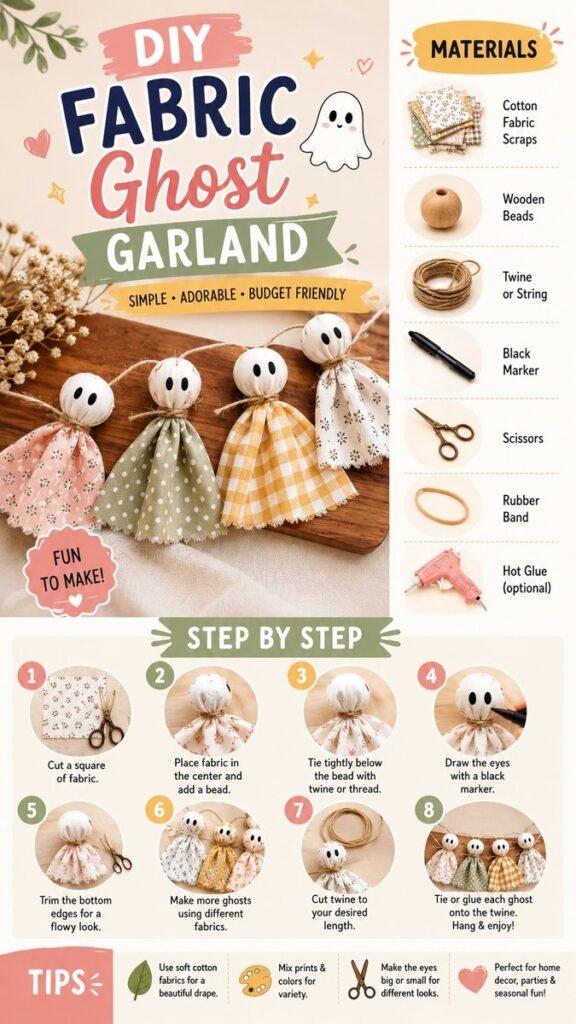
Looking for a simple craft that adds personality to your home without requiring a long list of supplies? This DIY fabric ghost garland is a charming project to try. Made with small fabric scraps, wooden beads, twine, and a few basic craft tools, these soft little ghosts create a playful seasonal decoration that feels handmade, cozy, and budget friendly.
The beauty of a DIY garland like this is its flexibility. You can choose floral cotton, gingham, polka dots, neutral fabrics, or a combination of your favorite prints. Each little ghost can look slightly different, making the finished garland feel more personal than a mass-produced decoration.
Key Takeaways
- Create a charming fabric ghost garland with simple craft supplies.
- Use cotton scraps in different colors and patterns for variety.
- Wooden beads help form the rounded ghost heads.
- Twine provides an easy way to connect and display the finished ghosts.
- Adjust the garland length and ghost size to suit your decorating space.
- Use small or large eyes to create different facial expressions.
Why Make a DIY Fabric Ghost Garland?
A homemade garland is one of those decorating projects that can completely change the feel of a small space. It can be draped across a shelf, hung above a console table, placed along a mantel, or used as a cheerful accent for a seasonal gathering. Because the ghosts are made from fabric, the decoration has a softer appearance than many traditional Halloween crafts.
This project is also a practical way to use leftover fabric. Instead of letting small pieces sit unused in a craft box, you can turn them into decorative figures with very little material. Mixing patterns makes the garland especially attractive because every ghost becomes part of the overall design.
Important: The best part of this craft is that it does not need to look perfectly identical from one ghost to the next. Small differences in fabric, shape, and facial expression give a handmade garland its character.
The finished design can lean playful, rustic, cottage-inspired, colorful, or minimalist depending on your fabric choices. Neutral cotton creates a subtle look, while gingham and floral prints add more visual interest.
Materials for a Fabric Ghost Garland
The project shown uses a short list of accessible craft materials. Having everything prepared before you begin makes the process much easier and keeps the assembly moving smoothly.
- Cotton fabric scraps: Choose lightweight fabric pieces with enough room to create the ghost shape.
- Small round wooden beads: These form the rounded heads of the ghosts.
- Twine or string: Use this to tie the fabric and connect the individual ghosts.
- Black marker: A marker can be used to draw simple eyes on each wooden bead.
- Scissors: Sharp fabric scissors make cutting and trimming easier.
- Rubber bands or thread: These help secure the fabric around the wooden bead.
- Hot glue: Optional glue can provide extra security where needed.
You do not need to use exactly the same fabrics throughout the project. In fact, a mixture of small prints can make the final DIY ghost garland more visually interesting. Try combining a floral print with gingham and a coordinating solid color.
Choosing the Right Fabric
Lightweight cotton is a particularly useful choice for this style of garland because it can gather naturally around the bead and drape into a simple ghost-like shape. Fabric that is extremely thick may be harder to gather neatly, while very slippery fabric can be more difficult to keep in place.
Look through your existing craft supplies before buying anything new. Small pieces left over from sewing projects, quilting, previous decorations, or other DIY crafts can work beautifully.
How to Make a DIY Fabric Ghost Garland
The construction is straightforward. Each ghost consists of a fabric piece gathered around a wooden bead, with the fabric secured below the bead. A simple face is then added, and the completed ghosts are attached to a length of twine.
1. Cut the Fabric Squares
Start by cutting square pieces of cotton fabric. The exact dimensions can vary depending on how large you want the finished ghosts to be. Keeping the pieces reasonably consistent will help create a cohesive garland, but there is no need to measure every square with extreme precision.
For a more relaxed handmade appearance, allow some variation in the sizes. Slightly different fabric shapes can produce ghosts with different silhouettes once they are gathered.
2. Position the Fabric Around the Bead
Place a wooden bead near the center of the fabric square. Bring the fabric upward around the bead so that the bead becomes the head and the remaining fabric hangs downward like a small flowing body.
Take a moment to adjust the fabric before securing it. Spreading the material evenly around the bead creates a fuller shape, while gathering it more tightly can create a narrower silhouette.
3. Secure the Fabric Below the Head
Once the fabric is positioned, tie it firmly just below the wooden bead using twine, thread, or a small rubber band. The goal is to hold the fabric in place while allowing the lower portion to remain loose and flowing.
Do not pull the fabric so tightly that it loses its natural drape. A little fullness around the head and shoulders helps the finished ghost look soft and dimensional.
4. Draw the Ghost Face
Use a black marker to add two simple eyes to the wooden bead. The face can be as minimal as two small dots or slightly larger oval eyes for a more expressive appearance.
Experiment with placement before marking permanently. Eyes positioned close together can give the ghost a sweet expression, while slightly larger eyes can make it look more playful.
5. Trim the Fabric Edges
Trim the bottom edges of the fabric if necessary. A straight edge creates a cleaner appearance, while a gently uneven or frayed edge can add texture and movement.
If you like the soft, rustic look of the example, avoid making every edge perfectly uniform. The slight variations contribute to the handmade character of the decoration.
6. Make Additional Ghosts
Repeat the process with different fabric patterns. This is where you can really personalize your garland. Alternate floral prints, gingham, dots, and coordinating solids to create a balanced rhythm.
For a more coordinated look, choose fabrics that share at least one color. This keeps the variety intentional rather than making the garland feel visually scattered.
Expert Insight
Think of the garland as a small repeating pattern. Alternating colors, prints, and ghost sizes creates visual movement while keeping the overall decoration cohesive. You can also repeat one favorite fabric every few ghosts to create a deliberate rhythm.
7. Prepare the Twine
Cut a length of twine that fits the area where you plan to display the garland. Leave enough extra length at both ends for hanging or tying the decoration securely.
Before attaching the ghosts, lay the twine flat and arrange the completed figures beside it. This lets you test the spacing and decide which fabrics should sit next to each other.
8. Attach Each Ghost
Secure each fabric ghost to the twine using a knot, thread, or a small amount of optional hot glue. Keep the spacing relatively even for a structured appearance, or group a few ghosts closer together for a more relaxed arrangement.
Once every ghost is attached, gently adjust the fabric so each figure hangs naturally. Fluff the gathered fabric and check that the faces are visible from the front.
Creative Ways to Customize Your Garland
The basic construction is simple, but there are plenty of ways to make the finished piece feel unique. Your fabric selection alone can completely change the mood of the project.
Mix Prints for a Playful Look
Gingham and floral fabrics work particularly well together because their patterns have different visual textures. You can add a solid-colored fabric between printed ghosts to give the eye a place to rest.
For a softer palette, consider cream, beige, muted green, dusty pink, or warm yellow. For a more traditional seasonal display, darker or brighter accent fabrics can create stronger contrast.
Change the Ghost Expressions
Not every ghost needs to have the same face. Try small eyes on some and larger eyes on others. You can also experiment with slightly different spacing to create a collection of individual personalities.
Pro Tip: Make a few practice faces on scrap material or spare beads first. Once you find an eye size and placement you like, repeat that approach across the garland while still allowing small variations.
Experiment With Garland Length
A short garland works well as an accent on a small shelf or cabinet. A longer version can stretch across a mantel, wall, console, or party display. Simply make additional ghosts when you need more length.
Spacing also affects the final appearance. Close spacing gives the decoration a fuller look, while wider spacing allows each fabric pattern to stand out.
Where to Display a Fabric Ghost Garland
Once complete, this handmade garland can become a flexible seasonal decorating accent. Place it somewhere that allows the fabric shapes to hang freely and remain easy to see.
- Across a mantel or shelf
- Along a console table
- Above a craft station
- Across a seasonal party backdrop
- On a nursery or children’s room shelf as a playful seasonal accent
- Along a decorated entryway
- Across a small display cabinet
Because the design uses soft fabric and simple shapes, it can work with many different decorating styles. A neutral fabric palette suits understated interiors, while colorful prints bring a cheerful craft-room feel.
Tips for a Better Finished Garland
A few small choices can make the assembly easier and improve the finished appearance. Start with clean, neatly cut fabric pieces and keep your supplies within reach.
- Prepare all fabric first. Cutting several squares at once makes assembly faster.
- Choose lightweight materials. Fabric that gathers easily will create a softer ghost shape.
- Test the bead placement. Center the fabric before tying it securely.
- Keep the faces simple. Small black eyes are enough to create a recognizable expression.
- Plan the color order. Arrange finished ghosts before attaching them to the twine.
- Vary the prints carefully. Use related colors to maintain a cohesive look.
- Leave extra twine at the ends. This gives you room to hang or tie the garland.
Important: Always handle scissors and hot glue carefully, especially when crafting with children. If younger crafters are involved, an adult should handle sharp tools and hot glue while children help with fabric selection and arranging the finished pieces.
Easy Variations to Try
Once you have made the basic fabric ghost, it is easy to adapt the idea for different seasons, celebrations, and decorating styles. Change the fabric and details rather than rebuilding the entire concept from scratch.
Create a Neutral Fabric Garland
Use cream, white, beige, and natural-toned fabrics for a subtle decoration. Wooden beads and natural twine complement this palette and give the garland a relaxed handmade appearance.
Use Seasonal Prints
Small-scale floral, gingham, checked, or coordinating patterned fabrics can make the garland more colorful without overwhelming the rest of your decor. Choose a limited palette and repeat the same colors throughout the pieces.
Make Mini Ghosts
Use smaller fabric squares and beads to create tiny versions. Miniature ghosts can be grouped together on a shorter strand or used as accents on a larger decorative arrangement.
Why This Budget-Friendly Craft Works
Good DIY decor does not always require complicated techniques or expensive supplies. This fabric garland combines basic materials in a way that produces a surprisingly decorative result.
Fabric scraps become the flowing bodies, wooden beads become the heads, twine creates the structure, and a marker adds the personality. Each individual component is simple, but together they create a cohesive seasonal decoration.
The project also encourages creativity. You can make decisions about color, pattern, spacing, facial expressions, and overall length without needing to follow a rigid template.
At a Glance
- Project: DIY fabric ghost garland
- Main materials: Cotton scraps, wooden beads, twine, and basic craft tools
- Style: Soft, playful, handmade, and seasonal
- Customization: Change fabrics, colors, expressions, spacing, and length
- Best feature: An easy way to turn fabric scraps into charming home decor
Conclusion
A DIY fabric ghost garland is a wonderful example of how simple craft supplies can become memorable seasonal decor. With cotton scraps, wooden beads, twine, and a few basic tools, you can create a row of charming fabric figures that adds warmth and personality to your space.
The project is easy to customize, so there is no need to make every ghost exactly alike. Mix floral and gingham fabrics, experiment with different colors, adjust the expressions, and choose a garland length that fits your decorating area.
The real charm comes from making the decoration your own. Save your favorite fabric scraps, gather a few simple supplies, and turn an ordinary afternoon into a creative DIY project that you can enjoy displaying season after season.
Tags
DIY Garland Fabric Crafts Ghost Garland Halloween Crafts DIY Home Decor Seasonal Decor Easy DIY Projects Budget Friendly Crafts