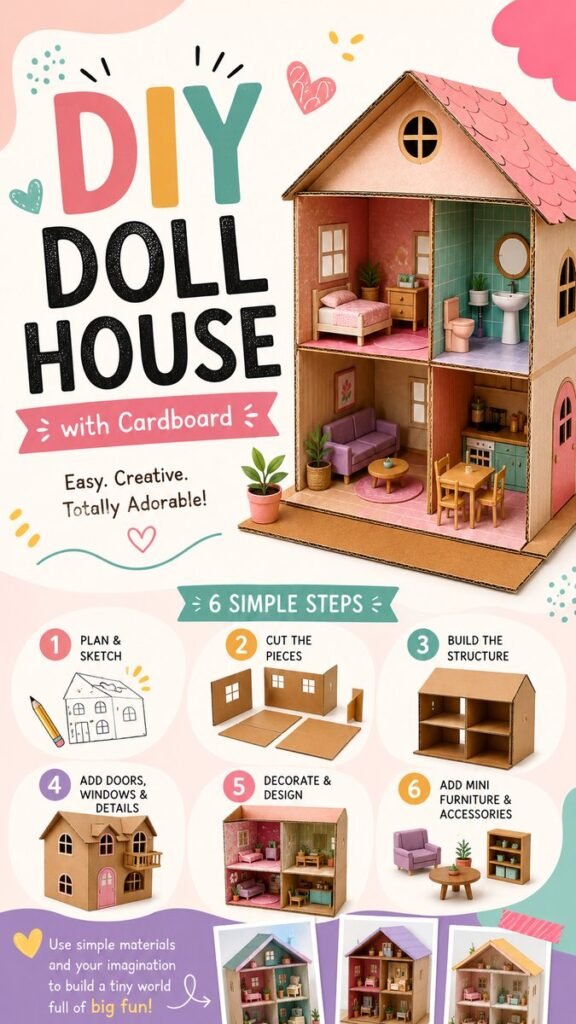
Creating a DIY dollhouse from cardboard is a fun way to turn simple craft materials into a charming miniature home. With a sturdy cardboard box, a few basic tools, paint or decorative paper, and plenty of creativity, you can build a tiny house with separate rooms, windows, doors, furniture, and personal touches. This project is especially appealing because it can be adapted to different sizes, colors, layouts, and decorating styles.
Whether you are looking for a creative weekend project, a budget-friendly craft, or an imaginative activity for children and families, a cardboard dollhouse offers plenty of possibilities. The key is to start with a simple structure and gradually transform it into a cozy miniature space.
Key Takeaways
- Use sturdy cardboard as the foundation for your DIY dollhouse.
- Sketch the layout before cutting walls, floors, and partitions.
- Decorative paper and paint can quickly transform plain cardboard.
- Small boxes, craft materials, and recycled pieces can become miniature furniture.
- Personal details make each cardboard dollhouse completely unique.
How to Make a DIY Dollhouse From Cardboard
The beauty of a DIY dollhouse is that you do not need complicated materials to get started. The example design uses a cardboard structure with multiple rooms arranged across two levels. Each room has its own color scheme and purpose, creating the feeling of a complete miniature home.
A large cardboard box works well as a starting point because it provides a ready-made outer structure. However, flat cardboard sheets can also be used to create walls, floors, partitions, balconies, or a custom roof. Before reaching for the glue, take a few minutes to imagine how you want the finished house to look.
Important: Planning the layout before cutting is one of the most useful steps in a cardboard dollhouse project. A simple sketch helps you estimate the size of each room and prevents unnecessary cuts or wasted cardboard.
Materials You Can Use
You can keep the supply list simple. The goal is to create a strong base and then use inexpensive decorative materials to give the miniature house character.
- Large cardboard box or sturdy cardboard sheets
- Craft knife or scissors
- Ruler and pencil
- Hot glue or strong white craft glue
- Acrylic paint or markers
- Decorative paper
- Small recycled boxes
- Scrap fabric or paper for rugs and bedding
- Mini accessories and handmade decorations
- Small wooden or cardboard pieces for furniture
If children are participating, adults should handle sharp cutting tools and hot glue. Younger crafters can focus on decorating, choosing colors, arranging furniture, and creating miniature accessories.
Step 1: Plan and Sketch the Dollhouse
Begin by deciding how many rooms you want. The illustrated concept features a compact multi-room house with bedrooms, a bathroom, living space, and a kitchen or dining area. You can follow a similar arrangement or create an entirely different floor plan.
Draw a basic front and side view on paper. Mark where you want the floors, interior walls, doors, and windows to go. Keep the design simple at first because the cardboard structure will become easier to build when the measurements are clear.
- Choose the overall width and height.
- Decide how many floors you want.
- Mark the position of interior partitions.
- Plan the location of doors and windows.
- Sketch the roof shape.
- Estimate the size of the furniture you plan to add.
A useful trick is to design the rooms around the furniture. If you already know you want a miniature bed, sofa, table, or shelving unit, leave enough floor space for each piece.
Step 2: Cut the Cardboard Pieces
Once the plan is ready, transfer the main measurements onto cardboard. You will generally need pieces for the base, floor levels, exterior walls, interior partitions, and roof.
Use a ruler to create straight cutting lines. If you are working with a large box, you may be able to preserve some of its original folds and corners rather than rebuilding every wall from separate pieces.
Cut slowly and check each piece against your sketch before moving on. Slightly uneven cuts can often be hidden with decorative paper or trim, but accurate pieces will make the assembly much easier.
Creating Windows and Doors
Windows and doors add personality while also making the dollhouse look more realistic. You can draw simple rectangles, arches, or other shapes directly onto the cardboard before cutting them out.
For an easier option, create decorative windows from paper and attach them to the wall instead of cutting completely through the cardboard. You can also add frames using narrow strips of cardboard.
Step 3: Build the Cardboard Structure
After cutting the major pieces, begin assembling the house from the base upward. Attach the exterior walls first, making sure they stand as straight as possible. Then add the floor pieces and interior partitions.
Hot glue can provide a quick bond for sturdy cardboard connections, while craft glue can work well for decorative elements. Reinforce important joints with extra cardboard strips on the inside of the structure.
Pro Tip: Reinforce the corners from the inside with narrow strips of cardboard. This small detail can make the entire structure feel more stable while keeping the reinforcements hidden from view.
Adding the Roof
A simple pitched roof can instantly give your cardboard dollhouse the appearance of a tiny cottage. Cut two matching roof panels and join them along the top edge. Add a small cardboard support underneath if the roof needs additional strength.
You can leave the cardboard exposed for a natural handmade look or cover the roof with colored paper. Small overlapping paper shapes can also imitate roof shingles and add visual texture.
Step 4: Add Doors, Windows, and Details
Once the main structure is secure, it is time to add architectural details. The example style uses charming windows, an arched doorway, a small balcony, and a decorative roof. These elements give a basic cardboard box much more personality.
Cardboard scraps are especially useful here. Cut narrow strips for window frames, tiny rectangles for shutters, or small pieces for balcony railings. Even simple shapes can look surprisingly detailed when painted and carefully arranged.
Simple Details That Make a Difference
- Frame windows with thin cardboard strips.
- Add colorful doors as a focal point.
- Create a small balcony from layered cardboard.
- Use paper to make curtains or wall art.
- Add tiny plants for a cozy room effect.
- Use different flooring patterns to separate rooms visually.
Step 5: Decorate Every Room
Decorating is where a DIY dollhouse really comes to life. Instead of making every room identical, give each space its own color palette and personality. A bedroom might use soft pinks and warm neutrals, while a bathroom can feature cool greens or blues.
Decorative paper makes an excellent miniature wallpaper. You can also paint walls directly with acrylic paint. For floors, use patterned paper, craft sticks, thin cardboard, or painted designs to create visual variety.
Why This Matters
A small dollhouse feels more complete when every room has a clear visual identity. Coordinating wall colors, flooring, furniture, and accessories creates a miniature home that feels intentional rather than simply filled with objects.
Ideas for Different Rooms
Bedroom: Create a tiny bed from layered cardboard or a small box, then add fabric or paper bedding. A miniature nightstand and a small framed picture can complete the space.
Bathroom: Small containers and shaped cardboard pieces can become sinks, tubs, shelves, and other bathroom details. Use a consistent color scheme to make the room feel cohesive.
Living Room: A tiny sofa, coffee table, rug, plant, and wall decoration can create a comfortable miniature gathering space.
Kitchen and Dining Area: Use small boxes and cardboard scraps to create cabinets, counters, tables, and shelves. Tiny paper or clay-style accessories can make the room feel lived in.
Step 6: Make Mini Furniture and Accessories
You do not need expensive miniature furniture to finish a cardboard dollhouse. Many pieces can be made from everyday craft materials. Small boxes can become cabinets or shelving, while layered cardboard can be shaped into tables, beds, and benches.
Keep furniture proportional to the rooms. A few well-placed pieces often look better than filling every corner. Leave enough open floor space so the rooms remain visually clear.
- Small boxes can become cabinets and shelves.
- Layered cardboard can create tabletops and furniture frames.
- Scrap fabric can become cushions, blankets, and rugs.
- Paper can be folded into tiny books, pictures, or decorative items.
- Small craft pieces can become plants, dishes, or room accessories.
How to Personalize Your DIY Dollhouse
The best cardboard dollhouse is the one that reflects your own style. You can create a colorful playhouse, a modern miniature home, a cozy cottage, or a completely imaginative design.
Try experimenting with unexpected color combinations. Pastel pink, muted green, warm beige, lavender, and natural cardboard tones can create a cheerful handmade aesthetic. For a more modern appearance, choose two or three coordinated colors and repeat them throughout the rooms.
You can also create a theme for the entire house. A nature-inspired design might use leafy patterns, wooden textures, and plenty of miniature plants. A contemporary design could feature simple furniture, geometric patterns, and neutral walls.
Tips for a Stronger and Neater Cardboard Dollhouse
Good construction does not require complicated techniques. A few practical habits can make the project easier and improve the finished appearance.
- Measure twice: Check dimensions before making permanent cuts.
- Use a straight edge: A ruler helps create cleaner walls and floors.
- Reinforce joints: Add hidden cardboard strips to important corners.
- Let decorations dry: Give painted or glued surfaces enough time to set.
- Keep furniture proportional: Match furniture sizes to the room dimensions.
- Decorate after construction: Finishing the main structure first makes decorating easier.
Important: Resist the temptation to add every decorative idea at once. A balanced dollhouse usually looks more polished when colors, patterns, and accessories are repeated thoughtfully throughout the design.
Creative Cardboard Dollhouse Ideas to Try
Once you understand the basic construction process, you can adapt the idea in countless ways. Change the floor plan, add another level, create a different roof shape, or design rooms around a particular theme.
- Create a tiny two-story family home.
- Build a compact dollhouse with open-front rooms.
- Design a colorful miniature apartment.
- Make a cottage with a pitched roof and balcony.
- Create seasonal room decorations that can be changed throughout the year.
- Build handmade furniture from leftover cardboard.
Another fun idea is to make interchangeable decorations. Instead of permanently gluing every accessory in place, keep some furniture and room details movable. This makes it easy to rearrange the house and create new layouts whenever inspiration strikes.
A Fun Project for Creativity and Imagination
A DIY dollhouse is more than a miniature building. It is a creative project that combines planning, construction, decorating, and storytelling. Every step gives you an opportunity to make a choice, from the shape of the roof to the color of a bedroom wall.
For families, the project can also be divided into manageable tasks. One person can sketch the rooms, another can help with safe decorating, and everyone can contribute ideas for furniture and accessories. The finished house becomes a collection of those creative decisions.
At a Glance
- Start: Sketch the floor plan and gather sturdy cardboard.
- Build: Cut, assemble, and reinforce the main structure.
- Detail: Add windows, doors, flooring, and a roof.
- Decorate: Give each room its own color and personality.
- Finish: Add handmade furniture and miniature accessories.
Conclusion
Making a DIY dollhouse from cardboard is a simple, creative project with plenty of room for personalization. Starting with basic cardboard, you can build a complete miniature home with multiple rooms, charming architectural details, colorful interiors, and handmade furniture.
The most important part is not making everything perfect. Focus on creating a sturdy structure, choosing a pleasing color palette, and adding details that make the house feel personal. Recycled materials and small craft supplies can go a long way when you approach the project with imagination.
Whether you build a tiny cottage, a colorful family home, or your own completely original miniature design, this cardboard craft offers an enjoyable way to create something special from simple materials. Gather your cardboard, sketch your dream layout, and start building your own tiny world.