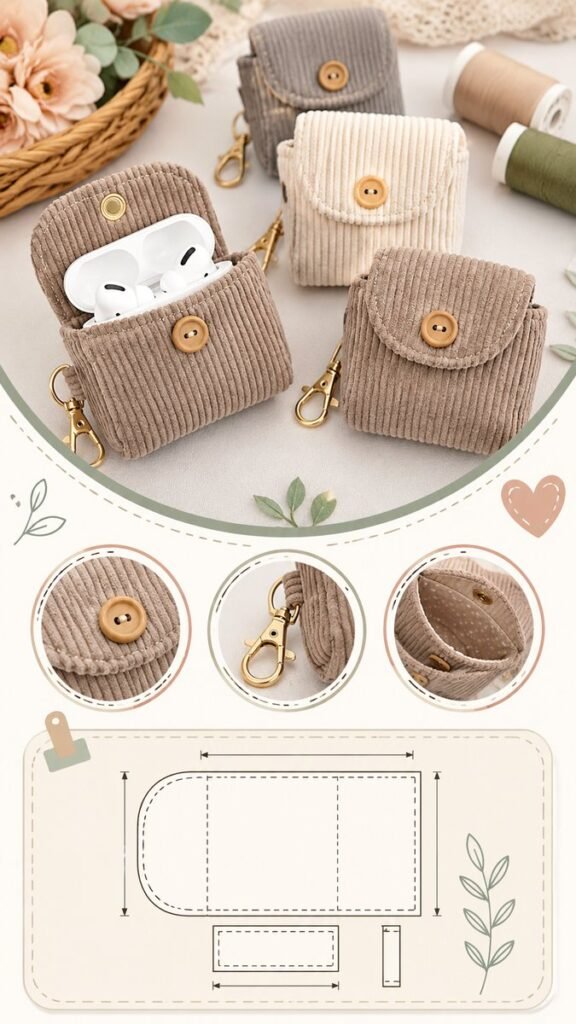
Small handmade pouches are one of those sewing projects that manage to be both practical and charming. A simple piece of fabric can become a useful little case for earbuds, coins, jewelry, sewing notions, or other everyday essentials. The cozy corduroy pouches shown here combine soft texture, rounded flap details, wooden buttons, and gold-tone clips for a polished handmade finish.
This pouch DIY idea is especially appealing if you enjoy quick sewing projects that look thoughtful without requiring a complicated design. The basic shape is compact, the construction is easy to understand, and the finished pouch can be customized with different fabrics, buttons, linings, and hardware. A simple pattern can also be adapted into several sizes, making this a versatile project for beginners and experienced makers alike.
Key Takeaways
- Use corduroy or another sturdy fabric for a soft but structured pouch.
- A button closure adds both function and a handmade decorative touch.
- A small clasp can turn the pouch into a convenient clip-on accessory.
- Add a lining for a cleaner interior and a more finished appearance.
- Experiment with proportions to create earbud cases, coin purses, or mini organizers.
Why a Pouch DIY Project Is Worth Making
A handmade pouch solves a surprisingly common problem: keeping small items together without carrying a bulky bag. Instead of letting earbuds, keys, coins, clips, or other tiny essentials disappear inside a larger purse, you can give each item its own compact space.
The design pictured here has a particularly useful combination of features. The pouch has a soft rectangular body, a rounded flap, a button closure, and side hardware that can accommodate a clip. These details make it practical while keeping the overall appearance simple and stylish.
Important: The best small pouch designs balance softness with enough structure to protect whatever you place inside. Choosing the right fabric and adding a suitable lining can make a noticeable difference in both appearance and everyday usability.
Choosing Fabric for Your Handmade Pouch
Fabric choice is one of the easiest ways to change the personality of a pouch. The corduroy style shown in the design has a warm, tactile appearance because of its raised ribs. It also gives the pouch enough visual texture to make a simple shape feel more interesting.
For a similar look, choose a medium-weight corduroy in neutral shades such as beige, taupe, cream, gray, or soft brown. These colors pair beautifully with wooden buttons and gold-tone hardware. If you prefer something brighter, the same pouch shape can work with pastel cotton, floral fabric, denim, canvas, or printed quilting cotton.
Consider the Fabric Weight
Very thin fabric can create a floppy pouch unless it is reinforced with interfacing. Heavy fabric can produce a sturdier case, but it may be more difficult to sew around small curves and layered edges. A medium-weight fabric is often a comfortable starting point for a compact DIY pouch.
Think About Pattern Direction
If you are using corduroy, remember that the ribs create a visible direction. Cutting every piece with the fabric running consistently in the same direction gives the finished pouch a more intentional appearance. This is particularly important when making several pieces for gifts or a coordinated collection.
Understanding the Pouch Pattern
The pattern illustrated with the project uses a straightforward shape with a rounded end and marked fold or construction lines. The diagram includes centimeter measurements, making it easier to understand the intended proportions before cutting fabric.
Rather than treating the pattern as something that can only create one exact pouch, think of it as a starting point. Once you understand where the body folds and where the flap sits, you can adjust the dimensions to make a slightly wider organizer, a smaller coin pouch, or a compact case for another accessory.
- Transfer the pattern carefully onto paper or cardstock.
- Mark the fold lines and important construction points.
- Check the dimensions before cutting your fabric.
- Cut the outer fabric and lining according to your chosen design.
- Keep seam allowances consistent around the pieces.
Making a paper template first is especially helpful for beginners. It allows you to test the proportions without wasting fabric and makes it easier to create multiple matching pouches.
How to Make a Simple Pouch DIY
The exact construction can vary depending on the fabric and closure you choose, but the general process is pleasantly straightforward. The goal is to create a neat pouch body, form the flap, finish the edges, and add the closure and optional clip hardware.
1. Prepare the Pattern Pieces
Begin by preparing your paper template. Make sure the measurements are clearly marked and that the rounded portion of the pattern is smooth. A clean template makes cutting and sewing much easier.
Place the template on the wrong side of the fabric and trace around it. If the material has a directional texture, such as corduroy, check the nap before cutting. Repeat the process for the lining if your design includes one.
2. Cut the Outer Fabric and Lining
Cut carefully along your marked lines. Small accessories reward precision because even minor inconsistencies can become noticeable on a compact finished piece.
If you want the pouch to hold its shape more firmly, consider adding lightweight interfacing to the outer fabric. Test the interfacing on a scrap first, especially when working with textured fabrics.
3. Build the Pouch Body
Follow the marked fold areas to create the pouch body. Pin or clip the layers carefully so that the edges stay aligned during sewing. When working with curved sections, take your time rather than trying to sew too quickly.
Once the main seams are completed, gently press the fabric where appropriate. Pressing helps establish crisp folds and gives handmade projects a more professional appearance.
4. Add the Flap
The rounded flap is one of the defining features of this pouch design. Its curved shape softens the rectangular body and creates a natural location for the button closure.
For a neat result, make sure both sides of the flap are symmetrical. If the fabric tends to fray, finish the raw edges using a suitable sewing method before completing the final assembly.
5. Add the Button Closure
A wooden button gives the pouch a warm, handmade character. The examples shown use rounded wooden buttons that complement the neutral corduroy beautifully.
Choose a button large enough to be easy to handle but proportional to the pouch. A simple fabric loop, elastic loop, or another suitable closure can be positioned around the button depending on your preferred construction.
Expert Insight
Small details have a big impact on compact sewing projects. Matching the button to the fabric tone, keeping the stitching even, and pressing the folds neatly can make a simple pouch look thoughtfully designed rather than homemade in a rushed way.
Adding a Clip for Extra Functionality
The gold-tone clips shown alongside the pouches are a useful design feature. A clip allows the finished accessory to attach to a larger bag, backpack, key ring, or other suitable loop.
When adding hardware, reinforce the fabric around the attachment point. Small pouches may be opened and closed frequently, so the area holding the clip should be strong enough to handle repeated movement.
If you do not want hardware, the pouch can still work perfectly well as a standalone accessory. A simple fabric loop is another option that keeps the project lightweight and easy to customize.
Ideas for Using Your Finished Pouch
One of the best things about a pouch DIY project is how many uses you can find for the finished piece. The compact design is suitable for organizing all kinds of small belongings.
- Earbuds and small charging accessories
- Coins and small personal items
- Hair accessories and clips
- Small sewing supplies
- Jewelry when traveling
- Keys or small everyday essentials
- Tiny craft supplies
Making several pouches in different fabrics can also create a coordinated set. Use one for electronics, another for coins, and another for craft supplies. Matching colors can make the set feel especially polished.
Easy Ways to Personalize Your Pouch
Once you have the basic construction figured out, personalization becomes the fun part. You can keep the design minimal or add decorative elements that reflect your own style.
Experiment With Colors
Neutral fabric creates a soft, timeless appearance, while brighter colors make the pouch playful and youthful. You can also combine a neutral exterior with a colorful patterned lining for a small surprise when the pouch is opened.
Try Different Buttons
Wooden buttons suit the cozy aesthetic of corduroy, but ceramic, fabric-covered, acrylic, or vintage-style buttons can completely change the mood. Choose a button that complements the scale of the pouch rather than overwhelming it.
Play With Texture
Corduroy is only one option. Linen gives the pouch a relaxed natural look, canvas adds structure, denim creates a casual feel, and quilting cotton opens up almost endless pattern possibilities.
Tips for a Cleaner Sewing Finish
A small project does not have to be rushed. In fact, taking a few extra minutes during preparation can make the final result significantly cleaner.
- Measure twice before cutting your fabric.
- Use sharp fabric scissors or a rotary cutter for clean edges.
- Keep your seam allowance consistent.
- Clip or notch curves carefully where needed.
- Press seams and folds as you work.
- Test the button placement before permanently attaching it.
- Reinforce areas that will carry clip hardware.
Pro Tip: Before sewing the final closure, place the pouch around the items you expect to carry. This simple test helps you confirm that the opening, depth, and button position are comfortable for everyday use.
A Great Handmade Gift Idea
Small fabric pouches are also excellent handmade gifts because they are useful, easy to personalize, and suitable for many occasions. You can coordinate the fabric with someone’s favorite colors or make a set using complementary patterns.
For a thoughtful presentation, place a small accessory inside the pouch before gifting it. The pouch itself becomes part of the gift rather than simply serving as packaging.
They can also be practical projects for using fabric remnants. If you have leftover pieces from larger sewing projects, a compact pouch can give those scraps a second life while creating something useful.
Quick Points
- Choose fabric that matches the structure and purpose of your pouch.
- Use a paper template to check proportions before cutting.
- Add lining and interfacing when you want extra structure.
- Personalize the project with buttons, colors, textures, and hardware.
- Repurpose fabric scraps into useful handmade accessories.
Conclusion
A pouch DIY project is a simple way to turn fabric, a few basic sewing supplies, and creative details into something genuinely useful. The corduroy-inspired design shown here proves that a compact accessory can be practical while still having plenty of personality.
With its rounded flap, button closure, optional clip, and tidy proportions, this style can be adapted for countless everyday uses. Keep the palette neutral for a minimalist accessory, choose colorful fabric for a playful version, or experiment with contrasting linings and decorative buttons to create something completely personal.
Whether you are looking for an easy sewing project, a handmade gift idea, a way to use fabric scraps, or a cute organizer for small essentials, a fabric pouch is a rewarding place to start. Once you make one, you may find yourself wanting to create several more in different fabrics and sizes.
Tags
Pouch DIY DIY Pouch Sewing Projects Fabric Pouch Easy Sewing Corduroy Crafts Handmade Accessories Beginner Sewing