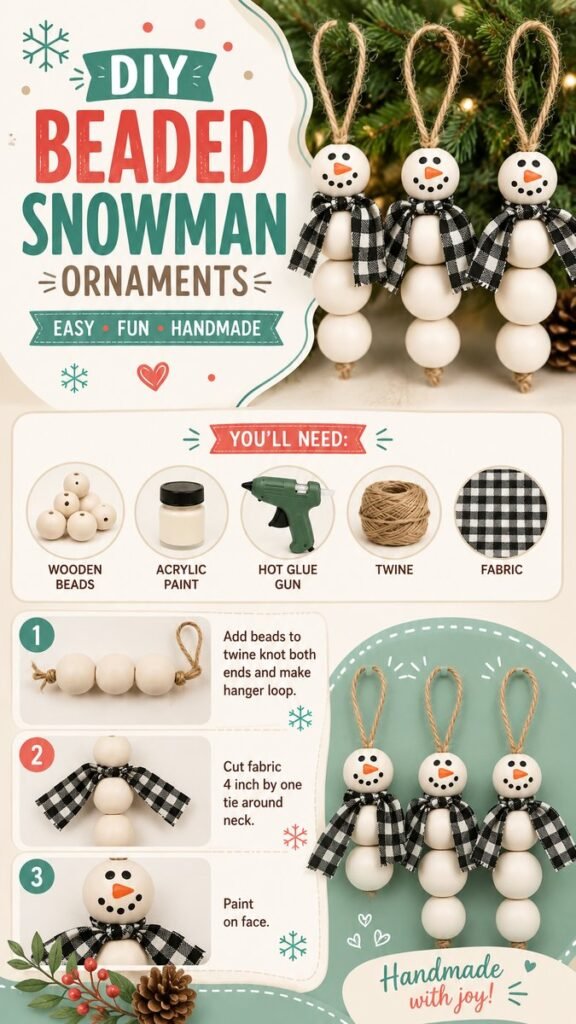
There is something special about handmade Christmas decorations. They add warmth, personality, and a little bit of creativity to a holiday space that store-bought ornaments simply cannot replicate. These DIY beaded snowman ornaments are a charming example. Made with simple wooden beads, twine, paint, and a small piece of patterned fabric, they create a cozy farmhouse-inspired look that feels festive without being complicated.
Whether you are decorating a Christmas tree, preparing handmade gifts, or looking for an easy holiday craft to enjoy on a winter afternoon, beaded snowman ornaments are a wonderful project to try. The design is simple enough for beginners while still offering plenty of opportunities to personalize colors, scarves, facial expressions, and finishing details.
Key Takeaways
- Beaded snowman ornaments are simple, festive, and beginner-friendly.
- Wooden beads, twine, paint, hot glue, and fabric create the basic design.
- A buffalo-check scarf gives the ornament a cozy rustic Christmas style.
- The project can be customized with different colors, fabrics, and facial details.
- These handmade ornaments work beautifully for Christmas trees, gift wrapping, and seasonal displays.
Why DIY Beaded Snowman Ornaments Are So Charming
Snowmen are one of the most recognizable symbols of winter decorating, and their friendly shape makes them especially appealing for handmade crafts. In this project, several round wooden beads are stacked to form the body, while a larger bead becomes the face. The result is a small three-dimensional snowman with a natural handmade character.
The beauty of this Christmas ornament idea is its simplicity. There are no complicated patterns or advanced crafting techniques required. Instead, the finished look comes from combining a few basic materials thoughtfully. Natural twine creates the hanging loop, neutral wooden beads provide the snowman’s body, and a patterned fabric strip becomes a tiny scarf.
The neutral palette shown in this style of ornament also makes it easy to coordinate with many Christmas decorating themes. Black-and-white check fabric works beautifully with farmhouse decor, while red, green, plaid, gingham, or even muted winter prints can create a completely different personality.
Important: The secret to making a simple ornament look polished is consistency. Choose beads with similar proportions, keep the hanging loop neat, and take a little extra time when positioning the face and scarf.
Supplies for a DIY Beaded Snowman Ornament
You only need a handful of craft supplies to create this festive decoration. The image highlights a particularly approachable combination of wooden beads, paint, hot glue, twine, and fabric. Most of these materials are easy to find in craft stores or may already be part of your craft collection.
- Wooden beads: Round unfinished beads form the snowman’s body and head. Similar-sized beads can create a balanced appearance.
- Paint: A light neutral or white-toned paint gives the wooden beads a snowy appearance.
- Hot glue: Useful for securing the scarf and other small decorative details.
- Twine: Natural-colored twine provides both the hanging loop and a rustic finishing touch.
- Fabric: A small piece of patterned fabric creates the scarf. Buffalo check is especially effective for a farmhouse Christmas aesthetic.
- Black paint or small dark details: These can be used for the eyes and dotted smile.
- Orange paint: A small triangular carrot-style nose adds an unmistakable snowman detail.
Choosing the Right Wooden Beads
Round wooden beads are ideal because their shape naturally resembles the rounded sections of a classic snowman. Using several beads in graduated or similar sizes can give the ornament a pleasing silhouette. The head should remain visually distinct from the body, so choosing a bead that looks slightly larger or more prominent for the face can help.
Unfinished wood also gives you plenty of creative freedom. You can leave portions natural for a Scandinavian-inspired look, paint the entire ornament white for a traditional snowy appearance, or experiment with soft cream and ivory shades for a warmer farmhouse feel.
Picking Fabric for the Scarf
The scarf is a small detail, but it has a major effect on the finished ornament. A black-and-white checked fabric creates strong contrast against the pale wooden beads. Plaid can make the ornament feel traditional and cozy, while red gingham adds a cheerful country Christmas touch.
Look for lightweight fabric that can be cut into a narrow strip without becoming too bulky. Since the scarf wraps around a small ornament, a little fabric goes a long way.
How to Make Beaded Snowman Christmas Ornaments
The project can be broken into a few straightforward stages. Preparing your materials before starting will make assembly easier and help you maintain a clean, balanced design.
Step 1: Prepare the Beads and Twine
Begin by gathering the wooden beads you want to use for each snowman. Cut a suitable length of natural twine, allowing enough extra length for tying knots and forming the hanging loop at the top.
Thread the beads onto the twine in the order you want them to appear. Keep the arrangement straight as you work. Once the beads are positioned, tie secure knots at the ends so the wooden pieces stay together.
The top section of the twine can then be shaped into a loop. This loop is what allows the finished snowman to hang from a Christmas tree branch, decorative hook, garland, or seasonal display.
Step 2: Secure the Snowman Shape
Once the beads are threaded and secured, check the shape from the front. The beads should sit closely enough together to look like a single snowman rather than separate pieces.
If necessary, adjust the knots before adding decorative elements. This is also a good moment to make sure the hanging loop is centered. A centered loop helps the ornament hang naturally instead of leaning to one side.
Step 3: Add the Fabric Scarf
Cut a narrow strip of fabric for the scarf. The reference style uses a small checked pattern that wraps around the neck area and extends outward on both sides.
Position the fabric between the head and upper body beads. Tie it securely around the neck area, arranging the two ends so they fall naturally. You can trim the ends at an angle, create a simple notch, or leave them straight depending on the look you prefer.
A small amount of hot glue can help keep the scarf in place if the fabric shifts. Use glue sparingly so it does not become visible on the finished ornament.
Expert Insight
Small ornaments benefit from simple details. Instead of adding lots of decorations, focus on a clean face, a well-positioned scarf, and a neat hanging loop. These three elements are enough to make the snowman immediately recognizable and visually appealing.
Step 4: Paint the Snowman Face
Now comes the part that gives the ornament its personality. Paint two small eyes near the upper portion of the head bead. Add a dotted smile beneath them, leaving enough space for the nose in the center.
An orange triangular nose creates the classic carrot-inspired snowman expression. It does not need to be perfectly symmetrical. In fact, a slightly handmade appearance can make the ornament feel even more charming.
Allow the paint to dry fully before handling the face. Small details can be easier to control with a fine brush or other precise craft tool.
Easy Ways to Personalize Your Snowman Ornaments
One of the best things about homemade Christmas ornaments is that you are not limited to one design. Once you understand the basic construction, you can create a whole collection of snowmen that look related but not identical.
Experiment With Scarf Colors
Create a coordinated set by using the same fabric on every snowman, or make each ornament different. Traditional red and green patterns work well for classic Christmas decor. Black-and-white checks are ideal for farmhouse styling, while soft beige and cream fabrics can create a more understated winter palette.
Create Different Expressions
Small changes to the eyes, mouth, and nose can give each snowman its own personality. Try a wider smile on one ornament and a smaller dotted expression on another. You can also vary the size of the eyes or add tiny rosy cheeks for a softer look.
Mix Natural and Painted Wood
You do not necessarily have to paint every wooden bead. Leaving some areas in their natural wood tone can introduce warmth and texture. A combination of painted and unfinished beads can create a rustic Christmas ornament that feels especially handmade.
Pro Tip: If you are making several ornaments, finish one complete snowman first. Use it as your visual guide for the rest of the set. This makes it easier to keep the proportions, scarf placement, and facial details consistent.
Where to Use Handmade Snowman Ornaments
These DIY Christmas ornaments are versatile enough to work in many parts of a holiday home. Their compact size makes them especially useful when you want to add handmade details without overwhelming a display.
- Christmas tree: Hang several snowmen among evergreen branches for a cozy handmade collection.
- Gift wrapping: Tie one onto a wrapped present as a decorative keepsake.
- Garlands: Combine snowman ornaments with greenery, ribbons, and natural textures.
- Seasonal trays: Place a few finished pieces beside pinecones and other winter decorations.
- Holiday baskets: Add handmade ornaments to a basket of seasonal decor for extra visual interest.
- Craft gifts: A small collection can make a thoughtful handmade present for someone who enjoys rustic Christmas decor.
Tips for a More Professional Finished Look
Simple crafts often look their best when the finishing details receive as much attention as the main construction. Before calling your ornament finished, take a moment to inspect the twine, scarf, paint, and overall shape.
- Keep the twine loop centered so the ornament hangs evenly.
- Make sure knots are tight and tucked neatly where possible.
- Trim loose fabric threads before attaching the scarf.
- Use small amounts of glue rather than applying too much.
- Let painted details dry completely before moving the ornament.
- Step back and view the snowman from a short distance to check its overall balance.
The goal is not perfection. Handmade Christmas crafts are appealing precisely because they have a personal quality. Slight differences between individual snowmen can make a finished collection feel more authentic and special.
Make It a Fun Holiday Craft Project
This project can also become a relaxing group activity. Set out the wooden beads, fabric scraps, twine, and paint, then let everyone create their own version. Children can help choose scarf fabrics and colors, while adults can handle steps that require hot glue or detailed painting.
For a larger Christmas craft session, prepare the materials ahead of time. Cut fabric strips in advance, portion out the beads, and organize the paint colors. This keeps the creative process flowing and makes cleanup easier.
You can even turn the project into a personalized ornament tradition. Add a small handwritten year on the back of each snowman or create one ornament for every family member. Over time, a collection of handmade snowmen can become a meaningful part of your Christmas decorating routine.
At a Glance
Quick Points
- Simple materials create a charming handmade ornament.
- Wooden beads form the snowman while twine creates the hanger.
- Fabric scarves add color, texture, and personality.
- Painted facial details bring each snowman to life.
- Customize the design to match your Christmas decorating style.
Conclusion: A Simple Christmas Ornament With Handmade Charm
DIY beaded snowman ornaments prove that beautiful Christmas decorations do not have to require complicated techniques or a long list of supplies. A few wooden beads, natural twine, a scrap of fabric, and some paint can become a cheerful seasonal decoration with plenty of personality.
The simple construction makes this project especially appealing for beginners, while the customization options give experienced crafters plenty of room to experiment. Change the scarf, adjust the colors, create different expressions, or build a coordinated collection for your tree.
Most importantly, these handmade snowmen bring the feeling of a thoughtful craft into your holiday decorating. Whether you make one as a small accent or create an entire family of ornaments, the finished pieces can add warmth and character to your Christmas display year after year.
Final Tip: Keep a few extra wooden beads and fabric scraps after finishing your first batch. They can be used later to create additional snowmen, matching gift decorations, or an entirely new set of handmade Christmas ornaments.