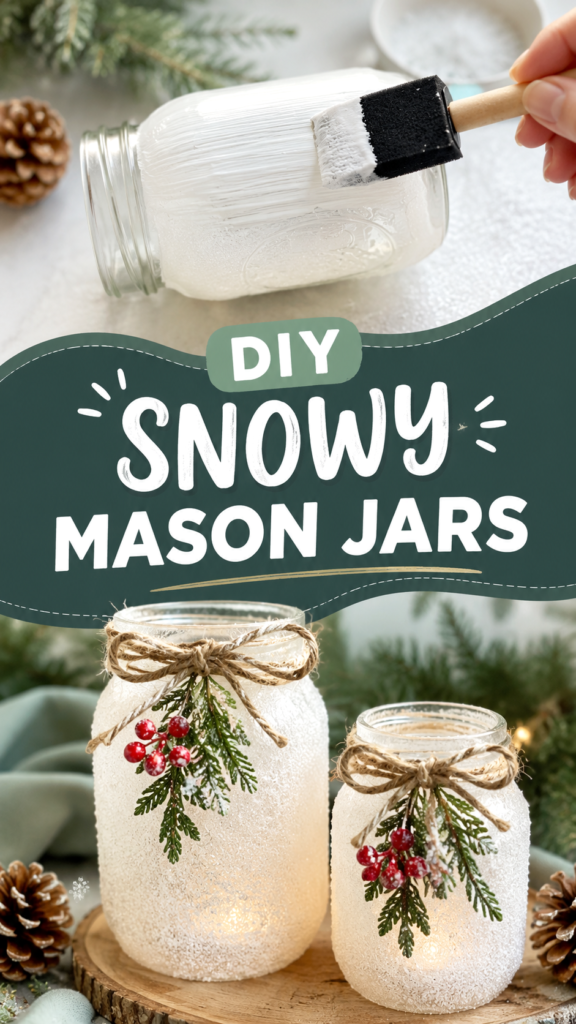
Christmas decorating does not have to be complicated to make a beautiful impression. A few simple supplies can transform ordinary mason jars into frosty, winter-inspired accents that look right at home on a mantel, dining table, shelf, or holiday centerpiece. These DIY snowy mason jars combine a soft white finish with rustic twine, evergreen sprigs, red berries, and warm candlelight for a cozy Christmas look that feels handmade and inviting.
If you are searching for easy Christmas decorations DIY ideas, snowy mason jars are a wonderful project to add to your holiday craft list. They are visually striking without requiring an elaborate design, and the finished jars can be customized to match everything from rustic farmhouse decor to a more natural winter theme.
Key Takeaways
- Turn simple mason jars into charming snowy Christmas decorations.
- Use a frosted white finish to create a soft winter-inspired appearance.
- Decorate the jars with twine, greenery, berries, or other natural accents.
- Add warm lighting inside the jars for an inviting holiday glow.
- Arrange several jars together to create an easy seasonal centerpiece.
Why Snowy Mason Jars Make Beautiful Christmas Decorations
Mason jars are one of those versatile craft supplies that can be reinvented for almost any season. For Christmas decorating, their simple glass shape provides the perfect foundation for a snowy makeover. The frosted appearance shown in this style of project gives the jars the look of freshly chilled winter glass while keeping the overall design soft and understated.
The magic comes from combining contrasting textures. A snowy white surface creates the wintry foundation, while rough twine adds rustic character. Small evergreen branches introduce a natural green element, and bright red berries provide just enough traditional Christmas color to make the arrangement feel festive.
Important: The most effective holiday crafts often rely on a small number of complementary details rather than adding decorations everywhere. For snowy mason jars, the frosted finish is the star, while greenery, twine, and berries work as simple accents.
What You Need for a Snowy Mason Jar Project
One reason this Christmas craft is so appealing is that the basic design is straightforward. You can adapt the materials depending on the look you want and the supplies already available in your craft collection.
- Clean glass mason jars
- White paint or a suitable frosted decorative coating
- A small foam brush or craft brush
- Natural twine or rustic cord
- Evergreen sprigs or similar greenery
- Small red berries or other seasonal accents
- Optional warm battery-operated lights or LED candles
- Newspaper or a protective surface for crafting
You do not need to use every decorative element listed above. A jar with only a snowy finish and a simple twine bow can look elegant, while another jar can receive a fuller arrangement of greenery and berries. The ability to adjust the details makes this project easy to personalize.
Choosing the Right Mason Jars
Different jar sizes can create different decorating effects. Taller jars work beautifully as lantern-style accents, while smaller jars are useful for clustered arrangements or tabletop displays. Using two or three jars in different sizes can also create visual height without requiring complicated decorations.
Before decorating, make sure the jars are clean and completely dry. A clean glass surface gives your decorative coating a better foundation and helps the finished project look neat.
How to Create Snowy Mason Jars
The basic technique is simple enough for a relaxed afternoon craft session. The goal is not to make every brushstroke perfectly uniform. A slightly textured finish can actually enhance the handmade, snowy appearance.
1. Prepare Your Work Area
Place your jars on a protected surface before you begin. Newspaper, cardboard, or a disposable craft mat can help keep your work area clean. Arrange your brushes, decorative materials, and drying space nearby so you can work without constantly moving supplies around.
2. Apply the Snowy Finish
Use a foam brush or suitable craft brush to apply a thin layer of white decorative coating to the outside of the jar. Work around the glass gradually rather than applying a very heavy layer all at once. Visible brush texture can help create the appearance of snowy frost.
Depending on the product you use, more than one coat may be helpful. Allow each layer to dry according to the product directions before adding another. The finished surface should look softly frosted rather than completely opaque if you want a little glass texture to remain visible.
3. Let the Jars Dry Completely
Patience is an important part of a polished DIY Christmas decoration. Give the jars enough time to dry before wrapping them with twine or adding decorative branches. Handling the surface too early can leave fingerprints or disturb the finish.
4. Add a Rustic Twine Bow
Wrap natural twine around the neck of the jar and finish it with a simple bow. The rough texture of the twine contrasts beautifully with the smooth glass and soft white surface. It also gives the finished jar a cozy farmhouse-inspired quality.
5. Add Greenery and Red Berries
Tuck a small evergreen sprig underneath the twine and add a few red berries for a classic Christmas accent. Keep the arrangement relatively compact so the frosted jar remains the main visual feature.
For a softer winter arrangement, use mostly greenery with only a small amount of red. For a more traditional holiday style, increase the berry accents. You can also experiment with other seasonal textures that coordinate with your existing Christmas decorations.
Expert Insight
A balanced Christmas display usually looks more intentional when one element acts as the visual foundation. Here, the snowy white jar provides that foundation. Natural greenery, warm lighting, and small red accents then add color and texture without overwhelming the design.
Ways to Use Snowy Mason Jars Around the Home
Once the jars are finished, there are plenty of ways to incorporate them into your Christmas decorating. Their neutral snowy appearance works with a wide range of seasonal styles, making them useful beyond a single centerpiece.
Create a Cozy Tabletop Centerpiece
Place several snowy jars on a wooden tray or natural wood slice to create an easy centerpiece. Varying the jar heights adds dimension and makes the arrangement more interesting. Pinecones, greenery, or additional natural textures can be placed around the base to complete the display.
Use Them as Holiday Lanterns
A warm LED light inside a frosted jar can create a gentle glow through the snowy surface. Battery-operated options are especially convenient for decorative displays because they avoid the need for an electrical outlet.
Pro Tip: If you want the frosted surface to remain the focus, choose a warm, subtle light rather than an overly bright one. A gentle glow can make the texture of the snowy finish much more noticeable.
Decorate a Mantel or Shelf
Snowy mason jars can be grouped with other neutral Christmas decorations on a mantel, bookshelf, entryway table, or open shelving. Pair them with wood, greenery, pinecones, and soft textiles for a cohesive winter-inspired arrangement.
How to Customize Your DIY Christmas Decorations
The beauty of DIY Christmas decorations is that there is no requirement to reproduce one exact look. Use the snowy mason jar concept as a starting point and adjust the colors, textures, and accessories to suit your home.
Try a Minimalist Winter Look
For a clean, understated display, keep the jar mostly white and use only a small twine bow. A neutral arrangement works especially well when your existing holiday decor already includes whites, creams, wood tones, or soft greens.
Lean Into Rustic Christmas Style
Natural twine, wood slices, pinecones, evergreen branches, and red berries can give the project a distinctly rustic feel. Combining these textures creates warmth and makes the snowy surface feel especially cozy.
Make a Coordinated Jar Collection
Instead of making just one jar, create a small collection in different sizes. Keep the snowy finish consistent while changing the greenery or ribbon details slightly. Grouping related pieces together creates a stronger decorative impact than scattering unrelated crafts throughout a room.
Tips for a More Polished Finish
- Start with clean glass. Dust and residue can interfere with an even decorative finish.
- Build the snowy texture gradually. Thin layers are easier to control than one thick application.
- Allow adequate drying time. This helps protect the finish while you add the remaining details.
- Keep decorative accents proportional. Small jars look best with small greenery arrangements.
- Repeat materials. Using the same twine, greenery, or color accents across several jars creates a coordinated display.
- Think about placement. A group of jars often looks more intentional when arranged at different heights.
Christmas Craft Ideas to Pair With Snowy Mason Jars
If you are building a complete DIY Christmas display, these jars can become part of a larger handmade collection. Pair them with rustic wood accents, pinecones, evergreen cuttings, neutral ornaments, or other simple seasonal crafts.
The strongest combinations usually share a few common elements. Repeating natural materials, limiting the color palette, and mixing smooth and textured surfaces can make even inexpensive decorations feel thoughtfully designed.
Build a Simple Holiday Display
Start with the snowy mason jars as the main focal point. Add a wooden base underneath, then place greenery or pinecones around the edges. Finish with a few warm lights to bring the arrangement together. This approach keeps the display visually interesting while avoiding a cluttered appearance.
At a Glance
- Style: Cozy, rustic, snowy, and festive
- Main material: Glass mason jars
- Key detail: Frosted white finish
- Decor accents: Twine, greenery, and red berries
- Best use: Centerpieces, shelves, mantels, and glowing holiday displays
Conclusion: A Simple Way to Add Winter Charm
Snowy mason jars are a simple example of how everyday materials can become beautiful Christmas decorations with a little creativity. The combination of frosted white glass, rustic twine, natural greenery, and bright seasonal berries creates a warm winter look without requiring a complicated craft technique.
Whether you make one jar for a small accent or several for a complete holiday centerpiece, this DIY project offers plenty of room for personalization. Change the greenery, adjust the amount of snowy texture, add warm lighting, or coordinate the colors with your existing Christmas decor.
If you love cozy handmade Christmas decorations, snowy mason jars are an easy project worth saving for the holiday season. Gather a few simple supplies, add your own creative touches, and turn ordinary jars into charming winter accents that make your home feel extra festive.