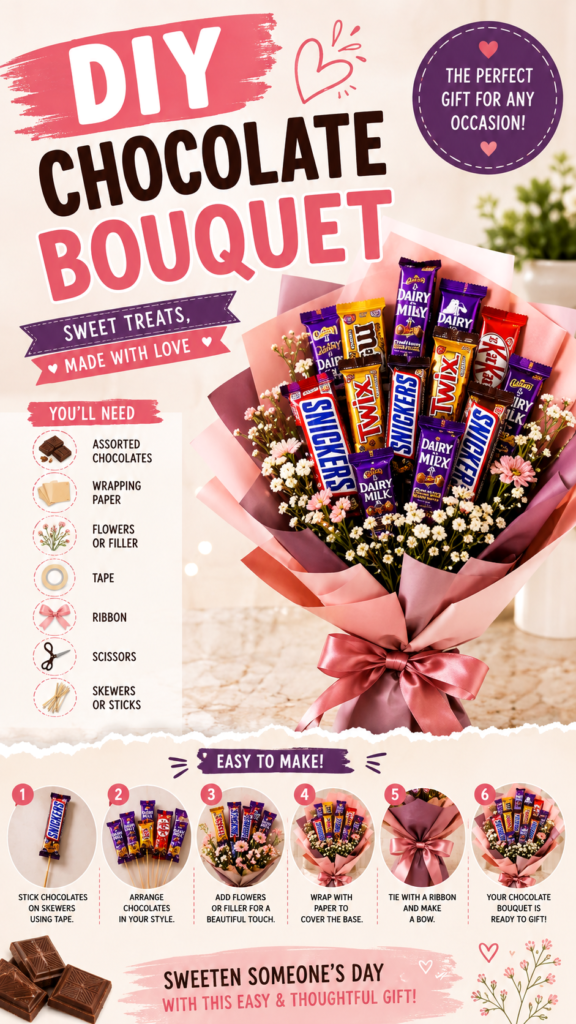
Looking for a creative handmade gift that feels personal, cheerful, and surprisingly easy to make? A DIY chocolate bouquet is a wonderful way to turn favorite treats into a beautiful arrangement that looks like a traditional flower bouquet but offers a delicious twist. With assorted chocolate bars, a little wrapping paper, decorative filler, wooden skewers, double-sided tape, and ribbon, you can create a thoughtful gift for birthdays, anniversaries, Valentine’s Day, congratulations, or simply to brighten someone’s day.
The charm of a chocolate bouquet is that it combines creativity with personalization. Instead of choosing a standard store-bought gift, you can select chocolates based on the recipient’s favorites and arrange them in colors and patterns that suit the occasion. The finished bouquet can be elegant, playful, colorful, or wonderfully simple depending on the materials you choose.
Key Takeaways
- A chocolate bouquet is an easy alternative to a traditional gift arrangement.
- Mixing different chocolate sizes and colors creates a fuller, more interesting bouquet.
- Wooden skewers and double-sided tape help keep the chocolates securely positioned.
- Flowers, greenery, and decorative filler add softness and visual balance.
- Wrapping paper and ribbon transform the arrangement into a polished handmade gift.
- The design can be customized for birthdays, anniversaries, Valentine’s Day, and other celebrations.
Why Make a DIY Chocolate Bouquet?
A chocolate bouquet is more than a collection of sweets placed together. The arrangement gives ordinary chocolate bars a completely different presentation. When the treats are positioned at different heights and surrounded by flowers or filler, they become the focal point of a gift that feels carefully prepared.
It is also a flexible project. You do not need to follow one exact design. A bouquet can contain a few favorite chocolate bars or a generous assortment of different treats. You can use pastel wrapping for a soft romantic look, bold colors for a birthday, or neutral paper for a more sophisticated presentation.
The most important idea is to design around the recipient. Their favorite chocolates, preferred colors, and the occasion can all influence the final arrangement. That personal touch is what makes a handmade chocolate bouquet feel much more special than an ordinary box of sweets.
What You Need for a Chocolate Bouquet
The project shown in the design uses simple craft and gift-wrapping supplies. Most of the materials are easy to find, and many can be adapted according to what you already have at home.
- Assorted chocolates: Choose a combination of bars, individual treats, and different package sizes.
- Wrapping paper: Two or more coordinating sheets can add depth to the bouquet.
- Artificial flowers or filler: Small flowers and greenery help fill empty spaces between the chocolates.
- Double-sided tape: Useful for attaching chocolate packages to skewers.
- Ribbon: Choose a ribbon that complements the wrapping paper and creates a polished finish.
- Scissors: Needed for cutting paper, tape, ribbon, and other materials.
- Wooden skewers or sticks: These provide the structure that allows the chocolate bars to stand upright.
Choosing the Right Chocolates
The best chocolate bouquet usually combines variety with a sense of coordination. Look for packages with different heights, shapes, and wrapper colors. Taller bars can create the upper portion of the arrangement, while smaller treats can be positioned toward the front.
You can also create a color theme. Purple, pink, red, gold, and brown wrappers can work beautifully together, while a more restrained palette can create an elegant bouquet. If you know the recipient’s favorite chocolate, make that the star of the arrangement and use other treats as supporting pieces.
There is no need to make every chocolate identical. In fact, variety can make the bouquet look fuller and more dynamic. The goal is to create a balanced arrangement rather than a perfectly symmetrical one.
How to Make a DIY Chocolate Bouquet Step by Step
The process is straightforward, but taking a little time to arrange the chocolates before permanently attaching everything can make a big difference. Build the bouquet gradually so you can adjust the height, spacing, and overall shape as you go.
Step 1: Attach the Chocolates to Skewers
Start by preparing the chocolate bars that will form the bouquet. Place a small piece of double-sided tape where the wooden skewer will meet the back of the chocolate package. Press the skewer firmly against the tape and make sure the connection feels secure.
Keep the chocolate packaging visible from the front. The skewer should provide support without distracting from the treat itself. For heavier chocolates, use enough tape to create a stable attachment, while avoiding unnecessary pressure that could damage the packaging.
Step 2: Arrange the Chocolates
Once several chocolates are attached to skewers, begin arranging them into a loose bouquet shape. Place some taller pieces toward the back and shorter pieces toward the front. This creates layers and prevents the front chocolates from hiding everything behind them.
Try several arrangements before settling on one. Move pieces closer together or farther apart until the bouquet looks full without becoming crowded.
Pro Tip: Varying the height of the chocolate bars is one of the easiest ways to make a DIY chocolate bouquet look professionally arranged.
Step 3: Add Flowers and Filler
Now introduce the decorative elements. Small artificial flowers, delicate filler, and greenery can be placed between the chocolate bars. These details soften the strong rectangular shapes of the candy packages and help the bouquet resemble a traditional floral arrangement.
Use filler strategically rather than covering every open space. A few clusters around the chocolates can be enough to create a balanced appearance. White or pastel flowers can provide contrast against colorful chocolate wrappers, while greenery can give the arrangement a fresh, natural feel.
Step 4: Prepare the Wrapping Paper
Choose wrapping paper that complements the chocolate packaging and decorative flowers. Layering two pieces of paper can create a richer appearance and give the finished bouquet more structure.
Place the chocolate arrangement over the paper and bring the lower edges upward around the skewers. Fold the paper gradually rather than pulling everything tightly at once. This helps create the characteristic fan-like shape seen in gift bouquets.
Expert Insight
Think of the bouquet as a layered composition. The chocolates provide the visual focus, flowers soften the arrangement, and wrapping paper creates the frame. When each element has a clear role, even inexpensive materials can look polished and intentional.
Step 5: Secure the Bouquet
Once the arrangement has the shape you want, gather the skewers near the base. Hold them firmly and adjust the wrapping paper around the lower section. The bouquet should feel secure enough to carry without the chocolates shifting dramatically.
Fold the wrapping paper around the base and use tape where necessary to hold the layers in place. Keep the top of the paper open and relaxed so the chocolate bars remain easy to see.
Step 6: Finish with a Ribbon
The ribbon is the finishing detail that brings the entire gift together. Wrap it around the gathered base and tie a generous bow. A satin-style ribbon can create a romantic finish, while cotton or textured ribbon can give the bouquet a more casual handmade character.
Before trimming the ribbon ends, check the bow from the front. Adjust the loops until they sit evenly, then cut the tails at your preferred length. A slightly oversized bow can make the bouquet feel especially festive.
How to Make Your Bouquet Look Fuller
A common challenge with handmade gift bouquets is creating enough visual volume. Fortunately, you do not need a huge number of chocolates to achieve a generous look. Layering is more important than quantity.
- Place the tallest chocolates toward the center or back.
- Position medium-sized bars around the middle layer.
- Use smaller chocolates to fill gaps near the front.
- Add flowers and greenery between visible gaps.
- Use layered wrapping paper to increase the visual width of the bouquet.
- Keep the base gathered tightly while allowing the top to spread outward.
If the bouquet still looks sparse, add more filler before adding more chocolate. Decorative flowers can occupy empty spaces without making the arrangement feel heavy.
Personalizing Your Chocolate Bouquet
The beauty of a chocolate bouquet DIY project is how easily it can be customized. Start with the recipient’s personality and the reason for the gift. A birthday bouquet can be colorful and playful, while an anniversary arrangement may look better with romantic colors and elegant ribbon.
For Birthdays
Use bright wrapping paper and a mixture of favorite chocolates. You can add a small birthday card between the treats or attach a short message to one of the skewers. A combination of different package colors can make the arrangement feel celebratory without requiring additional decorations.
For Anniversaries
Choose a coordinated color palette and keep the arrangement slightly more refined. Soft pinks, deep reds, cream tones, or neutral wrapping can work well. A simple ribbon and a small personal message can provide the final touch.
For Valentine’s Day
A chocolate bouquet is naturally suited to Valentine’s Day because it combines sweets with a handmade presentation. Pink, red, and soft neutral tones can create a romantic look. Heart-shaped accents or a short handwritten note can personalize the gift without making the design overly complicated.
For Congratulations
For graduations, new jobs, achievements, or other milestones, choose cheerful colors and arrange the chocolates in a bold, energetic pattern. The bouquet can be adapted to match the recipient’s favorite colors for an even more personal result.
Simple Tips for a Better DIY Gift
Small details can make a big difference in the finished chocolate bouquet. Before you begin, place all your materials on a clean work surface. This makes it easier to compare colors and see which chocolates should be placed together.
- Plan the color palette first. Choose wrapping paper and ribbon that work with the chocolate wrappers.
- Build in layers. Avoid arranging every chocolate at the same height.
- Check stability. Make sure each chocolate is firmly attached to its skewer.
- Keep the focal point visible. Do not let flowers or filler completely cover the chocolates.
- Use the ribbon as a finishing accent. A well-shaped bow can make a simple bouquet look much more polished.
- Add a personal message. Even a small note can make the handmade gift feel more meaningful.
A thoughtful presentation does not require complicated crafting skills. Consistent colors, varied heights, secure attachments, and a clean ribbon finish are enough to transform simple chocolate bars into an impressive handmade gift.
Common Mistakes to Avoid
When making your first chocolate bouquet, a few simple problems can affect the final appearance. One of the most common is attaching chocolates before deciding on the overall arrangement. It is much easier to make changes when the pieces are still loose.
Another issue is using too much decorative filler. Flowers and greenery should complement the chocolates, not compete with them. If the bouquet starts looking more like a flower arrangement than a chocolate gift, remove a few decorative pieces and allow the treats to become the focus again.
It is also worth paying attention to the base. If the wrapping paper is too loose, the bouquet can lose its shape. Gather the paper firmly around the skewers and secure it before tying the ribbon.
Why This Handmade Gift Works for So Many Occasions
A chocolate bouquet has a universal appeal because it combines something familiar with a creative presentation. It can feel casual enough for a friendly surprise while still looking special enough for an important celebration.
It also gives the maker plenty of room for creativity. You can change the chocolates, flowers, wrapping paper, ribbon, colors, and message without changing the basic technique. That makes the project useful throughout the year rather than being limited to one holiday.
For anyone who enjoys DIY gift ideas, this project is especially satisfying because the final result is both decorative and practical. The recipient can admire the bouquet first and enjoy the chocolates afterward.
Quick Points
- Choose a mix of chocolate sizes and wrapper colors.
- Build the bouquet from back to front for better visibility.
- Add flowers or filler to soften empty spaces.
- Coordinate the wrapping paper and ribbon.
- Personalize the finished bouquet with a small message.
A Sweet and Creative Gift to Make at Home
A DIY chocolate bouquet is a simple project with plenty of room for personality. With a handful of chocolates, basic craft supplies, attractive wrapping paper, and a little creativity, you can create a gift that looks thoughtful from the moment it is presented.
The key is not perfection. Focus on a balanced arrangement, secure each chocolate carefully, add just enough decorative filler, and finish everything with a beautiful ribbon. From there, the bouquet can be adapted to almost any celebration or recipient.
Whether you are preparing a birthday surprise, a Valentine’s Day gift, an anniversary gesture, or a simple handmade treat for someone special, a chocolate bouquet offers a fun way to make an ordinary collection of sweets feel extraordinary. Choose the recipient’s favorite chocolates, experiment with your arrangement, and enjoy the process of creating something made with care.
Conclusion
Creating a chocolate bouquet at home is an easy and rewarding way to turn everyday treats into a memorable handmade gift. The combination of colorful chocolates, delicate flowers, layered wrapping paper, and a finishing ribbon creates an arrangement that looks festive, personal, and full of charm.
Start with a simple design and build it one layer at a time. Once you understand how the chocolates, skewers, filler, wrapping, and ribbon work together, you can experiment with different colors and arrangements for every occasion. Most importantly, remember that the personal choices you make are what give the bouquet its character.
Gather your favorite chocolates, choose a beautiful paper and ribbon combination, and create a sweet bouquet that is made to make someone smile.
Tags
Chocolate Bouquet Chocolate Bouquet DIY DIY Gift Ideas Handmade Gifts Edible Gifts Birthday Gift Ideas Valentine’s Day DIY Creative Gift Ideas