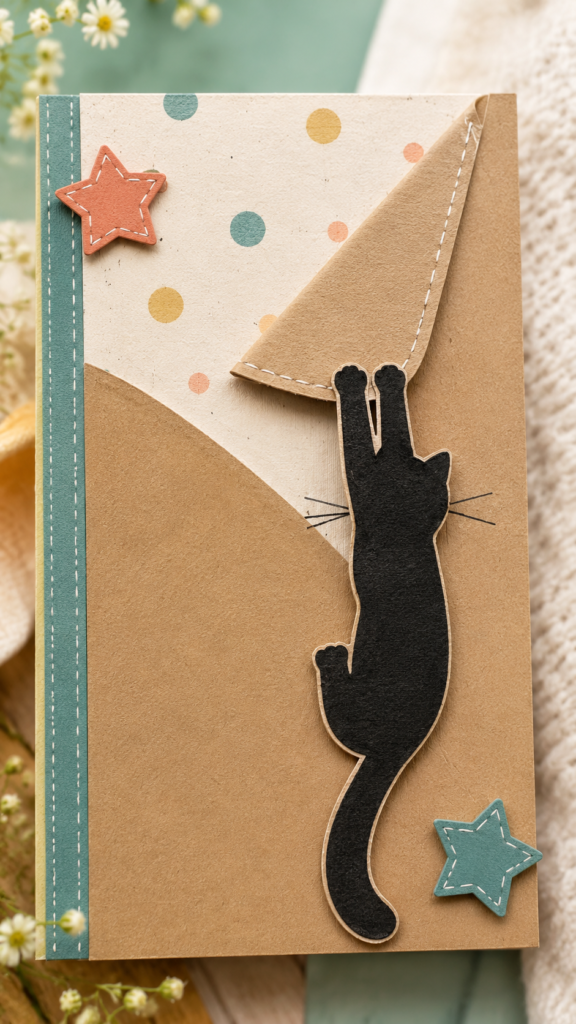
A handmade birthday card can turn a simple message into something genuinely memorable. This charming DIY design combines kraft paper, colorful patterned paper, playful star embellishments, and a fun black cat silhouette to create a card that feels personal, creative, and full of character. It is a wonderful example of how a few accessible craft materials can become a thoughtful birthday keepsake.
Whether you are making a card for a friend, family member, child, or anyone who enjoys handmade surprises, this birthday DIY project offers plenty of room for personalization. The layered paper construction gives the card visual depth, while the cat detail adds a playful focal point that immediately catches the eye.
Key Takeaways
- Create a personalized birthday card with simple paper-crafting techniques.
- Use kraft paper as a warm, natural-looking base for a handmade design.
- Add patterned paper, stars, and cutout shapes for dimension and personality.
- Customize the central decoration to match the recipient’s interests.
- Keep the message simple so the handmade details remain the visual focus.
Why Handmade Birthday Cards Feel So Special
Store-bought cards can be beautiful, but a handmade birthday card communicates something different. The time spent choosing materials, cutting shapes, arranging layers, and writing a personal message becomes part of the gift itself. Even small imperfections can make the finished card feel more authentic because they show that it was made specifically for someone.
The design shown here has a wonderfully tactile quality. Kraft-colored paper creates a neutral foundation, while the patterned section introduces soft color and visual movement. The contrasting cat silhouette adds a bold graphic element, making the card feel playful without becoming overly complicated.
Important: The strongest handmade cards usually do not need dozens of decorations. One memorable focal point, a few complementary details, and a heartfelt message can create a much more balanced result.
What Makes This DIY Birthday Card Stand Out
Several design choices work together to make this birthday DIY idea especially appealing. Instead of covering the entire surface with decorations, the composition uses distinct sections. The kraft-paper area provides plenty of visual breathing room, while the patterned paper peeking from behind the folded flap creates an unexpected layer.
The Kraft Paper Foundation
Kraft paper is an excellent choice for DIY greeting cards because its warm brown tone works with both bright and muted colors. It also gives a handmade, slightly rustic appearance that pairs naturally with paper embellishments.
If you do not have kraft cardstock, you can experiment with recycled paper, heavyweight brown cardstock, or another neutral material. The important thing is to choose something sturdy enough to hold the layered decorations without bending too easily.
The Decorative Paper Layer
A small amount of patterned paper can make a surprisingly big difference. In this design, the colorful dotted pattern introduces a cheerful birthday mood while remaining partially hidden beneath the folded kraft-paper section.
Try choosing a pattern that complements the main decoration rather than competing with it. Polka dots, tiny stars, stripes, miniature flowers, or geometric prints can all work beautifully for a birthday card.
The Playful Cat Silhouette
The black cat cutout is the main character of the design. Its long shape creates a strong vertical line across the card, while the raised paws make it appear to interact with the folded paper flap. This simple visual trick gives the card a sense of movement and personality.
You can recreate this idea with a cat silhouette or replace it with another shape that suits the birthday recipient. A favorite animal, hobby-related icon, flower, balloon, heart, or simple geometric character can become the centerpiece.
Materials for a Simple Birthday DIY Card
One of the best things about this project is that you can adapt it to supplies you already have at home. You do not need a large collection of specialist crafting equipment to achieve a similar handmade effect.
- Heavyweight cardstock for the card base
- Kraft paper or brown cardstock for the layered section
- Patterned scrapbook paper
- Black or dark cardstock for the cat silhouette
- Colored paper for stars or other embellishments
- Scissors or a craft cutting tool
- Paper glue or double-sided adhesive
- Pencil and ruler
- Black fine-tip pen for handwritten details
- Optional decorative tape, stitching details, or paper textures
Choosing the Right Color Palette
The reference design demonstrates how neutral kraft paper can be paired with small amounts of color. Instead of using many unrelated shades, choose two or three accent colors and repeat them throughout the card. This creates a more intentional appearance.
Soft teal, coral, mustard, cream, and charcoal make a particularly friendly combination for this style. You can also adapt the palette to the recipient’s favorite colors, making the birthday card even more personal.
How to Create Your Own Handmade Birthday Card
1. Prepare the Card Base
Start with a sheet of sturdy cardstock and fold it neatly in half. Press the fold firmly with a ruler or bone folder if you have one. A crisp fold gives the entire project a cleaner, more finished appearance.
2. Add a Decorative Side Strip
A narrow strip of patterned or colored paper along one side can frame the card and introduce another layer of visual interest. Keep the strip relatively narrow so it works as an accent rather than dominating the composition.
3. Create the Layered Paper Pocket
Cut kraft paper into a shape that covers the lower portion of the card. Add a second piece with an angled or folded edge to create the pocket-like effect. The layered construction is one of the most distinctive parts of this birthday DIY project.
Before gluing anything permanently, arrange the pieces on the card and check their proportions. Moving each element slightly can dramatically improve the final composition.
4. Cut the Main Decorative Shape
For a cat-inspired version, draw or trace a simple cat silhouette onto dark cardstock. The shape does not need to be extremely detailed. A recognizable outline with a curved tail and raised paws is enough to create the playful effect.
If precision cutting is difficult, simplify the silhouette. Clean, uncomplicated shapes often look better than intricate pieces with rough edges.
5. Add Small Decorative Details
Finish the card with a few small accents. Stars, dots, faux stitching, decorative tape, or tiny cut-paper shapes can fill empty areas without making the design feel crowded.
Expert Insight
Think of the card as a small piece of visual storytelling. Give the eye one main focal point, then use smaller decorations to guide attention around it. This keeps a handmade design playful while still looking polished.
Personalizing the Birthday Message
The written message is just as important as the decoration. The example uses a simple handwritten birthday greeting, which fits naturally with the handcrafted appearance. You can keep your message short and warm rather than trying to fill every available space.
Consider messages such as:
- Happy Birthday!
- Wishing you a wonderfully creative year.
- Hope your birthday is full of happy moments.
- Have the best birthday ever!
- Made especially for you.
For a more personal touch, add an inside message that references a shared memory, an inside joke, or something you appreciate about the recipient. That small detail can make a simple DIY birthday card much more meaningful.
Easy Ways to Adapt This Birthday DIY Idea
The basic layout can become the starting point for many different handmade birthday cards. Once you understand the combination of a neutral base, layered paper, a focal shape, and small accents, you can create completely different versions.
For Animal Lovers
Replace the cat with a dog, rabbit, bird, butterfly, bear, or another favorite animal. Choose colors and patterns that match the recipient’s personality.
For a Minimalist Look
Use only two or three colors and reduce the number of embellishments. A kraft-paper card with one bold silhouette and a clean handwritten message can look sophisticated and modern.
For a More Colorful Birthday Card
Introduce brighter scrapbook paper, colorful stars, confetti shapes, or layered balloons. Keep the background relatively simple so the additional color remains easy to appreciate.
Tips for a Cleaner Handmade Finish
A handmade project does not have to look messy. Taking a few extra moments during preparation can make a significant difference.
- Measure paper pieces before cutting them.
- Use sharp scissors for smoother edges.
- Test the arrangement before applying adhesive.
- Apply glue sparingly to prevent wrinkled paper.
- Allow layered pieces to dry flat when possible.
- Repeat accent colors throughout the design for visual consistency.
- Leave some empty space so the main decoration remains easy to see.
Pro Tip: If you want the card to feel especially dimensional, use small pieces of foam adhesive behind the main cutout. The slight lift creates natural shadows and helps the focal element stand out from the kraft-paper background.
Why This Project Works for Any Skill Level
This birthday DIY idea is approachable because most of the design comes from basic paper shapes rather than complicated techniques. Beginners can create a simplified version, while experienced crafters can add more layers, texture, stitching effects, or intricate cutouts.
It is also easy to scale. You can make a small, simple card in a short crafting session or spend more time creating a detailed layered design. The same concept can be adapted for different ages, personalities, celebrations, and color preferences.
At a Glance
- Style: Playful, handmade, and slightly rustic
- Main materials: Cardstock, kraft paper, patterned paper, and embellishments
- Focal point: A personalized paper cutout
- Best feature: Easy-to-customize layered construction
- Perfect for: Handmade birthday cards and thoughtful DIY gifts
Conclusion
A creative birthday DIY card does not need expensive supplies or advanced crafting skills to make an impression. The charm comes from thoughtful details, playful composition, and the personal effort behind the finished piece. A simple kraft-paper base can become something special when combined with patterned layers, a distinctive cutout, and a handwritten birthday message.
Use this idea as inspiration rather than a strict template. Change the colors, replace the cat with a favorite shape, experiment with different papers, or create your own decorative theme. The most meaningful handmade birthday cards are the ones that reflect the person receiving them.
Most importantly, have fun with the process. A handmade card is more than paper and decoration. It is a small, personal way to celebrate someone and show that you took the time to create something just for them.
Tags
Birthday DIY DIY Birthday Card Handmade Cards Birthday Crafts Paper Crafts Cat Birthday Card DIY Greeting Cards Creative DIY Gifts