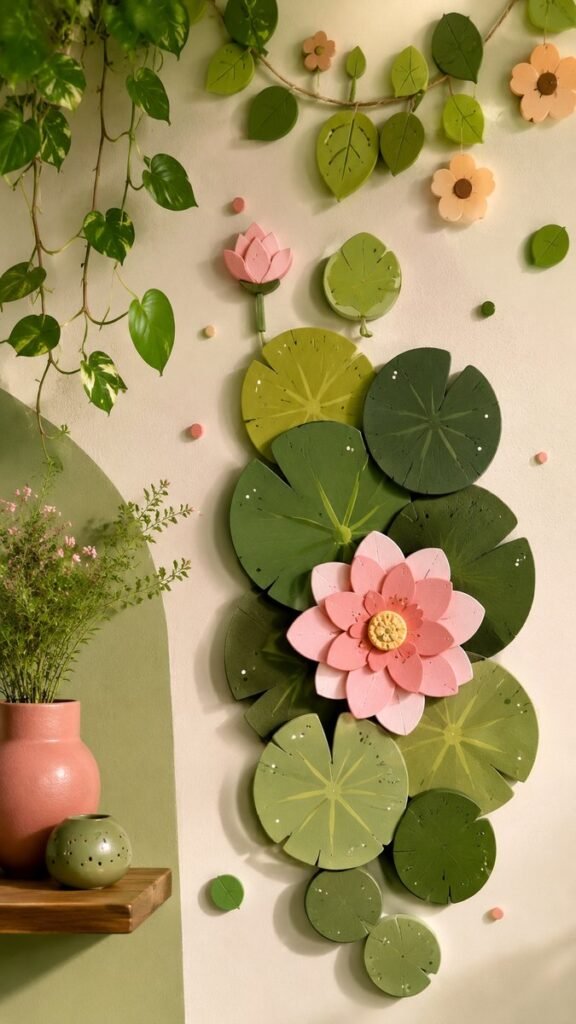
If you love creative spaces that feel fresh, cozy, and a little different, botanical wall decor is a beautiful place to start. This nature-inspired room features layered green leaves, playful flowers, soft pink accents, and handmade-looking shapes arranged into an eye-catching wall display. The result is colorful without feeling overwhelming, making it a wonderful source of inspiration for anyone searching for DIY room decor ideas, creative wall art, or simple ways to bring more personality into a room.
Key Takeaways
- Layered leaf shapes can create a dramatic botanical wall feature.
- Soft pink flowers add contrast and warmth to a green-focused palette.
- Handmade-style decor can make a room feel more personal and creative.
- A small number of colors can create a cohesive DIY room decor theme.
- Wall arrangements work especially well when different shapes and sizes are mixed.
- Natural textures and plant-inspired details can make an indoor space feel more inviting.
Why Botanical Wall Decor Feels So Inviting
Botanical decor has a natural ability to soften a room. Green shades immediately bring attention to the wall while creating a connection with the outdoors. In this design, the combination of large rounded leaves, smaller scattered leaves, and delicate flowers gives the wall movement rather than leaving it looking flat or predictable.
What makes this type of nature-inspired room decor particularly appealing is the balance between structure and playfulness. The leaves are arranged in a flowing vertical composition, while the flowers and small decorative details break up the larger forms. This creates a visual path that encourages the eye to move from one part of the wall to another.
The look can work in many spaces, from bedrooms and reading corners to creative studios, home offices, entryways, and cozy relaxation areas. You do not need to recreate the exact arrangement to achieve the same feeling. The main idea is to combine botanical shapes, natural colors, and a few contrasting accents into a display that feels intentional.
The Beauty of Layered Leaf Wall Art
One of the strongest visual features of this room decor concept is the collection of overlapping leaf shapes. Instead of placing every piece separately, the leaves are grouped together to form a larger botanical installation. Some are dark green, some are lighter, and others sit between the two shades.
This layering technique is useful because it creates depth. Even simple flat decorative pieces can appear more dimensional when they overlap slightly. Different leaf sizes also prevent the arrangement from becoming repetitive.
Important: When designing a botanical wall display, variety is more effective than trying to make every element identical. Combine large leaves with smaller shapes, vary their angles, and leave a little breathing room between selected pieces so the overall arrangement feels natural.
Use Different Shades of Green
Green is the foundation of this look, but using one exact shade throughout can make a wall feel visually flat. A more interesting approach is to work with a small family of greens. Deep forest green can provide visual weight, medium green can connect the pieces, and lighter olive or leafy green can brighten the composition.
You can also introduce a muted sage or moss tone if you prefer a softer room. The key is to keep the palette connected. Too many unrelated shades can make a handmade wall arrangement appear scattered rather than cohesive.
Create a Natural Flow
A botanical wall does not have to follow a rigid grid. In fact, a slightly organic arrangement often looks more convincing. Try positioning larger leaves toward the center of the display and using smaller pieces around the edges. This can create the impression of growth while giving the installation a clear focal area.
Add Flowers for a Soft Pop of Color
The large pink flower in the center of the design provides an important contrast to the surrounding green leaves. Without the flower, the wall would have a much more monochromatic appearance. The pink accent immediately draws attention and gives the display a warmer, more cheerful personality.
Flowers can be used sparingly in DIY wall decor. You do not need dozens of colorful pieces. One larger flower can act as the focal point, while a few smaller flowers placed higher on the wall can visually connect the arrangement.
Soft coral, blush pink, peach, dusty rose, or muted terracotta can all complement leafy green. If your room already has neutral furniture, these colors can introduce personality without requiring a complete room makeover.
Make the Main Flower a Focal Point
A focal point gives your wall decor direction. In this example, the large layered flower naturally becomes the visual centerpiece because it contrasts with the darker leaves behind it. Its rounded petals also differ from the broad leaf shapes surrounding it.
When planning your own arrangement, consider placing the most detailed or colorful piece near the visual center. Surround it with simpler shapes so it remains noticeable rather than competing with too many other elements.
Expert Insight
The most successful DIY wall displays usually have one dominant idea, one focal point, and a supporting color palette. Here, botanical leaves establish the theme, green creates visual continuity, and the pink flower provides the standout detail. This simple formula can make a handmade project look thoughtfully designed.
How to Build a Similar DIY Room Decor Look
You can interpret this style in many ways depending on your materials, room size, and crafting preferences. The goal is not to duplicate every detail. Instead, use the visual principles to create a botanical wall that feels like your own.
1. Choose Your Wall and Overall Shape
Start by deciding where the arrangement will live. A narrow wall can benefit from a tall vertical design, while a wider wall may look better with a broader cluster. Think about nearby furniture, shelves, plants, and other decor before deciding how much space the display should occupy.
A vertical arrangement similar to this concept works particularly well beside a shelf, desk, dresser, or narrow corner because it uses wall height efficiently.
2. Plan the Leaf Arrangement
Lay your decorative pieces on the floor before attaching anything to the wall. Begin with the largest leaves, then fill the spaces with medium and small shapes. Experiment with overlapping pieces and slightly different angles.
- Place the largest leaf shapes first.
- Add medium-sized leaves around the main cluster.
- Use smaller leaves to soften empty spaces.
- Position your largest flower where you want the eye to land.
- Add small floral or decorative accents last.
3. Introduce Texture and Imperfection
The handmade appearance is part of the charm. Tiny variations, painted details, visible texture, and slightly irregular shapes can make a DIY project feel more authentic. You do not need every piece to have factory-perfect edges.
If you are crafting your own pieces, consider adding subtle painted veins to leaves or small surface details to flowers. These details are especially effective when viewed up close and can give simple shapes more character.
4. Balance the Empty Space
One of the easiest mistakes in wall decorating is filling every available area. Empty space is useful because it allows the main shapes to stand out. The reference-inspired arrangement uses open wall areas around the botanical cluster, which helps the leaves and flowers remain visually distinct.
Pro Tip: Step back from your wall frequently while arranging pieces. A composition that looks perfectly spaced up close can appear crowded from across the room. Viewing it from a distance makes it easier to spot areas that need more breathing room.
Pair Botanical Wall Decor With Simple Accessories
The surrounding decor matters just as much as the wall installation. A small wooden shelf, a rounded ceramic vase, or a simple potted plant can reinforce the natural theme without competing with the main display.
In the image, the warm wood surface and muted pink vessel complement the green and pink wall accents. This shows how small accessories can repeat colors from the main artwork and create a more connected room.
Try repeating one or two colors throughout the room. For example, if your wall art includes blush pink, a small pink planter or cushion can subtly echo that shade. If the wall contains several greens, a leafy houseplant can naturally reinforce the palette.
Color Combinations for Nature-Inspired Room Decor
A botanical theme does not have to mean green everywhere. Green works beautifully with warm neutrals and gentle accent colors. For a calm look, combine sage green with cream and soft beige. For something more playful, add blush pink or peach. Deeper green paired with warm wood can create a richer, cozy atmosphere.
- Sage + cream + blush: soft, peaceful, and airy.
- Olive + beige + terracotta: warm and earthy.
- Forest green + natural wood + peach: cozy with stronger contrast.
- Moss green + pale pink + warm white: playful and welcoming.
Where to Use This DIY Wall Decor Idea
A handmade botanical wall display can adapt to many areas of the home. In a bedroom, it can become a colorful accent behind a small side table or beside a dresser. In a home office, it can add softness to a practical workspace. In a reading nook, leafy shapes can reinforce the relaxed atmosphere.
You can also use a smaller version in an entryway or hallway. Because the design relies on shapes rather than bulky furniture, it can add visual interest without taking up floor space.
Small-Space Decorating
For a small room, keep the arrangement narrow and vertically oriented. Choose a few large leaves rather than covering an entire wall. A single statement flower can provide enough color to make the installation feel complete.
This approach is especially useful when you want a noticeable decor update without adding large furniture pieces. The wall becomes the canvas, while the rest of the room can remain relatively simple.
Simple Ways to Personalize the Design
The best DIY room decor reflects the person who lives there. You can personalize a botanical wall by changing the flower shapes, introducing different leaf silhouettes, or choosing colors that already appear elsewhere in your room.
Another option is to create seasonal variations. A spring-inspired display could feature lighter greens and soft pinks, while an autumn interpretation could introduce olive, rust, muted orange, and warm brown. Keeping the basic botanical concept consistent makes it easy to refresh the look without starting from scratch.
At a Glance
- Build the display around layered botanical shapes.
- Use several shades of green for depth.
- Add one strong flower as a colorful focal point.
- Repeat accent colors through nearby accessories.
- Leave enough empty wall space to keep the arrangement airy.
Conclusion: Create a Wall That Feels Like You
DIY room decor does not have to be complicated to make a memorable impact. This botanical-inspired concept shows how a collection of leaves, flowers, soft colors, and carefully arranged details can completely change the personality of a wall. The layered green shapes create depth, while the pink flower adds warmth and a clear focal point.
The most useful lesson is to focus on balance rather than exact replication. Choose a color palette you love, mix different shapes and sizes, create one central feature, and allow some open space around your design. Then bring the look together with a few simple natural accessories.
Whether you are refreshing a bedroom, decorating a cozy corner, or looking for a creative weekend project, DIY botanical wall decor offers an approachable way to make your space feel more personal. Start with a few leaves, add a favorite flower, experiment with placement, and let your own style guide the final arrangement.
Tags
DIY Room Decor Botanical Wall Decor DIY Wall Art Nature Inspired Decor Handmade Home Decor Leaf Wall Decor Creative Room Ideas Botanical Home Style