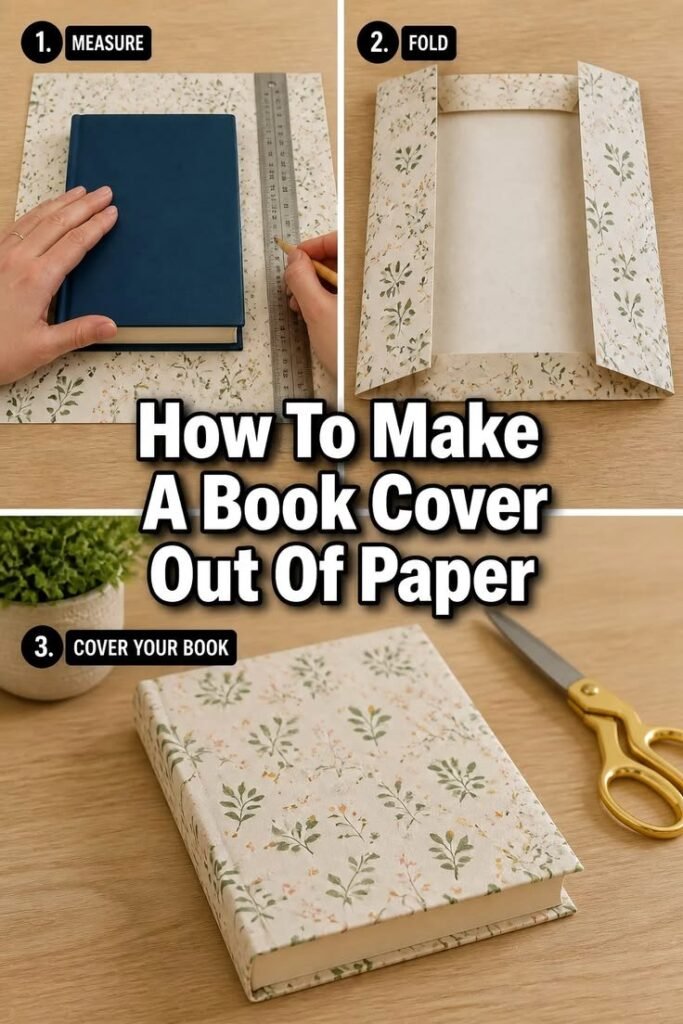
Giving a favorite book a fresh cover can be one of the easiest ways to turn an ordinary reading essential into something personal and beautiful. A DIY book cover is practical, creative, and flexible enough to suit everything from notebooks and journals to novels and cherished hardbacks. With decorative paper, a ruler, scissors, and a few simple folding techniques, you can create a neat cover without complicated tools or advanced crafting skills.
The project shown here uses a patterned paper design with delicate botanical details, creating a soft handmade look while still providing a protective layer around the book. The process is centered on three simple ideas: measure the book, fold the paper carefully, and secure the cover around the front and back. Once the basic technique is mastered, you can experiment with different papers, colors, textures, and decorative styles.
Key Takeaways
- A DIY book cover can refresh and protect a favorite book.
- Accurate measuring makes the finished cover look neat.
- Decorative paper adds personality without requiring complicated embellishments.
- Clean folds help the cover stay securely in place.
- The same method can be adapted for notebooks, journals, and planners.
Why Make a DIY Book Cover?
Books naturally collect signs of use over time. Corners become worn, covers pick up scratches, and frequently handled pages can leave a well-loved book looking tired. A handmade cover offers a simple way to give that book a new appearance while adding an extra layer between the original cover and everyday handling.
There is also a creative benefit. Instead of choosing from a limited selection of ready-made covers, you can select a paper pattern that matches your personal style. Floral prints, minimalist designs, vintage-inspired paper, geometric patterns, solid colors, and textured craft papers can all create completely different results.
For readers who enjoy crafts, the project is especially appealing because the finished result is both decorative and useful. It can also be a small weekend craft project that requires only a few accessible supplies.
Important: The most polished DIY book covers usually depend more on accurate measuring and crisp folds than on complicated decoration. Take your time during the measuring stage, and the final result will look much more professional.
What You Need for a DIY Book Cover
The beauty of this project is its simplicity. You do not need a large collection of craft supplies to create an attractive paper book cover. The exact materials can vary depending on the size of your book and the type of paper you choose.
- A book to cover
- Decorative paper large enough to wrap around the book
- A ruler for measuring and marking
- A pencil for light guide marks
- Scissors for trimming excess paper
- A flat work surface
Optional supplies can include a bone folder for sharper creases, removable adhesive for extra security, washi tape for decoration, stickers, or small paper accents. However, the basic folding method can remain very simple.
Choosing the Right Paper
Paper choice has a major effect on the appearance and durability of a handmade book cover. Decorative wrapping paper can create a beautiful result, while scrapbook paper offers many patterns and colors. For a more understated appearance, choose a solid sheet in a neutral or muted shade.
Botanical patterns, like the delicate leafy print shown in the design, work particularly well because they create visual interest without making the cover feel overly busy. Small repeated patterns are also useful because minor differences in positioning are less noticeable when the paper is folded around the book.
Consider Paper Weight
Very thin paper may tear around the folds or become wrinkled with repeated handling. Extremely thick paper, on the other hand, can be difficult to fold neatly around the spine and corners. A medium-weight decorative paper is often a practical starting point because it offers a balance between flexibility and structure.
Think About the Pattern
If your paper has a directional design, check how the pattern will appear when the book is standing upright. For repeating patterns, this is less important, but large illustrations or lettering may need more careful positioning.
How to Make a DIY Book Cover Step by Step
The process can be broken into a few straightforward stages. The reference design emphasizes measuring, folding, and covering, and these are the key skills that make the project work.
1. Measure the Book
Place the book on the decorative paper and open it carefully. Position it so there is enough paper extending beyond the top, bottom, and side edges to create secure folds.
Use a ruler to check the amount of paper needed. Avoid cutting immediately if you are unsure about the dimensions. It is usually better to leave a little extra paper and trim it later than to discover that the sheet is too small.
- Place the closed book on the paper.
- Check the top and bottom margins.
- Allow enough paper to fold over the inside edges.
- Check that the paper reaches across both covers.
- Mark light guide lines with a pencil if needed.
A ruler is especially helpful because even small measurement differences can become obvious once the paper is folded around the book.
2. Create the Main Folds
Once the paper has been measured, place the book in position and begin folding the excess paper around the edges. The goal is to create clean pockets that hold the front and back covers.
Work slowly around the top and bottom edges. Make each fold firmly, but avoid pressing so hard that the paper tears. If you have a bone folder, you can use it to sharpen the creases. Otherwise, the edge of a ruler or your fingertips can help create a clean fold.
The spine deserves particular attention. The paper should follow the shape of the book without being pulled so tightly that opening and closing the book becomes difficult.
3. Fold the Side Flaps
Next, create the folds that will hold the front and back covers. The side sections of paper should wrap inward and form secure pockets. Keep the book centered as you work so the finished cover remains balanced.
Check the alignment after each fold. If one side becomes noticeably larger than the other, gently unfold the paper and adjust it before making the crease permanent.
Expert Insight
Do not rush the folding stage. A few extra seconds spent aligning the book and checking each edge can make the difference between a loose, uneven cover and one that looks carefully handmade.
4. Fit the Cover Around the Book
With the main folds established, slide the front and back covers into the folded paper pockets. Make sure both covers sit evenly inside the flaps.
Open and close the book gently to test the fit. The paper should move naturally with the book without pulling excessively at the spine. If the cover feels too tight, adjust the folds before continuing.
5. Trim Any Excess Paper
Once everything is positioned correctly, inspect the edges. Small areas of excess paper can be trimmed carefully with scissors. Make small cuts rather than removing a large section at once.
This is also the stage to tidy uneven corners and make sure the decorative pattern looks balanced. Clean edges will make the finished DIY book cover look much more intentional.
Ways to Personalize Your Handmade Book Cover
The basic cover provides a blank canvas for creativity. You can keep the project minimalist or add small details that make the finished piece feel completely unique.
Use Decorative Paper
Patterned paper is one of the easiest ways to transform the look of a book. Florals create a soft, natural feel, while geometric patterns can give the cover a contemporary appearance. Kraft paper can create a simple handmade aesthetic, and colorful scrapbook paper can make a playful statement.
Add Simple Labels
A small paper label can identify a journal, notebook, recipe book, or reading journal. Keep the label simple so it complements rather than overwhelms the main pattern.
Experiment With Layers
For a more creative result, combine two coordinating papers. A plain paper can form the main cover while a patterned strip adds detail along the spine or edges. This approach is especially useful when you have smaller pieces of beautiful craft paper that are not large enough to cover the entire book.
Common DIY Book Cover Mistakes to Avoid
Even a simple craft can become frustrating if the paper is cut too early or the folds are made without checking the book’s position. Fortunately, most problems are easy to prevent.
- Cutting before measuring: Always check the full wraparound area first.
- Using paper that is too small: Make sure there is enough material for the inside folds.
- Skipping alignment checks: Keep the book centered as you work.
- Folding too aggressively: Create firm creases without damaging the paper.
- Ignoring the spine: Leave enough flexibility for the book to open naturally.
- Overdecorating: Let the paper pattern remain the main visual feature.
Pro Tip: Before making the final folds, close the book and inspect all four edges. This quick check helps you spot uneven margins while the paper can still be adjusted easily.
Creative Uses Beyond Traditional Books
This folding technique does not have to be limited to novels. It can be adapted for many paper-covered items around the home or workspace.
- Personal journals
- Sketchbooks
- Reading notebooks
- Study notebooks
- Planners and organizers
- Recipe notebooks
- Memory books and scrapbooks
Using the same basic method for several notebooks can also create a coordinated collection. Choose papers from the same color family while varying the patterns to give each book its own personality.
How to Get a More Polished Finish
The difference between a quick paper wrap and a polished handmade book cover often comes down to small details. Work on a clean, flat surface so the paper stays smooth. Keep your ruler nearby, and use light pencil marks rather than heavy lines that may remain visible.
Pay attention to corners because they are often the first place where uneven folds become noticeable. When working with patterned paper, step back occasionally and look at the entire book rather than focusing only on individual folds.
If the paper begins to crease in the wrong place, do not force it into position. Carefully unfold that section and realign it. Taking a little extra time during construction can save you from having to start over.
At a Glance
- Measure first and leave enough paper for secure folds.
- Choose a flexible decorative paper with a pattern you love.
- Make crisp, even folds around the front, back, and spine.
- Test the cover before trimming or adding decoration.
- Personalize the finished design with simple paper details.
Conclusion
A DIY book cover is a simple craft with plenty of room for creativity. The basic process of measuring, folding, and fitting paper around a book can transform an everyday item into something that feels thoughtful and personal. A delicate botanical print can create a soft, timeless appearance, while bold colors or modern patterns can produce a completely different style.
The most important part is not having expensive materials or advanced crafting skills. Start with accurate measurements, work slowly through each fold, and choose paper that reflects your taste. Once you are comfortable with the basic technique, you can experiment with patterns, layered papers, labels, and other small details.
Whether you are refreshing an old favorite, decorating a notebook, or looking for an easy paper craft, making your own book cover is a practical project worth trying. Keep a few sheets of decorative paper on hand, and you will always have an easy way to give your books a fresh new look.