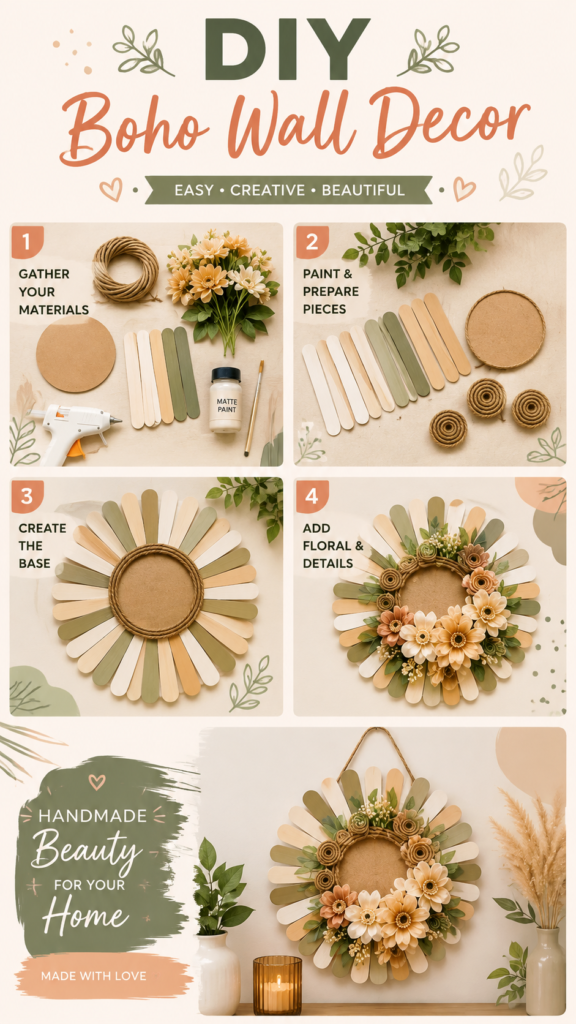
DIY art is one of the easiest ways to give your home a personal touch without spending a fortune on ready-made wall decor. This boho-inspired project transforms simple craft materials into a warm, floral sunburst wall hanging that feels handmade, relaxed, and beautifully decorative. With wooden craft sticks, jute rope, a round base, paint, faux flowers, and a few natural accents, you can create a statement piece that works especially well in bedrooms, living rooms, entryways, craft spaces, or cozy reading corners.
The design combines soft neutral shades with muted green, warm beige, natural rope, and delicate floral details. The result is a piece of DIY wall art that looks layered and dimensional while remaining approachable for beginners. If you enjoy handmade home decor, budget-friendly crafts, or boho decorating ideas, this project is a great place to start.
Key Takeaways
- Create eye-catching DIY art with inexpensive, easy-to-find craft supplies.
- Use painted craft sticks to build a simple sunburst-inspired foundation.
- Layer jute rope, flowers, greenery, and small handmade details for texture.
- Choose neutral and earthy colors to complement a relaxed boho interior.
- Customize the finished wall decor to match your room, season, or personal style.
Why DIY Art Works So Well in Home Decor
Wall art can completely change the atmosphere of a room. A blank wall may feel unfinished, while a thoughtfully chosen handmade piece can add color, texture, personality, and visual interest. The beauty of DIY art is that you are not limited to standard sizes, colors, or styles found in stores.
This particular project has several features that make it especially appealing. The circular shape creates a soft focal point, while the craft sticks radiate outward to form a playful sunburst effect. Natural jute rope adds warmth and texture, and the floral arrangement brings softness to the otherwise structured design.
Because the materials are relatively simple, the project can also be adapted. You could change the paint colors, replace the flowers, alter the number of decorative elements, or make the finished piece larger or smaller depending on the wall where you plan to display it.
Important: The strongest DIY wall art does not necessarily require complicated techniques. Combining simple shapes, repeated textures, and a thoughtful color palette can create a finished piece that looks far more detailed than the individual materials suggest.
Materials for This Boho Wall Art Project
The pictured design uses a collection of accessible craft materials. You can treat the list as a starting point rather than a strict recipe, especially if you already have supplies at home.
- Wooden craft sticks or jumbo popsicle sticks
- A round cardboard or wood base
- Natural jute rope or twine
- Craft glue or a hot glue gun
- Matte craft paint in neutral and earthy shades
- A small paintbrush
- Decorative faux flowers
- Small pieces of faux greenery
- Coordinating decorative rope flowers or coils
- Matte varnish or another suitable protective finish
- Scissors and basic craft tools
The image shows a palette built around cream, natural wood, muted olive green, soft tan, and warm floral shades. This combination is particularly effective for boho-inspired interiors because it feels organic without becoming visually overwhelming.
Choosing the Right Craft Sticks
Craft sticks form the visual structure of the project, so consistency matters. Look for sticks that are relatively straight and similar in size. Having a mixture of natural wood and painted pieces gives the finished wall hanging more depth and prevents the design from looking too uniform.
You can paint every stick or leave some natural. Another option is to use two or three coordinating colors and distribute them around the circle rather than grouping identical colors together.
Selecting Flowers and Greenery
Faux flowers are especially practical for wall decor because they retain their shape and color without regular maintenance. Choose flowers in different sizes so the arrangement has a natural sense of depth.
Greenery is equally useful. Small leaves can fill gaps around the flowers and visually connect the floral cluster with the wooden sunburst base. Keep the foliage relatively delicate so it supports the design instead of hiding the craft-stick pattern.
Step 1: Prepare Your Materials
Begin by gathering all of your supplies and arranging them on a clean, flat work surface. The reference design shows the materials grouped together before construction begins, including the round base, craft sticks, jute rope, flowers, paint, brush, and glue gun.
Preparing everything first makes the project much easier to manage. You can also test your colors and arrange the decorative elements before permanently attaching anything.
If you are using several paint colors, place a small amount of each on a palette or disposable surface. Painting a few sample sticks first can help you decide whether the colors work well together before you commit to the entire set.
Step 2: Paint and Prepare the Pieces
Paint the craft sticks in your chosen palette, leaving some pieces natural if you like the warmth of unfinished wood. The pictured project uses light cream, soft green, beige, and natural tones to create an understated boho look.
Allow the painted pieces to dry completely before arranging them. If the first coat looks uneven, add another thin coat rather than applying one heavy layer. Thin layers tend to give craft projects a cleaner finish.
While the sticks are drying, prepare the round center and decorative rope pieces. The rope coils shown in the design add an attractive handmade texture and work particularly well alongside the flat wooden sticks.
Pro Tip: Arrange all painted sticks around the circular base before gluing them down. This lets you balance the colors and spacing first, making the final sunburst pattern look intentional rather than accidental.
Step 3: Build the Sunburst Base
This is the stage where the project starts to look like finished DIY wall art. Arrange the craft sticks around the circular center so they extend outward evenly. The rounded ends create a soft petal-like effect, while the repeated radial pattern gives the piece its distinctive sunburst appearance.
Work slowly around the circle. Rather than attaching every stick immediately, place the full arrangement first. Look at the design from several angles and adjust any gaps or uneven sections.
Once you are happy with the layout, attach the sticks securely using craft glue or a hot glue gun appropriate for your materials. Allow the adhesive to set before moving the piece.
Keep the Spacing Balanced
The visual appeal of this DIY art depends heavily on repetition. Even if the colors vary, the sticks should generally follow the same circular direction. Small spacing differences can add handmade charm, but large gaps may make the base look unfinished.
If you want a more polished result, use the circular center as your visual guide and continually check the distance between neighboring sticks.
Step 4: Add Floral and Textured Details
Once the base is secure, it is time to introduce the decorative elements. The image places flowers, greenery, and coiled jute details around one portion of the circular center. This asymmetrical arrangement creates movement and keeps the piece from looking overly rigid.
Start with the largest flowers. Position them first so they establish the overall shape of the decorative cluster. Then add smaller flowers and greenery around them, filling empty spaces without completely covering the wooden background.
The jute coils are especially useful because they introduce a different texture from the smooth sticks and soft-looking flowers. Their natural brown tone also ties the center of the design to the neutral wood colors.
Expert Insight
Texture is what makes simple DIY wall decor feel layered and intentional. Combining flat wood, fibrous jute, leafy greenery, and dimensional flowers creates contrast while keeping the color palette calm.
Create a Natural-Looking Floral Cluster
Avoid arranging every flower at exactly the same height or angle. Slight variations make the cluster feel more organic. Place a few smaller pieces closer to the center and allow selected flowers to extend toward the outer craft sticks.
Greenery can be tucked underneath or between flowers to soften the transition from the floral section to the wooden base. If an area feels crowded, remove one element rather than continuing to add more.
Step 5: Paint, Protect, and Finish
After all decorative components are attached, inspect the wall hanging from a short distance. This is the best time to make small adjustments. Add a little greenery to an empty section, reposition a flower, or touch up any visible paint imperfections.
The pictured project includes a matte varnish, which can help provide a consistent finish depending on the materials used. Always choose a finish that is suitable for your specific paint and decorative materials, and allow it to dry fully according to the product instructions.
A matte finish works particularly well with the overall aesthetic because it preserves the soft, natural character of the wood, rope, and earthy colors.
How to Customize Your DIY Art
One of the best things about making wall decor yourself is the freedom to personalize it. You do not have to reproduce the exact color arrangement shown in the design. Use the basic construction idea as a foundation and make it your own.
Try Different Color Palettes
For a classic boho appearance, stay with warm neutrals, muted greens, cream, tan, and natural wood. For a brighter room, introduce dusty pink, terracotta, mustard, or another warm accent.
A monochromatic version can also look beautiful. Choose several shades of one color and combine them with natural rope and white or cream accents.
Change the Floral Arrangement
The floral section can be adapted to suit different seasons and decorating styles. Soft flowers can create a romantic look, while dried-style stems can make the piece feel more rustic. For a minimalist approach, use fewer flowers and allow more of the sunburst base to remain visible.
Experiment With the Center
The circular center gives you another opportunity to personalize the project. Keep it natural for a warm handmade appearance, paint it in a coordinating shade, or add a subtle decorative finish. The key is to preserve enough contrast between the center and the surrounding sticks so the radial pattern remains visible.
Where to Display Your Handmade Wall Decor
This type of DIY art can work in many areas of the home. Its circular silhouette and earthy colors make it particularly suitable for spaces where you want a cozy, relaxed focal point.
- Above a small console table in an entryway
- On a bedroom accent wall
- Above a shelf in a living room
- Inside a craft or creative workspace
- In a cozy reading corner
- As part of a boho-inspired gallery wall
For a layered display, pair the wall hanging with simple ceramics, greenery, woven textures, or other neutral decorative pieces. The finished design shown in the image is styled with plants, a vase, warm lighting, and natural decorative accents, creating a welcoming atmosphere around the artwork.
Tips for a More Professional DIY Finish
Small details can make a significant difference when working on handmade home decor. Clean edges, consistent spacing, thoughtful color placement, and secure adhesive all contribute to a more polished result.
- Test your full arrangement before permanently attaching pieces.
- Use thin, even layers of paint and let each layer dry properly.
- Balance colors around the circle instead of placing all similar shades together.
- Layer large floral pieces first, followed by smaller accents.
- Use greenery to soften transitions and fill small visual gaps.
- Check the finished piece from a distance before making final adjustments.
- Make sure all adhesives and finishes are fully cured before hanging the artwork.
Remember that handmade projects do not need to look factory-perfect. A little variation can make DIY art feel authentic and personal. The goal is a cohesive composition rather than absolute uniformity.
At a Glance
Quick Points
- Style: warm, natural, boho-inspired
- Main materials: craft sticks, jute, flowers, greenery, and a round base
- Key technique: radial craft-stick arrangement
- Best feature: layered texture and customizable colors
- Ideal use: handmade wall decor and cozy home styling
Conclusion: Create Wall Art That Feels Like You
DIY art does not have to be complicated to make an impact. This boho-inspired wall hanging proves that simple craft materials can become a beautiful decorative feature when they are combined with thoughtful color, texture, and composition.
The wooden craft sticks create a strong foundation, while jute rope brings natural texture and the floral details add softness and personality. Together, these elements create a handmade piece that feels warm, creative, and easy to adapt.
Whether you follow the design closely or use it as inspiration for your own version, the project offers plenty of room for creativity. Change the colors, experiment with flowers, adjust the size, or create several coordinating pieces for a larger wall display.
Most importantly, let your DIY art reflect your style. The charm of handmade decor comes from the personal choices behind it, so embrace the colors, textures, and details that make your space feel comfortable and uniquely yours.
With a few basic supplies and a little patience, you can turn an ordinary blank wall into a warm focal point that celebrates creativity. Gather your materials, experiment with your arrangement, and enjoy the process of making something beautiful by hand.